Friday, 31 December 2010

The Bad, the Ugly and the Good

2010 - a retrospective view

"Life (aka gardening) is not all a bed of roses", as they say... As all experienced gardeners know, gardening is a pastime that involves an element of luck as well as skill. Weather, animals, pest, diseases and WORK all conspire to foil our attempts to produce the perfect flowers / veg.

I've been blogging and photographing for not much over 4 months, but even in that short space of time I have taken a huge number of photos recording what's been happening in my garden. I would be the first to admit that not all my gardening ventures end in success. Amongst the gardening triumphs there are always a few disasters (or at least, disappointments). Here's a selection of photos representing the whole spectrum of Bad, Ugly and Good...

THE BAD

These are some of the "Scrumptious" apples, afflicted with the Bitter Pit disease. Even without that, the variation in colour is surprising, and indicates something seriously amiss.


Some of the tomatoes suffered from Blossom End Rot (here on "Ferline").


The "Tundra" cabbages were attacked by caterpillars. This seedling was stripped nearly bare.


The "fly-resistant" Carrots didn't all resist the fly...


 Some of the lettuces bolted.


 Some of the Tomatillo plants got blown over in a gale.


My indoor tomato "Wilma" developed the blight.


The fleece covers on my raised beds were destroyed by foxes (several times)


Some of the Endives were killed by the frost and went slimy.


So there was definitely plenty of the Bad. Some things turned out OK though, but just not very pretty.

THE UGLY

These "Black Cherry" tomatoes, split open by a surfeit of rain were OK to eat immediately after harvesting, but looked very odd indeed.


Some of the cucumbers grew in a funny shape.


This carrot decided to have three "legs".


This Celeriac would never win any beauty contests.


But despite all the above, gardening has given me a huge amount of pleasure and sense of achievement this year (not to mention loads of edible produce), so I end by taking a look at the good bits...

THE GOOD

Amongst the best things that my garden produced this year were:

Some great, and hugely picturesque, Borlotto beans


Masses of vibrant-coloured chillis


Some spectacularly-textured Cavolo Nero


A bumper harvest of many types of tomato


Even some quite nice looking flowers (not my forte, I have to admit; I normally concentrate on the edible plants)


But best of all it produced a new gardening enthusiast.

My granddaughter Lara takes a close interest in Grandpa's garden

As I sit poring over my seed catalogues, deciding what to buy, I look forward eagerly to what 2011 may bring.

I wish all of you a Happy New Year, and I hope that the hobby of gardening will bring you not only success, but also happiness and relaxation.

Thursday, 30 December 2010

Project Cucumber

In 2010 I grew a couple of plants of the outdoor cucumber variety "Marketmore", which produced a very good yield. I aim to do even better in 2011.


The 2010 cucumbers were grown in a redundant compost bin. It was one that I had made myself from scraps of timber, several years ago. Over the years it had become very dilapidated and the wood was rotten, so I ceased using it for making compost - and by this time I already had three plastic compost bins anyway. This is what it looked like


I decided recently to remove the old compost bin altogether and replace it with a rather more "scientific" arrangement for growing cucumbers. The plan is to have a couple of big containers that will provide a good depth of compost for the moisture-loving cucumber plants without relying on the poor, dry soil in the border. This way I will be able to provide completely new compost each year. There is also a secondary motive for removing the compost bin: I want to make enough room to plant a Buddleia bush, which will be not only decorative, but also good for attracting butterflies.

So today I removed the bin. First - off with the woodwork (a two-minute job with the aid of a large hammer!)


You can see that there was a nice depth of compost. However, apart from the top few inches it was very dry and crumbly, because the roots from the nearby shrubs had grown upwards into the rich compost, sucking out much of its moisture. I used my trusty Trug-tub to re-distribute the compost around the garden, as a mulch.

I also pruned VERY hard the overhanging Philadelphus (Mock Orange) shrub, which had got very gangly, and the Callicarpa bush. These two had provided the uprights for my cucumber-support frame, so I have left suitable branches to make this possible again. In due course I will construct a trellis of canes or branches, over which the cucumber vines will be able to climb.


There we are then - job done. It's too early to think about planting cucumbers or Buddleias just yet, but when the time comes I'll have a head start. I must make a trip to the garden centre again soon, to identify some suitable containers...

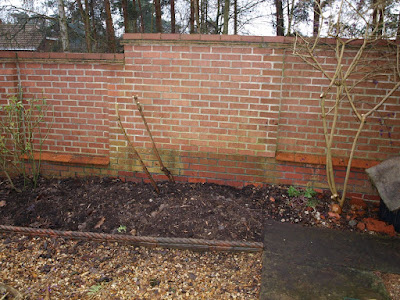
Isn't it a shame that the brick wall you see in my pictures faces North? If it was South-facing, it would be a brilliant place to grow peaches or nectarines. Still, I love that wall because it gives me privacy, and makes my garden feel much more secluded.

While I was removing the bin today I had to re-locate a couple of plants. Some of them were Lemon Balm. They had some lovely purple-coloured roots and shoots:-


Lemon Balm self-seeds very freely, so even if these particular plants don't survive the trauma of re-location, I know I'll never be short of it in my garden.

Wednesday, 29 December 2010

Bird-food Bonus

Is this a House Sparrow?


During the Winter months I make a special effort to feed the birds that come into my garden. They normally get:-

Any leftover / stale bread, biscuits or cake
Scraps of raw or cooked meat, such as the fat from our Boxing Day ham (particularly popular with the Magpies)
Sunflower kernels bought specifically for the purpose

Today they are having a special treat. Last night I was sorting through my collection of seeds, deciding what to buy for 2011 and discarding any old, probably non-viable ones, and those for veg that have proved unsuccessful. Instead of throwing the seeds in the bin, I emptied-out all the packets into a plastic basin, and the seeds have now become bird-food. I hope those birds like carrot-, beetroot-, parsnip- and tomato seeds!


Of course, I may live to regret this decision. The birds will eat most of the seeds, but they will inevitably miss a few. I'll probably end up with a lot more "volunteer" plants than usual in my garden next year, but that's a risk I'm prepared to take in order to keep my birds happy.

Tuesday, 28 December 2010

Mongolian Fire-pot

Continuing my theme of cooking-gadgets, in this post I'm going to describe the Mongolian fire-pot.

In essence, the fire-pot cooking technique is rather similar to the European method of fondue cooking.  A cooking vessel is filled with hot stock / broth and kept warm - originally with a charcoal burner, but these days more likely with an electric element. Thinly-sliced meat and vegetables are cooked in the hot broth. Once the meat and veg are consumed, the remaining broth is soaked up by cooking noodles in it. You could even use the fire-pot for heating oil, as in the Fondue Bourguinonne, though my feeling is that this might be a tad dangerous on the tabletop. Come to that, I'm not sure I would want hot charcoal on my Dining-Room table these days either. We used you live more dangerously in our youth!

This is our fire-pot.


We bought it many years ago in Hong Kong. It is made of aluminium. It is an old-fashioned one with a charcoal burner in the base, and a chimney for this in the centre. The cooking compartment has a removable lid.


 Hot charcoal is placed carefully down the chimney into the burner compartment, (using tongs). The stock is then placed into the cooking compartment, and the lid is put on to assist it to heat up. Of course you could also heat the stock in a saucepan on a traditional stove and then decant it into the fire-pot at the appropriate moment. When the stock is simmering you're ready to eat, and each diner cooks their own food by placing it in a specially-designed little wire basket implement and immersing it in the stock until it is cooked to their liking.


Perhaps best used for outdoor dining I think... We haven't used our one for many years now, but it's nice to keep as a 'curiosity'.  Does anyone have one of these in active use? I'd be interested to hear whether the electric ones are any good.

Monday, 27 December 2010

Roast ham with parsnips

This post, originally published on Monday 27 December, has recently been slightly adjusted in order to qualify for the Blog Carnival called How-To-Find-Great-Plants hosted by Eliza on Appalachianfeet ...

Parsnips and Celeriac, fresh from the garden

Regular followers of my blog will have seen that we have a bit of a family tradition in relation to our Boxing Day meal...for which a huge piece of ham like this


is converted into the ultimate object of gastronomic desirability, like this


As it happens, it is not the ham that I want to write about today. I'm the gardener of the family, so I want to concentrate on my contribution to the proceedings - the parsnips.

Parsnips are vegetables that have had a bit of a bad press. For many people they fit into the same category as Brussels Sprouts - i.e. the least popular. In the UK, lots of people only eat Brussels Sprouts at Christmas time, and then only because they feel they ought to, not because they like them. Parsnips too are often envisaged as dull and tasteless - which they can be if kept for too long and cooked badly. But when you grow your own parsnips and eat them within hours of picking them (or a day or two at most), they will be a real treat. We like to eat them roasted. This way they are less likely to go flabby (as can happen if you boil them). If you drizzle the parsnips with some honey, brown sugar, or some maple syrup when you put them in to roast this will caramelise and make them even sweeter and more.....well, yummy.

This batch of parsnips was in a wide range of shapes and sizes

On Christmas Eve the temperature was not quite as low as it had been for the previous few days and I managed to dig up some of my own parsnips. Their raised bed was still covered with snow, and the soil was frozen to a depth of a couple of inches, so I had to use my Border Fork to ease them out of the ground. This was not easy and regrettably I accidentally speared the biggest parsnip on the tines of the fork. No major harm done though - a slightly damaged parsnip will be OK if used within a couple of days.

So, I peeled the parsnips and smeared them with some goose fat left over from the previous day's turkey meal, and then drizzled them with a generous spoonful of runny honey


Smothered in goose fat and drizzled with honey

When the meat was having the last stage of its cooking (at high temperature - about 200C - uncovered, to brown the fat) I put the parsnips in. They had I suppose a total of about 40 minutes' cooking time, but this is only an approximate figure. The cooking time will vary, influenced by the freshness of the veg and the size of the pieces of parsnip. You just have to keep an eye on them and judge when you think they are ready. Test them by poking them with a knife if you're unsure.

This is what they looked like when they were done. In case you think they look overdone, bear in mind that much of the colouration is in fact the honey, caramelised.

The finished article

OK, so off they went to the table... Other accompaniments to our roast ham were Savoy Cabbage, boiled new potatoes, parsley sauce and Cumberland sauce - and a bottle of Rosé wine. A meal in the same league as our Christmas Day turkey meal I would say!

The gardeners amongst you may want to know what variety of parsnips mine were: they were "Cobham Improved Marrow" (what a lovely old-fashioned name!)

Sunday, 26 December 2010

The new camera

Santa Claus (as represented by my wife Jane) brought me a new camera - my first DSLR.  It is an Olympus E450. It has two lenses: a 14 - 42 and a 40 -150. I have started the process of learning how to use it, which is not going to be easy! It just has so many settings and features. To begin with I will be mostly using the automatic settings I think, and gradually learning a bit more about what works and what doesn't, through the time-honoured Trial-And-Error approach. I find that the User Manual is not partucularly helpful for the real beginner. OK, it tells you how to change Feature X to Setting Y; but not necessarily why you would want to do that! Perhaps the best thing is that the memory card I have got will store about 3500 photos, so I'm less likely to hear that dreaded bleep that signifies "Memory Card Full".

Anyway, just to prove that I have mastered Lesson 1, here are a few of my first attempts. More work required, methinks.

I started with some relatively easy subjects - ones that didn't move


Callicarpa berries

Frosted leaves of a bay tree

Cavolo Nero

Sprouting Broccoli

Then some rather more difficult (i.e. mobile) subjects...


Our Grey Squirrel eyeing-up the sunflower seeds

This Thrush has been helping himself to the bread I put out

Bluetit and Goldfinch race to see who can eat most sunflower seeds

At last - a decent picture of the elusive Blackcap

I can see already that I'm not going to be satisfied with the lenses I have now! I'll need at least a telephoto zoom lens for those long-distance views if I'm to adequately capture the wildlife shots I want.

Note to self: must remember that I am primarily a Veg gardener, not a wildlife photographer!

Saturday, 25 December 2010

The Christmas Blues

I thought we needed something fairly "undemanding" for a Christmas Day post (and Yes, this has been produced in advance for Scheduled posting!)...

You remember the picture of the "Ghostly chillis" I posted a few days ago...?  Well, I have done a few more in similar style. They are achieved simply by inverting the colour scheme.

I suppose you get used to things being certain colours. Most people think of carrots as being orange - though they were not originally, they were white, and lots of other coloured carrot varieties exist too, such as yellow and purple. But how would you like to eat blue carrots? (Especially ones that glowed in the dark).


Lots of people enjoy Black Beans, so why not blue beans?


Blue pears?


Blue lettuce? Why not??


These "Blue" raspberries look like to me like frog-spawn!


And these tomatillos have a very amoeba-like appearance.


These cucumbers look like some of those creatures from the depths of the ocean that we saw on David Attenborough's programme "Blue Planet".


What about some "radioactive" Tenderstem broccoli?


And despite the wide range of different-coloured varieties available does this bowl of mixed tomtatoes look quite so appealing in shades of blue and turquoise?


The fact is, we have our own PERCEPTION of what is right and what is not...

What do you reckon? Do they look right / attractive or not?