Friday 30 March 2018

Sowing Carrots

We love homegrown carrots, and since I started using Enviromesh they have become a regular crop on my plot. Without the mesh they would not be worth the effort, because they would inevitably fall prey to the Carrot Root Fly.


Carrots can be sown over a long period [Feb to Jul], especially if sown successionally (in little batches, at different times), but I usually sow mine all at once, in mid to late March and aim for an extended harvest by sowing several different varieties. This year I have chosen "Nantes" for early cropping, and "Autumn King" and "James Scarlet Intermediate" for maincrop, and I also have a few "Dragon Purple" that I got from a seed-swap. At a later date I will also sow some "Amsterdam 3 Forcing" for baby salad carrots.

This is my method for sowing the carrots:-

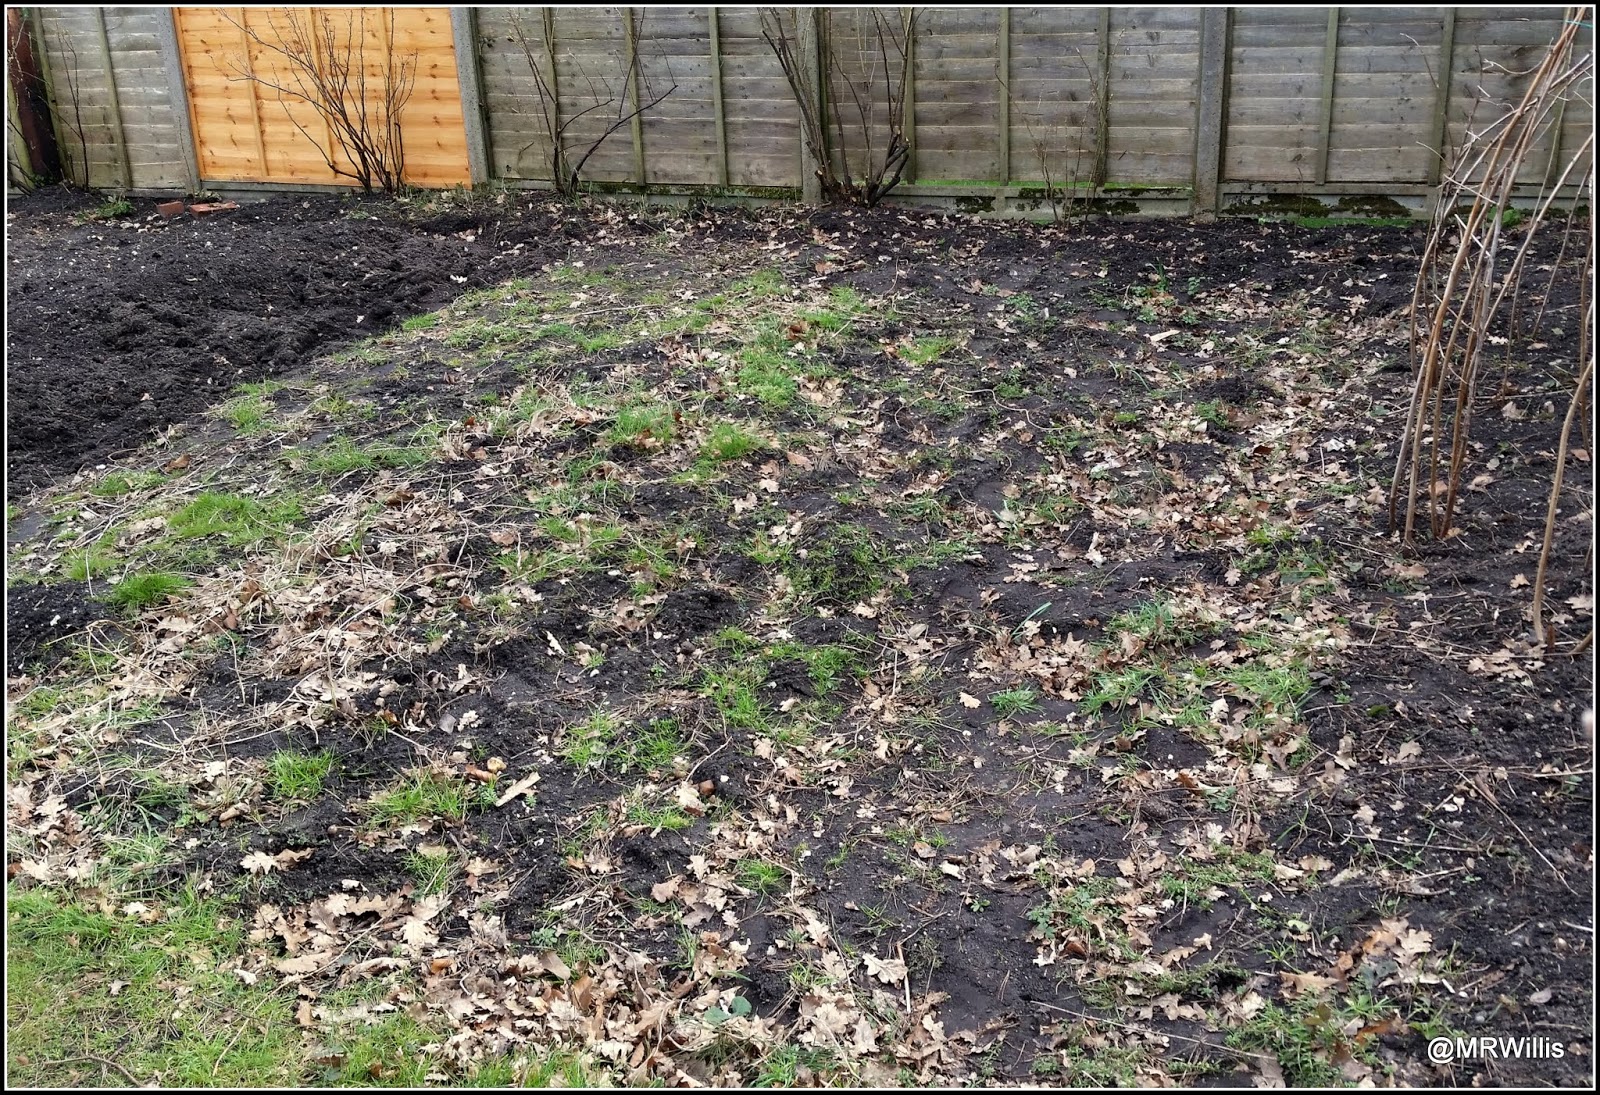
The first thing to do is prepare the ground. I am using a raised bed which is 1 metre wide, 2.4metres long and 40cm deep. It is filled with a soil-and-compost mix, and is virtually stone-free. I dug it with a fork and then raked it to a fine tilth. I specifically avoided manuring this bed, because manure can (allegedly) cause carrots to fork or spilt.

Raised bed prepared for sowing

My next stage is to make a number of shallow drills (grooves) in the soil, about one inch deep. I do this by pressing the handle of a rake into the surface of the soil. (Luckily, my rake has a detachable head). My drills are very roughly 15cm / 6 inches apart, which is probably closer than ideal, but I always try to squeeze as much as possible out of my limited space.

Seed-drills made with the handle of a rake

I then use a watering-can with the rose removed to carefully wet the surface of the drills, whilst keeping the surrounding soil dry.

Wetting the soil in the seed-drills

Then I manually sow the seed along the drills a "pinch" at a time, using thumb and forefinger, trying to sow them as evenly as possible. Again, the ones in my photo below are probably too close, and if they all germinate they will need to be thinned. I like to err on the generous side, because I don't want gaps in the rows because my space is very limited.

Sowing the seeds

I label each row so that I remember which is which.

Labelling the rows

Once the drills are fully populated the next stage is to cover the seeds with dry soil. For this task I use a little metal tool called a "Widger". It's a very handy little item that has lots of uses in the garden.

Covering the seeds with dry soil

Then, tamp down the soil using the back of a rake with the handle held vertically. This will ensure that the seeds are firmly in contact with the moist soil in the drills.

Tamping down the soil with the back of a rake

The final task for me is to erect a suitable frame and cover it with Enviromesh or similar. Here I'm using the very effective and versatile "Build-a-Ball" system, with aluminium rods purchased from Gardening Naturally.

Raised bed covered with fine mesh supported by a frame

So, there you are then. That's my method. Hopefully by about the end of June I'll have some lovely crunchy carrots to harvest!

Wednesday 28 March 2018

Potato-planting at the new plot

Well, after a few days of mostly milder and drier weather, I judged that it would be OK to plant my first potatoes at the Courtmoor plot. As I indicated the other day, my plan was to make 3 ridges for the potatoes, with gullies in between. I used some long pieces of wood to help align these:


Let's be honest, with plenty of space to play with, they didn't need to be ultra-neat, like the raised beds I'm used to in my own garden! The soil here is very light and sandy, so it only took me a few minutes to build the ridges. It was satisfying to see that although this patch of the plot is the first bit that I dug, very few weeds had grown back. I must have cleared them pretty thoroughly. There were still a few bits of Couch Grass though, so I'll have to watch out for that.

Once the ridges were made I placed some short sticks to indicate where I was going to put the seed tubers. They were roughly 50cm apart.


Then I just used a trowel to make a hole about 15cm deep, adjacent to each stick, and placed the seed tuber in it "Rose end" (the bit with most of the shoots) uppermost, and backfilled. I made a small mound of soil over each potato.


On this occasion I planted 3 varieties - "Foremost", "Sarpo Una" and "Jazzy" - one First Early and two Second Earlies. In a couple of weeks' time I'll be planting some Maincrops too.

As I was admiring my handiwork today I realised that even when I have completed the three rows of potatoes, I will have used only about a quarter of the plot, leaving me plenty of space for other crops.

The Broad Beans and two rows of potatoes can be seen right down at the far end.

My preparatory digging task is now about 80% complete. I only have an area of approximately 5m x 5m to dig. Here it is...

Raspberry canes just visible at extreme Right of photo. Blackcurrant bushes alongside the fence.

Since the potato planting took less time than I had expected, I had an opportunity to start on mulching the Raspberry canes. Fortunately the compost heap is very close to the Raspberry patch, but even so it was hard work digging out and distributing about 10 trug-tub-loads of compost!


I only managed to do one of the two rows of canes before I got tired. The other row will have to wait till next time.

Sunday 25 March 2018

Planting Second Early Potatoes

Unsurprisingly, Second Early potatoes mature a bit later than First Early ones! Typically they take about 13 weeks from planting to harvest, whilst First Earlies take about 10. I usually plant the Second Earlies a couple of weeks after the First Earlies, so that they will be ready about a month later. This year I am only growing two Second Early types - the superb and well-known "Charlotte" and a rather similar but less well-known variety called "Nicola". The latter is sometimes described as an Early Maincrop, and is ready for harvesting just that bit later, which is useful when you want to extend the harvesting period.


As I have mentioned previously, this year I am trying an experiment to establish whether the number of seed tubers planted in a container has an influence on overall yield. Because of this, some of my containers have been planted-up with two tubers, and some with only one. So on this occasion it was two pots each of "Charlotte" (a 2 and a 1) and of "Nicola" (ditto). My planting method was exactly the same as that which I used for the First Earlies, which I described HERE. The four pots now are similarly protected from the elements by the other one of my two "Seedling Greenhouses":


The Seedling Greenhouses are placed just next to the three upright 2-Tier Mini Greenhouses which are hosting my "Foremost" First Early potatoes.


The other pots you see at the left of the photo above are waiting for tomatoes. They are going to have a long wait because I have decided not to sow any tomatoes until after we return from a holiday next month, so it will be late April by the time they go in. I'm acutely conscious that young tomato plants demand a lot of careful attention, and I don't want to impose this upon any of my regular Garden Helpers. As it happens, having to sow late will probably be a blessing in disguise, because I find that early-sown tomato plants often struggle with cold weather and poor light. March has been a particularly poor month in this respect, so let's just hope that April is better.

In other news... some of my Shallots are sprouting now:


These are ones I rescued from the Courtmoor Avenue plot late last year. I have no idea what variety they are, and having been harvested far too late in the year they are not good specimens, but several of them are showing signs of growth now - the most obvious being the green leaves.


Several of the bulbs that have not yet produced green shoots have put out a lots of little white roots, so they are definitely alive. Here's an example (sorry about the poor photo):


I planted 45 Shallots, but to be honest, I'll be happy if 15 of them grow. Just as long as I can bring a few to maturity, allowing me to provide that genetic continuity that I'm striving for.

Friday 23 March 2018

First planting at the new plot

I thought potatoes would probably be the first things to be planted at my new plot, but I was wrong - it was Broad Beans. Having assessed that the spare plants I had were not going to be needed in my own garden, I decided to take them up to the Courtmoor plot and put them in there. It was a small gesture (only 8 plants), but it was a significant moment for me!


I used some of the prunings from the Apple trees as stakes for the beans, and tied them in loosely with some soft string. The sticks are about 4 feet tall.


I have been trying to envisage what the plot will look like when it is fully populated, and today I used a couple of pieces of wood to help me work out how many rows I'll be able to have. My next job is going to be planting potatoes (honest!), so some more spadework will be required. I'm going to make three low ridges for the potatoes, with "gullies" in between, up which I will be able to walk.


Each row will be roughly 5 metres long, and I plan to plant 10 seed potato tubers in each. I'm hoping to be able to plant them at my next visit to the plot - sometime next week - because they are looking ready to go. They have been chitting on the windowsill of a cool spare bedroom:


The chits look really good - short, dark and strong-looking.


I have also finished weeding and pruning the Raspberries now:


When I get the opportunity I am going to put down a mulch of partially-rotted compost along the rows of canes. This will hopefully help to suppress the weeds and keep the roots of the canes cool.


Wednesday 21 March 2018

They survived - again!

I like it when the weather forecast turns out to have been right - even when the weather has been poor! At least you feel that any protection measures you have taken were worthwhile. When I saw that the "Mini Beast From The East" spell of cold weather was due to hit us, I moved all my vulnerable plants under cover. In some cases this was relatively easy - for instance some of them went into the garage, and the little seedlings in pots and trays went into the coldframes and mini-greenhouses. The Broad Beans I had planted out a few days previously needed a different approach...

Here they are, shortly after planting out, protected by netting against animals.


When I heard about the imminent severe weather, I covered them with my long cloches. Although Broad Beans will stand a few degrees of frost, I was afraid that they might be broken by heavy snow accumulating on top of them.


I was right to be worried. We had our heaviest fall of snow for several years. This photo was taken when the thaw had already begun.


Well, it seems the cloches did their job pretty well. The beans are fine.


No sign of any damage.


The first few leaves of my Rhubarb were killed off by the Beast From The East weather event, during which the temperatures were lower and the snow lasted longer. This time, the Rhubarb seems to have got off unscathed:


Meanwhile, the little Brassica and Allium seedlings have also survived all right, protected as they were by the big Gabriel Ash coldframe.


One of the few crops I am currently harvesting is the Purple Sprouting Broccoli.


The first variety to be ready was "Rudolph". This year I decided to be unconventional and not cut the tip of the plant first. Doing that is supposed to stimulate the production of spears lower down the plant. This one doesn't seem to need much stimulation. I have already picked 15 really nice big spears from it, and there are plenty more to come.

"Rudolph"

The things we call "spears" are the flower shoots of the plant, and they grow in the leaf axils (i.e. between the leaves and the main stalk), just like Brussels Sprouts. In this next photo you can see where some have been harvested.


Many readers will know that I am growing four PSB plants, one of each of four different varieties, with the intention of having a longer harvesting period.

L to R: Early Purple, Red Spear, Red Arrow, Rudolph.

The plan is definitely working. The "Rudolph" plant is probably good for another 2 or 3 pickings, by which time "Red Spear" will be ready to come on stream:

"Red Spear"

Though not quite as big as "Rudolph" (which is about 4 feet tall), "Red Spear" is a big plant, and will yield a good number of spears.

"Red Spear"

"Red Arrow" is a bit less well advanced, and will not be ready for about 3 or 4 weeks yet.

"Red Arrow"

And ironically "Early Purple Sprouting" will be last of the four!

"Early Purple Sprouting"

Hopefully within a few days I will be able to report my first planting up at the Courtmoor plot, which is scheduled to be potatoes (and possibly a few of the spare Broad Beans).

Monday 19 March 2018

Chilli update

You might recall that about a month ago I sowed seeds of 20 different varieties of chilli. They germinated at different rates, keeping me guessing (and checking the propagators in the airing-cupboard at least twice a day). Well, 16 of the 20 varieties have germinated now. I think it is unlikely, though possible, that the others will eventually show up. I certainly haven't given up on them yet. However, I did sow "one or two" more varieties, just to make up for the No-Shows.


For the record, the No-Shows were:

Piri Piri (seeds from a Twitter friend, so age of seeds not known)
Turkey Long Red (seeds brought home from a holiday in Turkey in 2012)
Tenerife (seeds saved by me in 2016, but all from a single fruit)
Panama 3 (seeds from dried fruits brought from Panama by my daughter in late 2015)

I think you can probably understand why I am not really surprised that those ones have not germinated!

My first sowing of Aji Limon (one of my favourite varieties) failed to germinate, but then I sowed a second batch, and 4 out of 5 came up. This is curious, because the second batch used older seeds - from way back in 2014. Whilst I am relieved that I did eventually manage to get some of these to germinate, I am also a bit annoyed, because they are now well behind schedule. Aji Limon is usually one of the last varieties to produce ripe fruit and it looks as if this year they may be later than usual! [Except that one of my over-Wintered plants is an Aji Limon...]

Aji Limon, the second sowing

This year, I am growing mostly chilli varieties that have some special significance for me - ones acquired while on holiday for instance, or ones given to me by friends. Here are a few examples:

"Nepali" - seeds from Allan in Brussels

"Fish" - seeds from Paul in Chorley

"Scotch Bonnet" - seeds from Dee in Hawkinge

As you can see from my photographs, the chilli plants are still small, but they look very healthy. I haven't yet had too much of a problem with aphids (tough wood!). The ones seen in the photos above were transplanted into individual 9cm pots about a week ago. Even when all the seeds I had sown germinated, I kept only the two strongest-looking seedlings of each type, and my intention is to give away one, so that I'm only left with one to grow on to maturity. This selection will probably be made some time around the end of April.

The potted-up plants have been doing the usual "Indoors-Outdoors" dance, being taken out to spend a few hours each day in the coldframe whenever the weather has allowed, and brought inside for the nights. In my opinion it is a good idea to toughen-up the plants as soon as possible, and as long as they get good (natural) light they will tolerate slightly lower temperatures. Last week the temperature in my big coldframe was mostly somewhere between 14 and 16C during the day, and on one occasion reached 20C.

Chilli seedlings admiring the snow from a safe distance - March 17th

The later arrivals are a lot smaller and still being nursed in the Growlight House.


I think most of those will be ready for potting-on into individual pots in about another week or so.

Meanwhile, the over-wintered ones are still hanging on - the ones that had the benefit of the self-watering system, that it. The others didn't make it.

Over-Wintered "Aji Benito", showing the self-watering kit

You can see the snow covering my garden in the background of this photo.

I have started giving the over-wintered plants a weak feed of tomato fertiliser ("Tomorite") every few days now, so I'm hoping they will buck up and produce some new growth. At present I would say they are just surviving, not thriving. Still, if I can keep them going for just a few more weeks, until the weather warms up, I think they will be OK.