Sunday, 29 April 2018

Planting cabbages

With limited space available in my raised beds, I can't normally grow as many Brassicas as I would like, but with the additional space up at my Courtmoor plot the situation is different this year. I have grown from seed a few specimens each of cabbage (both red and green), cauliflower and Brussels sprouts. This week I judged that the first ones were big enough to plant out, and the conditions were right too, with the soil very moist from recent rain.


Seedlings like this need to be planted out when they are strong enough to survive in the open (normally when they have developed at least 2, preferably 3 pairs of true leaves), but before they outgrow the little pots. If they stay in the pots for too long the roots will circle around and become very matted and may not spread out properly when they are planted into open ground.

Before planting, it's a good idea to lay them out in their pots in the place where you intend to plant them, just to see that they will fit in all right. I had originally intended to plant 10 green cabbages and 2 red ones, but after a trial run I felt that if I did they might be too cramped, so I left the red ones for another day. The 10 green ones (5 each of "Greyhound" and "Golden Acre") are spaced approximately 45cm apart.

Cabbage seedlings laid out to check spacing prior to planting.

Planting is simplicity itself: with a trowel, dig a suitable hole; knock the plant out of its pot by tapping sharply on the bottom; put the plant in the hole; backfill and smooth-down the surrounding soil.


The seedling should be planted quite deeply, such that the soil level is just below the first pair of true leaves (not the cotyledons or seed-leaves). Brassicas like firm soil, so use your knuckles to push the soil down very firmly around the base of the plant. This will aid stability and lessen wind-rock.


My procedure also contains one more step - adding a "collar" around the base of the plant to deter Cabbage Root Flies from laying their eggs close to the stem. I use collars made from thick cardboard, which will eventually break down, though by that time their job will have been done.


If the weather had been dry, I would have watered-in these little plants to help them get established, but the soil was pretty moist so I didn't think it was necessary this time.

Before I plant my cauliflowers, red cabbage and Brussels sprouts, I will probably have to finish digging the last bit of undug ground - between the beanpoles and the Raspberry canes. That little patch of weedy / grassy ground needs to submit to the spade just like the rest of the veg-patch!


Meanwhile, the Raspberry canes are looking very luxuriant now, and lots of flowers are forming.

Just look at all the weed seedlings shooting up! Probably from within the compost mulch I applied...

Raspberry flowers

The Blackcurrant bushes are also looking healthy. Despite (or perhaps because of) the severe pruning I gave them a couple of months ago, they look as if they will still deliver a significant harvest.

Blackcurrant flowers

Friday, 27 April 2018

My chillis are recovering

This year my chillis got off to a bad start. They germinated OK and did well enough under the lights for their first few days, and soon grew big enough for me to pot them on into 7cm pots. At this point things started to go wrong. We were away from home for several days on two occasions during April and the plants stayed indoors on the windowsills, because I didn't think it reasonable to ask my Garden Helpers to move them in and out twice a day (and more often if the weather were to change suddenly). At this stage I usually like to begin hardening them off by taking them outside for a few hours a day if the weather permits, and it was probably this that prompted me to rush them outside on the first sunny day we had once we got home from our first trip.

Chillis outdoors, 5th April

The plants were definitely not strong enough for me to leave them outside during our recent trip to Seville, so the same indoor regime was instituted. On our return from Seville I was really worried: the plants looked very weak and sickly, with many pale leaves, and some that were shrivelled and brown at the edges.


I have thought carefully about what went wrong and have concluded that there are two possible explanations. The first is that the plants were adversely affected by their sudden outing into the sun as described above. Maybe the sun was too strong for them, or the sudden transition from indoors to bright sunlight was just too much? The other possible cause is poor choice of compost. When I re-potted the plants into the 7cm pots I only had a little amount of John Innes No.1 compost (specially formulated for seeds and seedlings) so for most of the plants I used John Innes No.2, because I had a whole bag of that. This was a mistake, because the JI No.2 is intended for more mature plants. It contains more nutrients and has a heavier, denser texture than the No.1 and it doesn't drain so well.

Anyway, it was time to mount a rescue operation! The day after we got back from Seville I went and bought some multi-purpose compost and re-potted all the chillis a second time. As I suspected, their compost was very wet and "claggy", so when putting them in the new compost I didn't water them in like I would normally have done, but left them for a few days to dry out. I have also been super-careful with attempting to give them the best conditions in which to grow - moving them into the shade when the sun is very strong (as it was for several days last week), and bringing them indoors at night-time. I'm pleased to report that most of them are looking a lot better now.


Most of the plants are beginning to produce new growth, although they have also shed a fair few of the damaged leaves.


It was a close call, but I think I will still have enough plants to meet my requirements. I originally had 38 seedlings, with a view to keeping about 16 - 20 of them. This is in addition to the over-wintered mature plants, of which I have 5.

Over-wintered "Aji Benito"

These ones don't look too bad, do they?

"Whippet's Tail"

"Greek Chilli" (official name not known)

"Cayenne"

The moral of this tale is "Don't take shortcuts"! Little plants (especially ones originally from tropical climes, such as chillis) are delicate things and need to be looked after properly. You would think that I would know this by now, wouldn't you?

Wednesday, 25 April 2018

Beanpoles

Having sown some bean seeds the other day, my thoughts have now turned towards beanpoles, particularly in relation to my new Courtmoor Avenue plot.

I intend to grow Runner Beans in my own garden as usual, and I see no reason to change the way in which I provide support for them. This is the system I have used for many years - pairs of poles in an inverted V shape, secured with a horizontal pole up at the top. The primary criteria for a bean support system are that it should be tall and strong, and this meets both of them.


Until recently I used to use 8-foot bamboo poles, but for the last two years I have used more sustainable Hazel rods, obtained locally, and they are 9 feet long.

This arrangement works well in my raised beds, but on the open space of my new plot I will be using a different system. For one thing, there are no raised bed timbers on which to stand in order to tie the poles at the top, and fix the cross-piece in place!

Using some metal piping, I have made this contraption, with two tripods hammered deep into the soil, supporting a horizontal pole.


The height of the horizontal pole is very roughly 3 feet. To this I have fixed the 8-foot bamboo canes formerly used in my own garden ("waste not, want not"!).


This time the poles are arranged facing outwards, and secured to the horizontal pipe at just below their halfway point.


The theory is that the bean pods will dangle down on the outside of the row and will thus be easier to pick - and less likely to get missed in amongst the foliage. Well, it certainly sounds possible, so let's see...

As well as the Runner Beans grown this way, I plan to have two or three cane wigwams to support other types of bean - such as "Cobra" climbing French Beans, and some Borlotti, maybe some "Cherokee Trail of Tears". My plans for these are still fluid, and will be influenced by how well the many and various seeds I sowed germinate. So far I have put up just the one wigwam, which you can see here next to the Runner Bean poles.


Looking in the other direction for a minute, see how little of the patch remains to be dug - just this little strip between the beanpoles and the Raspberry canes. Nearly there!


Monday, 23 April 2018

Tapas

All my regular readers know that I am very fond of food, and of cooking! Inspired by our recent trip to Seville, I made an array of tapas-style dishes for our dinner on Saturday. They turned out well, so I have decided to show them off...

This is where the evening begins - aperitifs, accompanied by a selection of olives. My drink is a fino sherry, Jane's is a Whisky Mac (whisky with Green Ginger wine).


The tapas concept lends itself to the use of a multitude of small plates, so I took the opportunity to use some of our extensive collection of little dishes from around the world for this meal. In the photo above you see two which we bought last year in Tavira, Portugal. [Tavira is geographically quite close to Seville...]

The first "tapa" I dished-up is also inspired by our holiday in Portugal, though I'm sure it is ubiquitous in the Mediterranean area - a sort of bruschetta, with a piece of sourdough toast topped with chopped tomato and avocado, sprinkled with dried Oregano and drizzled with olive oil and a splash of sweet/sharp pomegranate molasses. Jane wasn't keen to have the pomegranate molasses, so I used Sweet Freedom agave syrup to add the sweetness on hers.


Well, that was a nice easy one to start with; now for something more complex. These are my (experimental) version of "Croquetas" (croquettes).


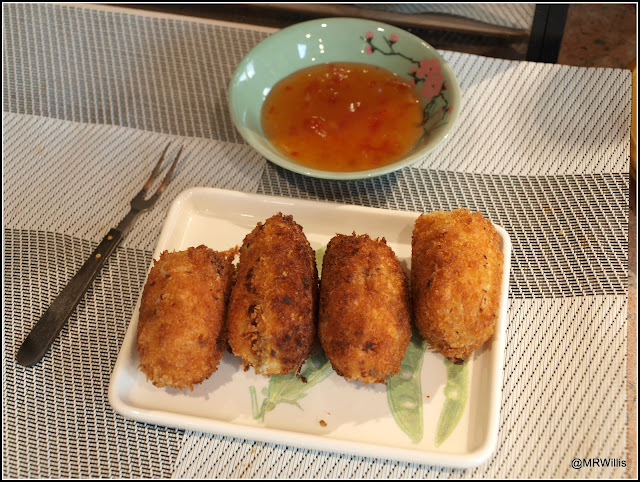
Everywhere we ate in Seville served croquetas! The authentic version is made with a stiff béchamel, but mine are potato-based. I boiled and mashed some potatoes, added some grated Parmesan cheese and left them in the fridge to firm up. Later on I incorporated Spring Onion, fresh Thyme and some reconstituted dried Winter Chanterelle mushrooms (foraged by me last Autumn). I formed the mix into a number of small oblong (croquette?) shapes and put them back in the fridge to chill. Just before cooking I coated them in flour, egg and breadcrumbs and then shallow fried them in sunflower oil, turning several times to achieve an even colour. I served them with a Sweet Chilli dipping sauce - probably very un-Spanish, but very yummy all the same.

Time for some meat now. This dish is slow-cooked Lamb, served with flatbreads (home-made of course).


After browning all over in a searing-hot pan, the Lamb is cooked for about 3 hours in a covered Pyrex casserole, at low temperature, submerged in olive oil along with some sprigs of fresh Rosemary and a couple of cloves of crushed garlic. It comes out really falling-apart tender - and tasty too.

Back to the vegetables again now. The next course was a Carrot Hummus with miniature cucumbers and more flatbreads.


The Carrot Hummus is very easy to make. You put some peeled carrots in a roasting-pan, along with a couple of tablespoons of olive oil and loads of fragrant spices (I used seeds of Fennel, Caraway, Cumin and Coriander), and roast them for about 45 minutes until tender. Then you zuzz them up in a food-processor, adding a bit more oil if necessary to achieve the desired texture. A beautifully tasty alternative to the usual chickpea version.

My fifth and final offering was actually my personal favourite. It is "Lomo de Cerdo" (Loin of Pork).


It doesn't look very ambitious, but I assure you it was fantastic! The meat is some slices of pork tenderloin, cut fairly thin. It was marinated in Oregano-flavoured olive oil (left over from a jar of olives!), with an added dash of Piri-Piri (hot chilli) condiment - again from Portugal, not Spain! I flash-fried it in a very hot dry pan. In retrospect, I think I'll nab this one as a recipe for some other time, but do it in larger scale - perhaps served with some more croquetas, which were Jane's favourite.

This was a really fun meal to cook, and very different to the typical British "meat and three veg" type of meal. The tapas concept is very flexible: you can have as much or as little as you want, and you can have loads of different things all in one meal without having to limit your options!

Saturday, 21 April 2018

First sowings at Courtmoor

Until this week, all the seed-sowing I have done has been at my own house / garden. Now I have finally got some seeds in at the Courtmoor Avenue plot. I have sowed a row each of Beetroot "Boltardy" and Parsnip "Thrupp", the latter a gift from a friend who is a member of the Stroud Community Seed Group. The cultivated part of the plot is gradually "outnumbering" the uncultivated bit!


Because the plot is very open and vulnerable to damage by cats, foxes etc, I devised a novel way of delineating the seed-beds and giving them a little bit of protection. I laid down some bits of wood and metal piping which I found at the end of the garden, and pegged them in place, like this:


The pegs are just short lengths of stick, cut from the apple-tree prunings.


This arrangement is not intended to be a long-term one, and once the seedlings are up and established, I'll remove the wood and metal. I know it doesn't offer much protection, but hopefully the cats will prefer the more open ground elsewhere on the plot.


On this visit I also planted some more of the Shallots. So far 28 of the 45 have sprouted, well over my self-imposed target of 15.


The first half-dozen Shallots, which I planted 10 days ago, look well-established now and growing strongly.


The Broad Beans haven't grown very enthusiastically yet. In fact a few of them look very pale, with one or two of their lower leaves going yellow. This sounds disturbingly like a nutrient deficiency in the soil, but maybe I'm worrying too much. It might just be that they have been pining for some warmth and sunshine (some of which finally arrived this week).


The first few potato shoots are poking up through the soil now. These are the First Early variety "Foremost".


I'm hoping that we have had our last frost of the year now, and that I won't have to dash up to the plot one evening to cover over these tender shoots. Our weather is all over the place these days, and you never know what to expect! This week we have had daytime temperatures in the mid 20s, and night-time ones in double figures a couple of times too.

The Raspberry plants at the top of the plot are covered in delicate green new leaves too. I evidently did their pruning / weeding just in time. It's depressing to see that despite my efforts, there are still plenty of weeds coming up in amongst the canes.


A month or so ago, when the plot was completely bare, it seemed huge, but now as I begin to populate it I'm beginning to think I may not have room for all the things I want to grow! Must remember to leave room for the Winter veg as well as the Summer ones...

Thursday, 19 April 2018

A chemical attack?

[A very topical subject, this...!]

One of the "Foremost" potato plants I am growing seems to have been the victim of a chemical poisoning. Not Novichok this time, but probably Clopyralid weedkiller.


As most readers will know, some of the potatoes I am growing at home in large plastic tubs are ones that I rescued from my new plot at Courtmoor Avenue last Autumn. I think it's possible that this one had been contaminated with weedkiller before I brought it home, because all the others (and the seed tubers I bought at the Potato Day I attended in January) seem to be OK. If the weedkiller were the soil / compost I'm using, I believe they would all have been affected. Look at these two side-by-side. One of the plants seems fine, but the other displays the "fern-like" and "spoon-shaped" foliage so characteristic of this type of chemical damage.


This year all my container-grown potatoes are in a mix of home-made compost and soil taken from a decommissioned raised bed.  Apart from the one seen above, they all look OK so far.


Long-time readers of my blog will possibly remember that a few years ago (2014) my garden suffered severely from weedkiller contamination in commercial compost, but I don't think any of that is still with me. I made strenuous efforts to avoid any of the affected material getting into my compost bins, and in any case I empty them completely at least once a year.

If you grow vegetables but also have a lawn, be VERY careful if you use any proprietary lawn-care products. In particular, never put grass clippings from a treated lawn into the Green Waste, because it will end up in the Municipal Compost and go on to devastate the crops of some other unsuspecting gardener!

I'm hoping the contamination in my garden is limited and a one-off, but I'll be keeping a very careful watch on my plants!

Wednesday, 18 April 2018

Supporting Broad Beans

Broad Bean plants can be very floppy and I think they benefit from some support. If left to their own devices they often get very tangled, and sometimes fall flat on the ground, where they can become wet and start to rot. Another reason why they are best kept upright is to give bees better access to the flowers. I have tried various support systems over the years, but I have concluded that the best method is to stake each plant separately. This of course is only really practical if you have a small number of plants. In this raised bed in my garden I have a total of 20 plants - 5 each of 4 different varieties - and this week I have staked them. They were getting too tall for the net which has been covering them since they were first planted out.


Each plant has its own 5-foot bamboo cane, to which it is lightly tied with soft green string.


Some varieties of Broad Bean grow quite tall, so longer canes might be necessary for these, though of course most people pinch out the tops of the plants once pods begin to set, because this helps to reduce Blackfly infestation.

The net which had been protecting the Broad Beans has now been re-deployed to the Parsnip bed, which has gone from this...


To this...


Up at the Courtmoor Avenue plot I have used the same staking technique for my Broad Beans, except that the canes have been substituted with some rather rustic sticks taken from the apple-tree prunings.


I can see that the apple-trees are going to be a very valuable source of materials for one thing and another. This makes me happy, because it is good to work in harmony with Nature whenever possible and little bits of wood will be much better for the planet than plastic or even bamboo imported from the other side of the world.

Tuesday, 17 April 2018

Stocking up with Brassicas

Over the last few days I have been busy pricking out a lot of little seedlings, most of which are brassicas of one sort or another - cabbages, cauliflowers, Brussels sprouts etc. These are destined to be planted out at my Courtmoor Avenue plot in due course. I'm revelling in the feeling of being able to expand my horizons and grow a lot more plants than usual!


I had sowed the brassica seeds quite thickly in a collection of 8-inch pots, and what I have done now is to move them into separate 3.5-inch pots. In the course of doing this I have discarded any that looked weak, but even so I have ended up with about 50 little plants.

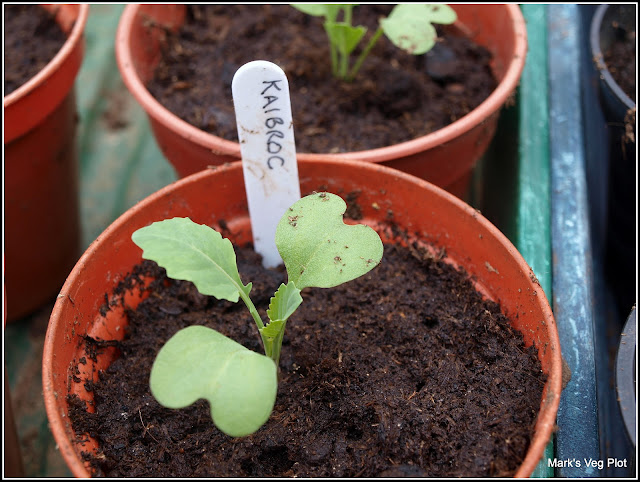
I have two different types of green cabbage (Greyhound and Golden Acre), one type of red cabbage (Red Drumhead), one type of cauliflower (All Year Round), two types of Brussels sprout (Cromwell and Evesham Special), and a few of Kaibroc (a hybrid of broccoli and kailaan).


When pricking out young seedlings like this you sometimes find that they have quite long, "leggy" stems, and it makes sense to bury the plants almost up to their first set of leaves. This will provide the plant with greater stability and make it less vulnerable to damage, as well as encouraging it to produce more roots.

A Brussels sprout seedling, buried up to the level of its first pair of leaves

The green cabbages will hopefully mature by early Summer, to be followed by the red cabbage and sprouts in the Autumn, and the cauliflower in late Autumn or early Winter. The Kaibroc grows much more quickly and I hope to be able to harvest some by late May or early June.


While I was in the mood I also pricked out some of the Leeks - though not all of them because this is a fiddly and time-consuming job!

Leek seedlings prior to pricking out.

Leek seedlings moved to individual pots

I still have a load of onions to do as well, but I'm not sure whether I should prick these out into individual modules, or just plant them out direct. What would you recommend?

Onions "Ailsa Craig"

Over the last week or so lots more of my shallots have sprung into life. I said previously that I would be happy if as few as 15 of my 45 shallots sprouted, so I'm very pleased to be able to report that so far the tally is 24. The others may well follow, I think.


Here's a view of all (no, most) of my seedlings. Do you think I'll have enough?


Now that this lot is sorted out for now, I really must get round to sowing more seeds. I didn't want to do this before our short holiday in Seville, but now that we're back I want to sow Parsnips, Beetroot and beans of various sorts, and before long it will be time to do the cucumbers and squashes. This is the busiest time of year in the garden!