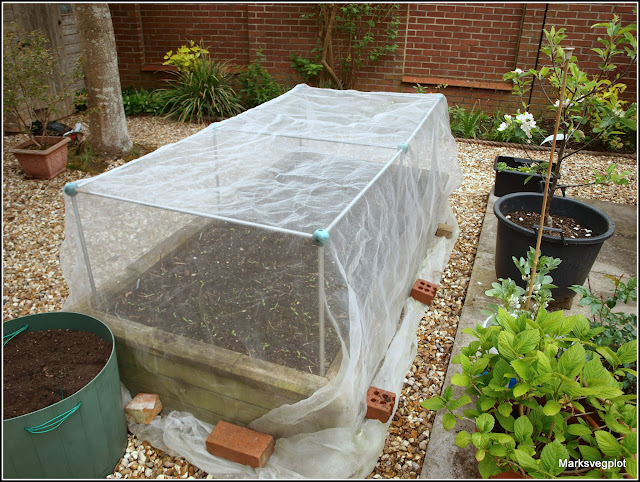
Carrot seeds are tiny, and it is very difficult to sow them at the correct density, so most people (me included) sow them fairly thickly and then thin them out later on. Carrots that are too closely spaced will compete for light, air, water, and nutrients from the soil, and will probably produce fairly thin roots. It's usually better to have fewer but better carrots. On Saturday I thinned mine.
How much space you leave between the seedlings depends on several factors, for instance the variety of carrot. Some of mine are "Autumn King", which can get very big, but others are "Nantes", which usually remain quite small. If you want carrots to develop big roots it is usually better to err on the generous side when it comes to spacing. I have left about an inch or two between mine, but as they develop I may decide to thin them even further by removing every other plant at the "Baby veg" stage.
A few tips on thinning carrots:
1. Do the job on a dull, cool day. If it's warm and sunny the scent of the carrot thinnings can be detected more easily by Carrot Root Flies.
2. Water the rows of carrots before thinning, to make it easier to remove the unwanted plants without disturbing the ones you wish to keep.
3. Put the thinnings in a receptacle of some sort as you go along (I use a plastic pot-saucer), so that you can more easily move them off-site when the job is done.
4. Put the removed seedlings into a covered compost-bin, or if you only have an open bin cover them with a layer of other material. This will mask their scent so that Carrot Root Flies are less likely to detect them.
5. Water the rows again after thinning, to settle the plants in firmly. They may have been disturbed a bit by the removal of some of their siblings.
6. If you can, cover the thinned rows with some Enviromesh or similar material as soon as possible after completing the task, in order to deny the Carrot Root Flies the opportunity to move in.
As well as thinning the carrots, I also did the parsnips. This was easier, since I had sowed fewer seeds. You may remember that I "station-sowed" them, with 2 seeds at each station. Germination of the "Hollow Crown" ones was excellent, but there were a couple of gaps in the "Student" ones. I have filled these gaps with thinnings from elsewhere, though I'm not optimistic about the results. I find that parsnips hate being moved, so the transplanted ones may not take. I think the ideal spacing between parsnips is about 6 inches, so again mine might get thinned a second time if they all develop well.
If you look very carefully, you might just be able to make out the rows of tiny seedlings in this photo. There are 4 rows of parsnips nearest the camera, and 5 rows of carrots in the distance.
The warm weather during early April helped with germination of my carrots and parsnips - it's the first year for quite a while that I have not had to re-sow at all - but just recently it has been very dry, so I have been making sure I water the little seedlings every few days, which I will continue to do until they are well established.
P.S. Just wanted to sneak in a photo of my watercress. It's definitely growing!


Ohhhh! Is it very hard to grow watercress?
ReplyDeleteNo, evidently not!
Deleteoh excellent. Maybe my novice green fingers could manage this!
DeleteMark, I can see your watercress is growing in a washing up bowl, can you tell us a bit more? I'm growing mine in a gutter, and would be interested to know what you have done re drainage, soil conditions, watering etc. Did you sow seed direct or transplant seedlings?
DeleteHave a look at my post about this on 11th April...
DeleteGreat job thinning the carrots and parsnips. Thinning can be quite a chore but yours look well spaced.
ReplyDeleteWhat size enviromesh do you have? I just bought some, but it won't be wide enough if the plants grow any more (and I'm definitely hoping they do!)
ReplyDeleteI'm not absolutely sure, because it's a fair while since I bought it, but I seem to remember it is 5 metres wide... I remember wanting to ensure it would still be wide enough if I were to grow some very tall plants.
DeleteJust dug out the original invoice: 5 metres x 3.6 metres. Got it from "Gardening Naturally".
Delete