Monday, 6 June 2016

Harvest Monday - 6 June 2016

I don't have much in the way of harvests to report this week, just some Lettuce:


This one is another "Tom Thumb". We have been really impressed with this variety. It has good taste and texture, and is just the right size for a 2-person salad.


For a lettuce of such diminutive proportions, it has a surprisingly big heart!


We did also have another lettuce during the week, but I didn't photograph it. It was one of the "Dubacek" variety, and to be honest, they all look exactly the same, so I'll cheat and show you one from last week! :)


Apart from lettuce, the only other food that has come out of the garden is a bit of Mint, Thyme and Parsley.


The Tom Thumb lettuce became the main ingredient for a really nice salad that Jane made, which I'm going to describe more fully tomorrow. In this picture it's missing one vital ingredient, so come back tomorrow to see what it was!


I'm linking my post to Harvest Monday, hosted by Dave at Our Happy Acres, where hopefully you will be able to see some more ambitious harvests!


Sunday, 5 June 2016

Ferns and Lysimachia

Despite the recent poor weather (cold, dull, windy), most of the plants in my garden are doing what they normally do at this time of year - putting on lots of new growth. I'm sure they would prefer to have some sunshine, but they know that they can't afford to wait too long. To quote the words of William Shakespeare "Summer's lease hath all too short a date"!

I recently noticed that my Dryopteris Erythrosora fern was beginning to form some new fronds, so I cut off almost all the foliage remaining from last year, which was looking tatty to say the least.


Hopefully the fact that the plant will now get more light will assist it to develop quicker and stronger. There are quite a few new fronds coming up already.


As you can see, these rather weird-looking fronds start off being a deep russet sort of colour, and when they unfurl they will initially be dark gold, and then later will turn to green. I think this particular fern is much more interesting than many of the plain green ones.

This "adolescent" frond looks as if it has overdone it when applying the hair-gel!


My green ferns are a bit further advanced:


Last year I removed several Ferns like the one seen here, because I felt they were becoming too dominant.


In the place of the Ferns that were removed, I put a Lysimachia Ciliata "Firecracker" plant, which I had previously had growing in a pot.


Lysimachia is an herbaceous perennial, so it died down during the Winter, but it has come back strongly now, and is shooting up rapidly. It will eventually be about a metre tall.


At present its attraction is in the deep red/purple foliage, but in due course it will have a mass of small bright yellow flowers.


I know that Lysimachia has a habit of spreading rapidly, but I have put it in a place where it will have stiff competition, not only from ferns, but also from the adjacent Japanese Anemone "September Charm" and the Wild Garlic which is well-established in that little corner.

Saturday, 4 June 2016

Leaf Celery

Although I like its flavour, I don't like the texture of "proper" Celery so I have been experimenting with Leaf Celery, which I first discovered as an element of a Mesclun / Baby Leaf Salad mix a couple of years ago. The tiny leaves have a very powerful flavour and make a wonderful garnish or salad ingredient.


The plant is grown in a way similar to that used for Parsley - none of the hassle associated with Celery or Celeriac - although it does still prefer moist soil and plenty of water. It seems to be very tolerant when it comes to site and soil requirements. Due to space restrictions, the first time I grew it, I had some plants in a big plastic crate, filled with multi-purpose compost. Now, I have a patch of it next to one of my compost bins. On the face of it the soil here looks very unpromising, though I suppose it must benefit to a certain extent from nutrients leaking out of the base of the compost bin.


I sowed this little group of plants last Spring (2015 that is), and up till now it has performed just like Parsley, and we have used leaves of it whenever required. Now, it is running to seed (it's a biennial, like Parsley) and has produced some tall thick flower-stems.


I'm going to leave them to flower, then I can save the seeds for sowing next year.


Because this plant has a strong taste, we use it primarily for flavouring soups, stews and stock - anything that calls for Celery in fact - but not as a vegetable in its own right. It has a very pronounced "Umami" (savouriness) effect. One or two leaves (stalk included) each time is all you need. If you are going to eat it raw, I suggest using only the tiniest leaves - like these perhaps:


For the purposes of scale - that is an 8-inch side-plate


For the time being I have given up on trying to grow Celeriac. My results to-date have been far from impressive, and certainly not worth the effort that has gone into them!

Friday, 3 June 2016

Care and maintenance of Tomatoes

Having been very disciplined and got rid of all my surplus tomato plants, I can now concentrate on the "A"-Team ones. I thought some readers might appreciate an insight into how I look after them.


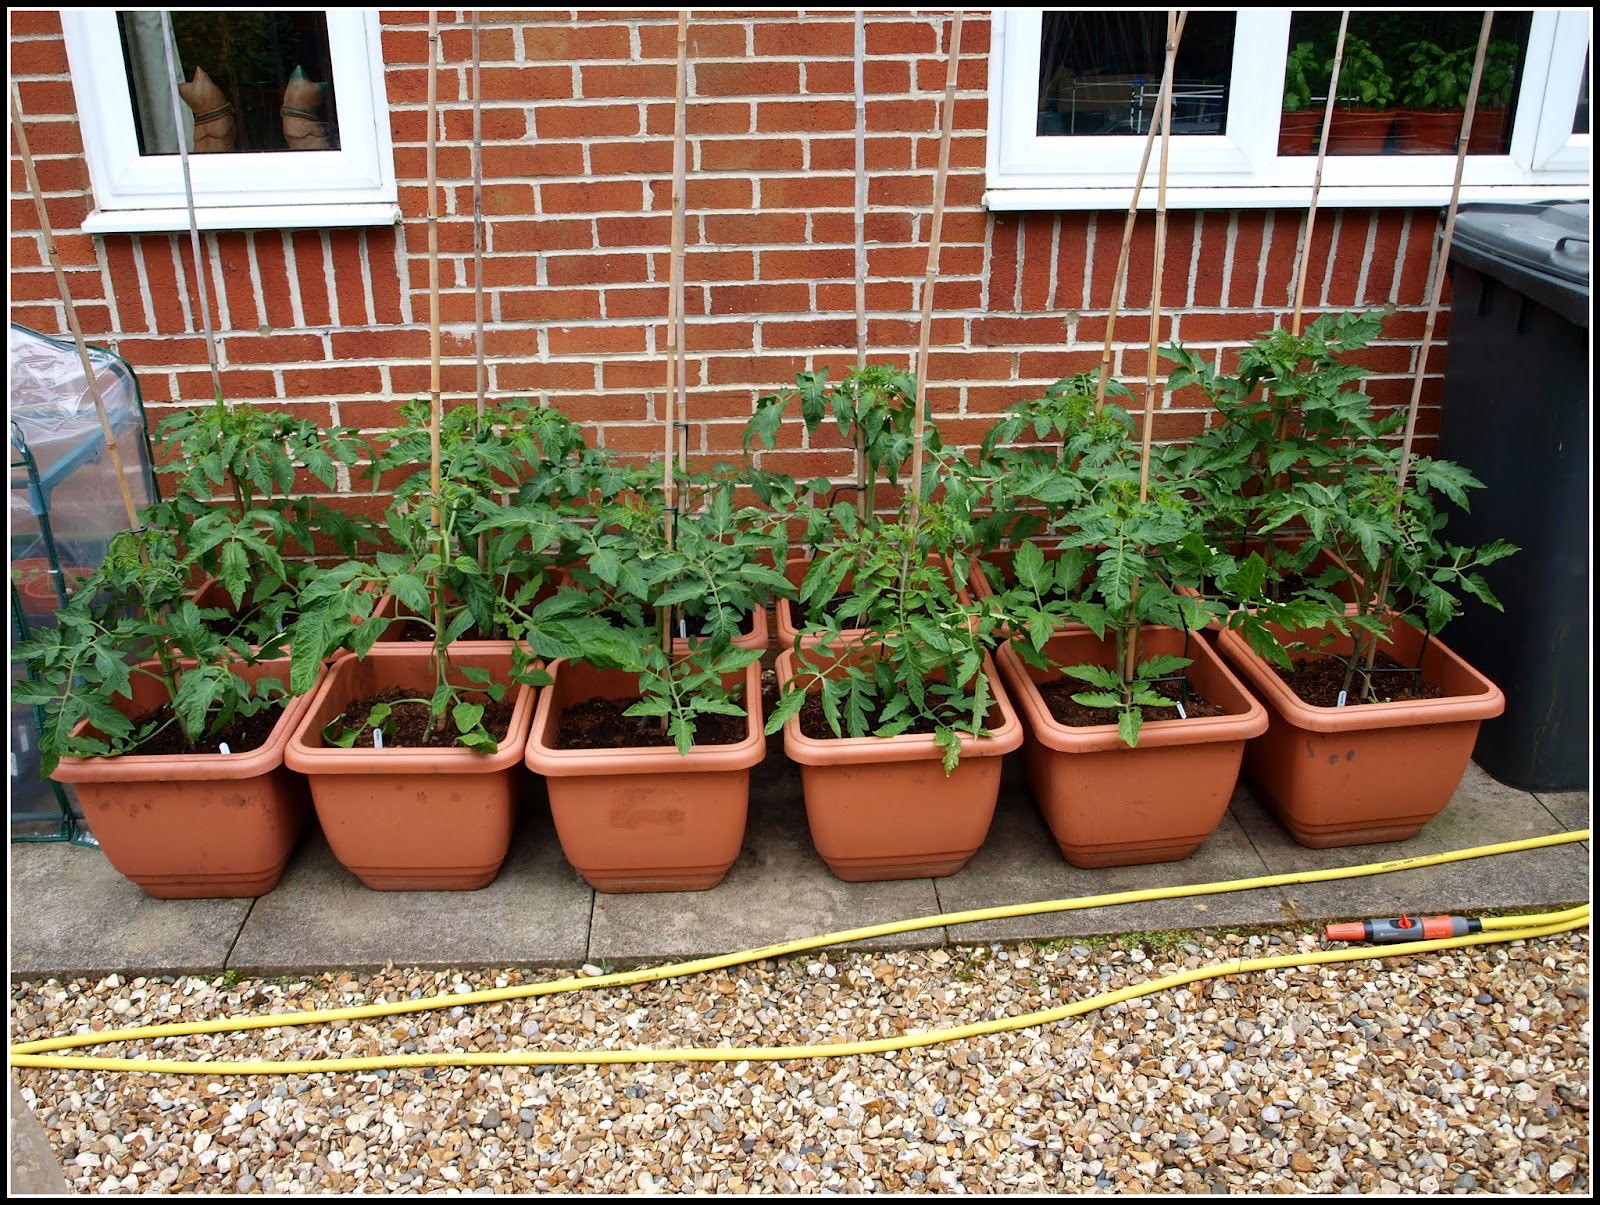
Well, the first thing to note is that the ones I'm growing as cordons (i.e. the "Indeterminate" ones) are already getting quite big, and it is becoming difficult to manage them with the pots arranged in a double row:


With my restricted mobility, it is difficult to reach over to the back ones whenever anything needs to be done to them, so very soon I will be re-arranging the pots into a single row.


Side-shooting.
One of the most frequent tasks that needs doing is the removal of the side-shoots that grow in the leaf-axils, like these:


If you don't remove the side-shoots, they will grow into lateral branches and the plant will get very straggly and hard to maintain. Furthermore, less energy will be available to the main stem. I always pinch out the side-shoots when they are still very small, using my finger and thumb. Once they get bigger it is necessary to use secateurs. If you like, you can use the removed side-shoots as "cuttings" and grow new plants from them. I don't generally do this, but I might have a try some time, just for fun.


Tying-in.
Another task that needs doing is tying-in the plants to their supporting canes at frequent intervals, to keep them upright. At this time of year tomato plants grow very rapidly and they need tying-in about every other week. I use soft garden twine for tying-in, and I usually do a tie every six inches or so, in order to provide good support for later on when hopefully the crop will be heavy. It's good practice to make at least two loops of twine each time, thus spreading the load, since a single loop could easily cut into the surface of the stem.


Watering.
Inadequate and irregular watering is the most common cause of failure in amateur tomato-growing. This is why I have got these so-called self-watering containers:


They have a reservoir in the base, which will hold enough water for a big tomato plant for a couple of days even when the weather is warm. Even with pots like these it is a good idea to check the moisture of the compost very frequently - I'm talking about at least once a day - and add water if necessary. In high Summer I often water my tomatoes twice a day. Constant dampness is much better than a cycle of drying-out followed by flooding! Erratic watering inhibits the plant's ability to absorb nutrients (especially calcium), which is a major factor in the incidence of Blossom End Rot.


Feeding.
Tomato plants are frequently grown in commercial multi-purpose compost, which often contains strictly limited amounts of nutrients, so once the plants start producing flowers, it is usually time to start feeding them. I'm hoping that mine will not be lacking in nutrients this year, due to all the good stuff I put into their growing-medium, but I shall be feeding them nonetheless!


My tomato plants benefit from two sources of feed. The first is a weekly dose of Tomorite commercial tomato-fertiliser, used as per the manufacturer's instructions (i.e. diluted in water). The other food they get is my home-made Comfrey Tea. I just put a load of Comfrey leaves and chopped stems into a bucket, cover them with water and let them rot. Within about 2 - 3 weeks they will have "deliquessed" into a thick green sludge. This sludge may be less than appealing to us humans, but it contains nutrients that tomatoes and other fruiting plants (such as chillis and aubergines) love - particularly Potassium. When the "tea" is ready, I dilute it about 50:50 with water and just pour it into the tomato containers, preferably just after normal watering has taken place, so that the Comfrey Tea is more easily absorbed by the compost.


So far, I have been writing about the Inderterminate varieties of tomato, but the culture of Determinate (aka Bush) varieties is different. Since they don't grow tall you don't need to do any tying-in (although I do generally tie them in to short (2-foot) canes for greater stability), and since you want them to be bushy you don't remove the side-shoots. However, what I have said about watering and feeding still applies. By their very nature, Bush tomatoes are going to be straggly and cover a lot of ground, so it is a good idea to think carefully about where you site them. Of course all my Toms are grown in containers, so it's not too much of a problem for me, and I can move them around if necessary. Tomatoes grown in the ground are a different matter!


One other thought: sometimes you see tomato plants bunching-up their top leaves into a tight ball (particularly overnight), with the leaves curling inwards towards the stem, like this:


At first sight this may look alarming, but actually it's fairly innocuous. It's caused by the plants getting too cold - or at least colder than they would like. The action is just the same as that which we humans do when we're chilly - we wrap our arms around ourselves and hug ourselves. When the temperature warms up they will return to normal.

Thursday, 2 June 2016

Early June update

Being a gardener requires a certain amount of patience. Well, quite a lot of patience, really. In my garden now lots of lovely veggies are growing, and I keep thinking "Do I need to be out there doing stuff?", but the answer is "No". The plants just need time to grow. So I do the odd bit of weeding (a never-ending task which I approach on a little-and-often basis), the odd bit of watering, and the odd bit of tying-in, but on the whole it's a relatively easy time of year. I'm just going to show you a few pics of how things are getting on.


There are three nice strong rows of Parsnips:

"Tender and True" at left; others are "Duchess"


Next to the Parsnips are the Broad Beans. The tall ones are "Masterpiece Green Longpod" and "De Monica", while the short ones are "Robin Hood".


You can see some of the tomato plants in the terracotta-coloured pots in the background, next to the house. (Beside those lovely picturesque wheelie-bins!). Here they are in more detail:


The first Broad Bean pods are beginning to appear amongst the brown dead flowers. I'm anxiously scanning the plants to judge how many pods there are going to be. Not every flower gets pollinated, and the un-pollinated ones just wither and die without producing a pod.


At the Fleet Food Festival last Sunday I bought these two herb plants. One is a Black Pepper Mint, and the other is a Tricolour Sage.


The Sage is primarily for ornament - hence the glazed pot - but the Mint is for culinary use, so it gets the utilitarian black plastic pot!


I potted the Mint in home-made compost, which is very rich and moist. I think the plant will enjoy this, and hopefully it will grow rapidly. My other Mint (The Moroccan type) is not doing very well this year; it's a bit weak and unenthusiastic for some reason.


An attack by a couple of cunningly-camouflaged green caterpillars of some sort didn't help. It's amazing how much damage one caterpillar can do before you spot him...


Brassicas in the foreground.


Climbing Beans:


Another general view, with the Salads bed in the foreground.


I have Lettuces at various different stages of development. This "Little Gem" is beginning to heart-up.


Down the other end of the bed I have some smaller ones of various sorts, and a couple of Chicories (top left of photo below).


Carrots under the Enviromesh. My Carrots haven't germinated so well this year, and I had to re-sow some thin patches.


The chillis are looking a lot happier since I put them into the bigger pots. There is lots of new growth on this "Ring of Fire" one, which is just beginning to branch-out.


Potatoes - even more luxuriant than ever!


Herbs. The flowering ones in the foreground are Thyme.


This is Leaf Celery, running to seed now, and producing some very thick stalks. I'm going to let it flower so that I can save the seeds.


 Even the pears are looking hopeful. I have seven little clusters like this:


So the message is that I have lots to look forward to, though nothing very much to harvest just yet - apart from salad.

Wednesday, 1 June 2016

Making a Strawberry cage

Lots of my Strawberry plants are beginning to set their first fruits now, so it won't be long before they deliver their harvest.


When you only have a few Strawberries, every one is precious, so you need to cover them with nets of some sort. If you don't the birds (and in my case probably the squirrels) will grab the fruit before you can harvest them.


My few Strawberry plants are in black plastic crates, so they are easily moved around the garden when necessary. They are also relatively easy to protect. This is my method...


I use bits and pieces left over from previous generations of plastic mini-greenhouses - metal rods and plastic corner-pieces. The corner-pieces are especially useful, and I would never throw one of these away unless it were broken!


I assemble a cube-shaped structure, like this:


I would prefer the structure to be lower, but I don't have any short rods. Hmmm, maybe I should cut some up?? No, that's a bad idea, because I will need long ones for when I use the same approach for Blueberries.


The structure is then placed over the conveniently-arranged plastic crates. Notice that mine have been put in a position that provides dappled shade, with not a lot of direct sunlight. This area gets sunshine first thing in the morning, and then again in the evening, from the opposite direction. This helps to prevent them drying out too rapidly. I still water the containers very frequently during the flowering and fruiting season though.


The final part of the procedure is to cover the structure with a suitable net, and weigh it down with bricks, making sure that the net is well away from the plants.


It's important to use a net which does not have too fine a mesh, because you still want the pollinating insects to be able to get in.


Just a final thought: have you noticed how much of what I write on this blog is about protecting my plants from pests? Scary, isn't it?

Tuesday, 31 May 2016

Planting Cucumbers

This year, as for the past few years, I am growing a few of the so-called "cocktail" Cucumber plants - the little ones also sometimes known as Lebanese Cucumbers. They are not huge plants and they produce small (approx. 6" / 15cm) fruits.


Photo from 2013


I don't have a greenhouse, but I find that I can grow these plants quite successfully outdoors, as long as I don't start them off too early. This year I sowed mine on April 19th. Initially I kept them indoors, but after they developed their first true leaves I moved them outside into one of the plastic mini-greenhouses. On sunny days I have had them out in the fresh air, acclimatising. Now I have planted a couple in their final location, which is a big container filled with compost-enriched soil:


I am intending to put in at least one more plant, but for the time being I'm only risking two. I'll keep the others in their pots until I'm sure that frost is no longer a risk. I only have a total of 5 plants, and one of those is definitely not going to be any good. This one is the sole example of "Mini Munch", a leftover from last year. Whether it's because it's an old seed, or for some other reason, this one has not developed properly at all and I think it will have to be thrown away.


In any event, the two Cucumbers I have planted out will have their own protection anyway, because I have made sure that they will fit under one of my biggest plastic cloches, at least for the time being:


In a couple of weeks they will have out-grown that cloche, so I'll remove it and at that time give the plants some support by putting in a wigwam of bamboo canes.


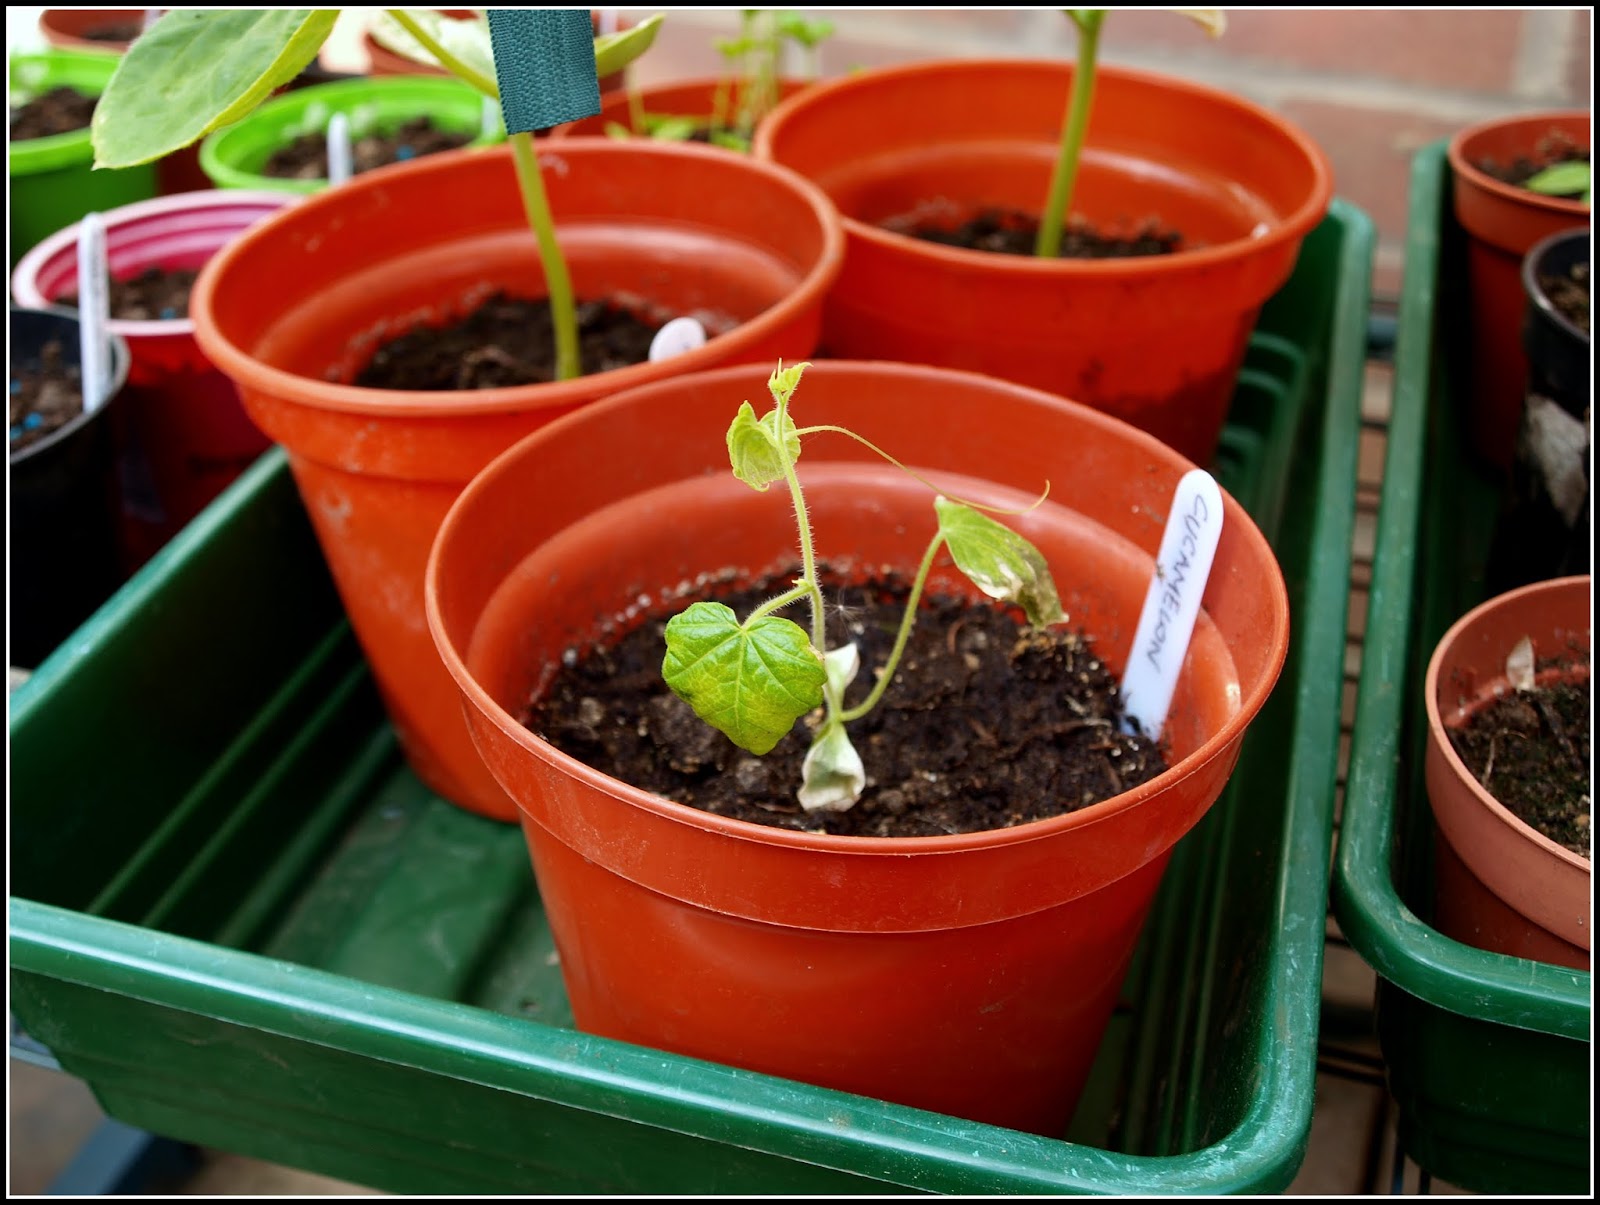
As I've probably mentioned at some stage, I'm also having a go with Cucamelons, but don't hold your breath, they are still very tiny and frail-looking. This is the best of the pair!


It doesn't look good, does it? If (and that's a big "if"), either of them begins to look like becoming anything decent, I'll put it / them in the same container as the Cucumbers.


Who else has grown Cucamelons? Are they normally this frail?