Saturday, 14 May 2016

Staking my Broad Beans

This year I am growing three varieties of Broad Bean - "Masterpiece Longpod", "De Monica", and "Robin Hood". Up till now they have been covered with netting to prevent animal disturbance, but since the plants are now flowering I have decided to remove the netting to make it easier for the bees to access the flowers. Broad Beans are usually pollinated by Bumble Bees which, being large, might find it hard to get through the holes in my netting.

The netting has also acted as a bit of a wind-break, which is useful because even in my comparatively sheltered garden the plants do sometimes get a battering. With the exception of the "Robin Hood" type, the plants are getting much taller now (about 2' 6") and I think they have reached the stage where they would welcome some support. Theoretically, Broad Beans can manage without any support, but I find that if you don't provide support the plants will flop all over the place, which can be another reason why bees find it hard to access the flowers. So, my beans will be kept upright!

I have tied each of the 12 tall plants to a 5-foot bamboo cane, using soft string, not tied too tightly.


At this stage I have only tied each plant in one place, but as they grow taller I expect I will need to do it at least once more, probably twice, because the plants will eventually be about 5-foot tall. If they look like going taller than that I will pinch them out anyway.


Here's a size comparison. The tall ones at left are six each of the "Masterpiece Longpod" and "De Monica", whilst the short ones at the right are the "Robin Hood".


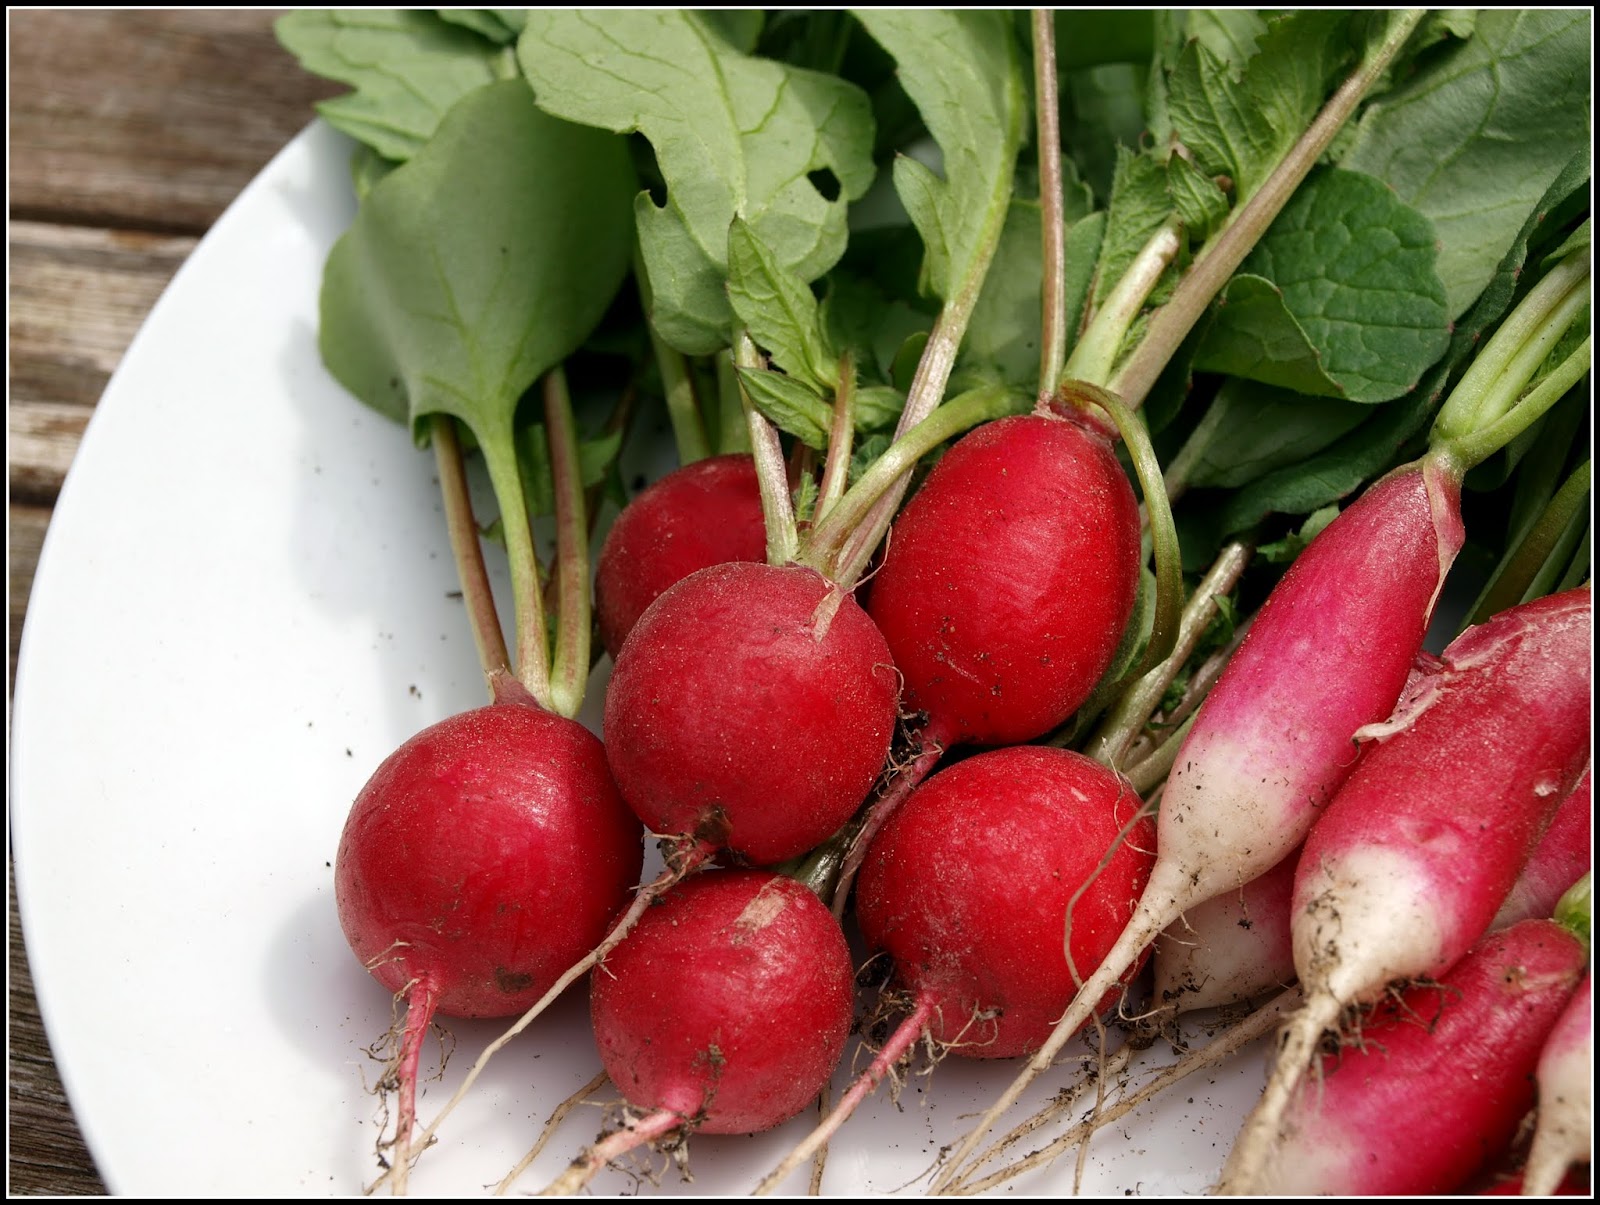
Not having tried "Robin Hood" before I'm not sure, but I don't think they are going to grow a huge amount taller - perhaps just 2-foot. It looks as if they will manage OK without any support. Compare them with the Radishes either side in this next photo...


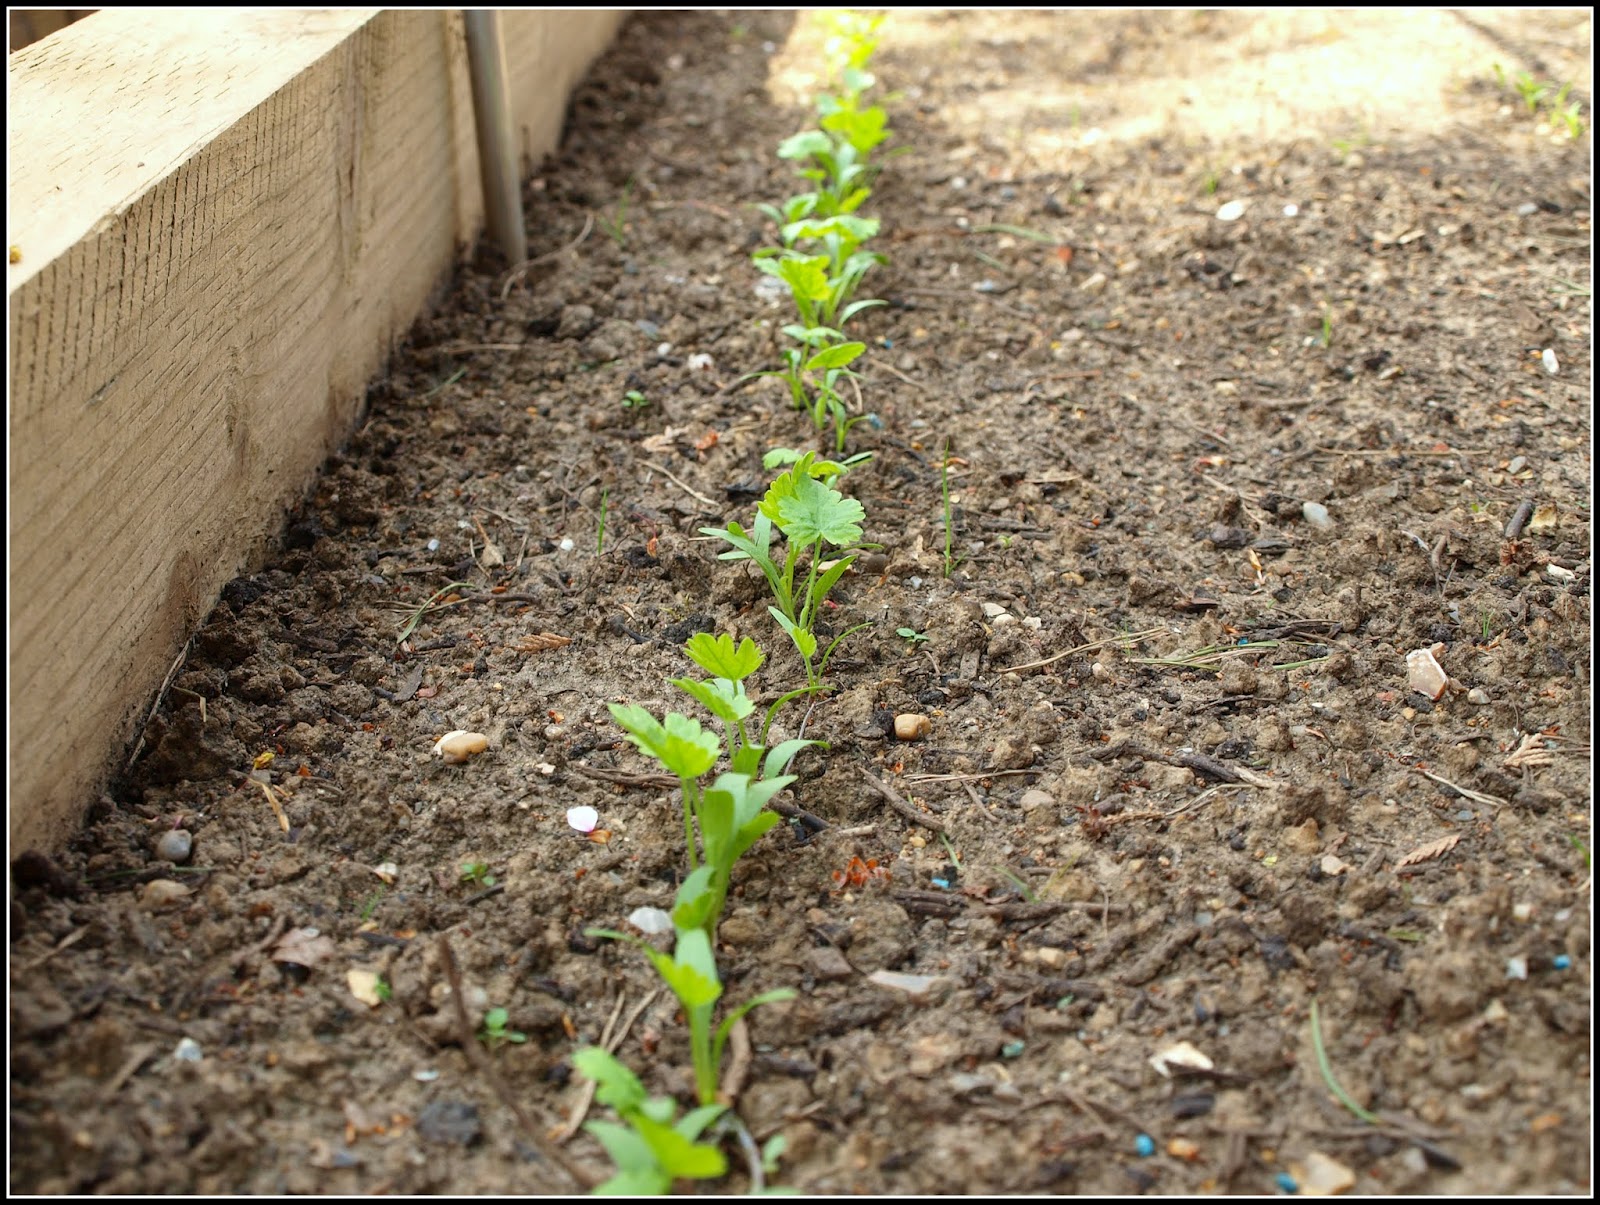
Talking of Radishes, I'm sure you have seen that I maximised my use of space by sowing three rows of Radishes in this bed along with the beans. In this next photo you can clearly see a row of Radishes in the foreground. The left-hand part of it has been depleted by harvesting, but the right-hand end is still densely populated.


It's curious that the tallest beans are in the centre of the row, and the smallest ones are at the ends. Is this pure chance, or what? I didn't consciously arrange them in that way when I planted them.

At this present time I'm very happy with the condition of my Broad Beans. The plants are very clean and have suffered almost no damage from pests so far. Long may it stay that way! In the past, I have often had big problems with aphids / blackfly once flowering begins, so I suspect that I have that "joy" to look forward to in the not-too-distant future.

Incidentally, tying beans to bamboo canes is not the only way of supporting them. In the past I have tried several different methods, such as growing the plants between two lines of string or a criss-cross pattern of strings, but they weren't very effective - the plants still flopped over, especially when laden with pods.

Photo from June 2013

You could also use twiggy sticks like the ones often used for Peas, but I think the individual canes method is by far the best. Perhaps not if you have loads of plants, but with just a few like mine, it's easy and effective.

Friday, 13 May 2016

Butter-braised Leeks with Thyme

We use a lot of fresh herbs in our cooking, and I try (not always successfully) to maintain in my garden a supply of the ones we use most often. I don't mention these herbs on my blog as much as they deserve, but this post is a small step towards redressing the balance in their favour.


Thyme is probably my favourite culinary herb. It is so versatile, going with so many different styles of cuisine. I love having enough of it in the garden that we can use as much as we want.


Here's a dish in which I used some of it recently. (Haha - "a dish" in more ways than one!) I mean a recipe... This is Butter-braised Leeks with Thyme.


Step 1 is to line a deep oven-proof dish with a layer of fresh Thyme sprigs. Be generous!


Clean a couple of Leeks and cut them into pieces about three inches long. If you are worried that there might be grit inside them, cut them lengthways and soak them in cold water for half an hour beforehand.


Place the Leeks in the dish and dot them with knobs of butter. Season with salt and black pepper.


Add a litre of hot vegetable or chicken stock.


Cook in the oven on medium heat for as long as it takes to soften the Leeks completely - say, about 40 - 45 minutes.


I served mine with a Braised Beef casserole, so I was able to put the Leeks in the oven for the last part of the beef's cooking-time. Being honest though, I added cold stock, and it took ages to heat up because the oven was on a fairly low temperature for my beef!!


While I'm on the subject of herbs, I just want to give a shout-out to a firm of herb-growers based not far from here, called Pepperpot Herbs. They sell a wide range of herbs, mostly wholesale to Garden Centres and the like, but also at local events (like the Fleet Food Festival) and at Farmers' Markets. I have seen their stall many times, and bought from them occasionally. I'm always impressed with the quality and consistency of their plants, which is all the more creditable in view of the fact that they don't use artificial heat or light. In 2016 that is really unusual. If I were in the market for herb plants, this is who I would buy from (and they despatch throughout mainland UK...).

Thursday, 12 May 2016

How to grow perfect Radishes

I remember watching the first episode of The Big Allotment Challenge on TV. The contestants had been tasked to present I think it was three identical (and perfect) Radishes. Each pair of contestants sowed a lot of radishes (probably a whole packet), yet they struggled to put up even three presentable specimens! Growing Radishes is not as easy as some people think it is.


In my opinion, there are two golden rules for growing good Radishes:


1. Sow thinly. By "thinly" I mean about an inch apart. This shouldn't be difficult since Radish seeds are quite big and it is easy to position them individually if you want to. If you do sow more thickly than you should have done, then remove some of the seedlings as soon as possible after germination. Radishes that are overcrowded soon bolt. These ones are perhaps a little close, but they seem OK:


2. Water frequently. Radishes dislike dry soil, and if they don't get enough moisture they will probably bolt before sizing-up, and at best will be tough, woody and over-peppery.


In my garden I tend to grow Radishes early in the year, since they don't take very long to grow, and psychologically give me a boost when I find myself harvesting something as early as May! Radishes are members of the Brassica family, and as such are relatively hardy. They will grow OK even in fairly cold conditions, but I usually start mine off under tunnel cloches if I can, since I generally sow the first ones in March. They don't do so well for me later in the year, because my soil is very sandy and I find it hard to keep it moist enough for the Radishes.


My technique for sowing Radishes is very conventional - make a shallow (half-inch) drill (groove) in the soil using a trowel or hoe. Then carefully water along the drill to moisten the soil. Place the seeds in the drill (preferably spacing them individually about an inch apart), then cover them with a thin layer of dry soil and pat them down so that the soil is flat again. As mentioned above, I often cover the rows with cloches to give a little protection against extreme weather and also against animals. However, if you cover your Radishes with cloches, don't forget to water them because they won't benefit from rain.


The time from sowing to harvesting varies a lot, and depends to a great degree on the weather, but in comparison with most vegetables is very short. I sowed my first batch this year on March 18th, and began harvesting them on May 7th. This is what you're hoping for...


So, if Jim Buttress is reading this -- how did I do, Jim?

Wednesday, 11 May 2016

Fast Forward

Warmer weather and plentiful sunshine has given my garden a long-awaited boost. Everything seems to have grown more in the last week than in the previous six!


The fruit trees have hopefully got their timing right - their blossom is opening at a time when the likelihood of frost seems small:


Pear blossom - "Concorde"

Apple blossom - "Winter Banana"

The Asparagus is shooting up so quickly you feel as if you can see it getting taller by the minute.


My experiment with transplanting the Asparagus into that big tub seems to have worked. Each of the four crowns I saved has produced at least a few spears, and more are continuing to come up.


In the sheltered spot between the big tubs that house the Asparagus and my new apple tree, I have established a little patch of culinary herbs. At present it includes Chives, Parsley and Thyme, but I expect others will be added in due course.


The Cabbages and Brussels sprouts in the raised bed in front of the Asparagus are looking great - almost too good to be true.


Such good looks in a brassica must be a great temptation to a multitude of pests, and whilst the net I have provided will keep off the butterflies, it won't deter Cabbage Root Fly, so I have just placed an order for some nematodes. The type I normally use is effective against a range of pests, including the Cabbage Root Fly and (allegedly) the Carrot Root Fly.


Nearby, my second sowing of Radishes is coming on rapidly now. I'm expecting them to mature just as the first sowing comes to an end. That's the plan, anyway.


You can see that I have put in a few Lettuces between the rows of Radishes. They are only small at present, and the Radishes will be gone before they need more space. This is the sort of planning ahead that a gardener with limited space available must engage in.


Just next to those Radishes is my Baby Leaf Salad mini-bed:


Germination of the salad has been a bit erratic. It seems that most of the seedlings are brassicas of some sort (including Mizuna and Red Mustard), and very few Lettuces.  Actually that's no bad thing, because I have plenty of Lettuces already.


This tray of seedlings left over after I had planted out the ones I needed is definitely destined to be a Baby Leaf Salad!


The Spring Onions are looking good too. Their little "loops" are unfurling now, such that it seems they have doubled in size overnight.


All five types of bean that I sowed are popping up now. These ones are Runner beans "Tenderstar":


And these ones are climbing French bean "Cobra".


The bean-poles are up and ready whenever the beans are!


The Cucumbers are living outdoors during they day now, and in a mini-greenhouse at night. They are just forming their first true leaves now.


The patio table (seldom used for dining, I regret!) is laden with pots of Chillis, Tomatoes etc. This is a place where they can get sunshine almost throughout the day. Notice the use of old washing-up bowls as a way or reducing the effort of carrying them round when needed. I have drilled holes in the bowls just so that they don't fill up when it rains.


I love this time of year! Everything is so full of the promise of good things to come.

Tuesday, 10 May 2016

Thinning Parsnips

Often when I sow Parsnips I have to re-sow to fill a few gaps, but not this year! I sowed three 2.4 metre rows of Parsnips - two of "Duchess" and one of "Tender and True". Although the "Duchess" ones were slow to come through, the germination rate of both types has been brilliant - I'd say almost 100%.  All three rows are visible here - "Tender and True" is at the left. They are bigger because they germinated earlier.


Because of less good germination rates in the past, I usually sow Parsnip seeds much more thickly than ought to be necessary, so this means I now have the task of thinning them out. If they are not thinned the roots will not have enough room to develop properly.


This is the Before photo, with the seedlings very close together:


This is the After photo, with some clear space between the seedlings.


I only thinned the "Tender and True" row this time, because I didn't think the "Duchess" ones were big enough. I like to do the thinning when the plants have at least one good leaf, because this enables me to see which are going to be the strongest ones. The thinning involves simply pinching off the superfluous seedlings at ground level, which avoids disturbing the roots of the ones that are to remain.


I removed probably every other one, which meant that the seedlings are now roughly three inches apart. If they grow strongly, I may decide to thin them again, probably removing alternate ones again. Something I have done in the past is to delay the final thinning until the roots are just about touching. This means that the ones you remove are big enough to eat as "Baby Veg" and don't just get wasted.


My rows of Parsnips are about 18" apart, and my plan is to eventually plant some Leeks in the gaps between the rows of Parsnips. I won't be doing this just yet, because my Leeks are still very small. Here they are:


Leeks "Toledo", "Apollo" and "Winter Giant".

Monday, 9 May 2016

First harvest

It's been a long time coming, but today I can announce the first harvest of a crop sown this year - in other words excluding things like the Purple Sprouting Broccoli that was sown last year and harvested this.


Yes, my first batch of Radishes. As you can see, they are of two types  - "Cherry Belle" and "French Breakfast".


 The round, plain red ones are the "Cherry Belle". This is a variety I have grown many times before, and I find it very reliable. It has a nice crisp texture and just the right amount of pepperiness.


The long ones with the white tips are the "French Breakfast".


I don't know whether French people eat these things for breakfast, but I can say that they are the type I associate very firmly with French markets. When we used to go across to Calais to bring home our wine, we used to try to get into the centre of town before the market closed, mainly so that we could splash out a couple of Euros on a big bunch of these! Here's a photo of some on a market stall in Ferney Voltaire (France), near where our daughter Fiona and her family live:


The sign says 1.20 a bunch, or 2 euros for 2 bunches.


This is our favourite way to eat Radishes - raw, dipped in salt, eaten with a pre-dinner aperitif:


Finally, an arty photo for you. This one uses an effect called "Ortonish", named after the famous photographer Michael Orton, who invented a photographic technique which mimics watercolour painting. The effect is easily applied to a photo via Picasa or Google Photos.


I'm linking my post to Harvest Monday, hosted by Dave at Our Happy Acres. (Hooray - my first chance to contribute something, for ages!)

Sunday, 8 May 2016

The Challock Chilli

It is no secret that I am friendly with Stephen Shirley, who runs Victoriana Nursery Gardens, situated in Challock near Ashford in Kent, (and sponsors the UK Veg Gardeners forum, of which I am a member). One of the reasons for our friendship is a mutual love of growing chillis. As an amateur gardener with strictly limited space available, I can only grow a few chillis, but Stephen is a professional and grows them commercially. He is also a member of the Chile Pepper Institute of New Mexico State University, so I suspect here is not much about chillis that he doesn't know! Each year for the last few years, Victoriana plays host to the Challock Chilli Fest, at which visitors can see and taste 150+ varieties of chilli. This year the event takes place on 1st and 2nd October.


Seen at Challock - chilli "Explosive Embers"


When I visited the Chilli Fest last year (reviewed HERE), Stephen told me about a new chilli variety that he has been breeding. He even gave me a little taste of one of its fruits (a special privilege!). There are literally hundreds of chilli varieties available, and since chillis are notoriously promiscuous, many more are appearing all the time. Some of the new varieties are produced purely fortuitously by the random cross-pollination of nearby plants, but this doesn't lead to consistently reproduceable plants. If you want something consistent you have to rear it in controlled conditions, which will prevent the flowers of one variety being pollinated with another unless you want it to be.


Stephen tells me that the parents of his new chilli, which he has called the "Challock Chilli", are "Birds Eye Baby" and "Jalapeno".


Obviously, Stephen is not going to tell me too much about how he rears his chillis, (nor would I expect him to) but I'm sure he will be taking steps to look after it, with a view to increasing his stocks - possibly being able to sell seeds for it in due course. This year he has only very limited stock of this type, and they are available only to personal callers at the nursery (i.e. not by mail order).


I consider myself hugely privileged to have been asked to assist with trialling this new variety and I now have not one, but TWO of them to grow in my garden. I have naturally consented to observe very carefully how they perform, and report back. Right now they are just settling in and getting to know their neighbours (it's a pretty heavily-populated neighbourhood, if you know what I mean...), but early indications are good. Both plants look strong and healthy, and as I potted them up I saw that they had very strong root systems.


Thinking back to last October, my recollection (which may of course be totally false!) of the new type is of medium-sized fruits, with fairly thick flesh; a deep red - almost brownish - colour, and a very fruity flavour. To be honest I don't remember much about the level of heat it had, but I'll let you know in due course!


By the way, should you be interested in such things, please note that the forum called UK Veg Gardeners has a special interest group called "Chilli-lovers". If you are new to this fascinating hobby,  and want to find out more about it, we would love to have you join!


*******************************************************************************
P.S. Since I posted this, Stephen has sent me a photo of the Challock Chilli. It's a good-looking one!