Thursday, 20 February 2014

Fasciation

Fasciation is something I was only vaguely aware of until I read about it in a post written by fellow-blogger Sara at Hilwards, last December. When fasciation occurs in a plant, a stem which is normally roughly cylindrical becomes flattened and ribbon-like. I had noticed some time ago that I have a good example of this in my flowering cherry tree (Prunus Autumnalis "Subhirtella"). In a recent spell of sunshine, I decided to take a closer look:


The affected twig starts off with a 360-degree contortion reminiscent of a pig's tail:


Having finally decided the direction in which it wishes to grow, it then heads off in a pattern that sees it gradually transform from cylindrical to ribbon-like, and increasing in diameter:


Somehow the twig still manages to produce flower buds:


So far, the twig is about 2 feet long, but presumably it is continuing to grow. I wonder how wide it will get?


In order to take my photos without looking up into the sun I had to take the kitchen step-ladder outside. This enabled me to see aspects of the cherry tree that I don't normally see, like this tiny "moss garden" nestling in the crook of a branch:


I think this is amply demonstrates the idea that if you only look at something from a distance you usually see just one thing, but when you look closer you see lots of other things as well!

Wednesday, 19 February 2014

Pinching-out Sweet Peas

My two batches of Sweet Peas are coming on nicely - though perhaps a tad on the leggy side due to limited amounts of light being available. This is despite them living outside on the patio in one of the plastic mini-greenhouses.

This is the second batch. They are about 4 or 5 inches tall.


The first batch is (understandably) bigger, and I felt that they were ready for pinching-out. The books advise doing this when the plants have formed 3 to 4 pairs of leaves (which these have).


Now, not being an expert on such things, I have read-up about pinching-out. You do it in order to make the plants bushier, because when their main growing point is removed they put up sideshoots from lower down. Some plants do this naturally, like this one, which already has two stems:-


Others have to be persuaded. All you do is literally pinch-out the growing point with your finger and thumbnail. Pinch the main stem, not a leaf-stalk - like this:-


So there we are, let's see what they make of that...

By the way, I am quite relieved that my Sweet Peas survived the latest big storm last week. I had weighted-down their mini-greenhouse with copious quantities of bricks, but I was still worried. In the event, the greenhouse moved about a foot horizontally, but it didn't take off. Phew.

Tuesday, 18 February 2014

Re-potting Mint

Gosh, is it that time of year already? I re-pot my Mint every year to keep it vigorous. It is a plant that grows very rapidly and unless you confine it in pots it is very likely to take over your whole garden. Its productive time is during the Summer months, and by Autumn it dies down and hibernates for a while. Because of the huge amount of root growth it makes, a Mint plant is not going to be happy in a pot unless it is re-potted into fresh compost at intervals of at most a year.

This is what mine looked like until last weekend:


The Mint plant's roots tend to grow outwards, towards the edge of the pot. The older part of the plant, in the centre, becomes tough and woody.


This is my procedure for re-potting Mint.

Stage 1: Tip the plants out of their pots. You will see straight away the truth of what I was saying about the Mint producing lots of roots:


In this next close-up photo you can see how the horizontally-growing roots put up new shoots at the edge of the pot:


Stage 2: Using an old kitchen knife I cut some "chunks" [root cuttings] off the plant, each with a good amount of fat white root and preferably one or two new young shoots. I use perhaps 5% of the plant:


Stage 3: Half-fill the pots with fresh compost (I always add a layer of stones at the bottom, to aid drainage), and put in a couple of the chunks of plant:


Stage 4: Cover the root cuttings with another layer of compost, leaving any new shoots sticking up above the surface, and water-in:


That's it - job done!


The other 95% of the old plants is placed in a plastic sack for later disposal at the Council tip. Never put the old plants in your compost bin - they would simply take over. Of course, if you are really keen, you could pot-up dozens of little Mint plants into suitable containers and grow them on for selling at a Church Fete or something. The success rate for establishing Mint from root-cuttings is practically 100%, and lots of people would buy a decent young Mint plant for a £1. It's not for nothing that making money is called "minting"!

In a few weeks' time these new Mint plants of mine will be putting up strong new shoots and by about May I should be able to harvest from them. The re-potting task is a mucky one (especially on a cold day), but it is certainly worthwhile.

Monday, 17 February 2014

Chilli con Carne with cornbread topping

Chilli con Carne is one of our old perennials - a dish that appears on our menu again and again. It is nutritious, filling, tasty and warming, a winner in every respect. It is also a tolerant dish - one that requires no finnicky cooking techniques, keeps warm for ages without spoiling, warms-up readily the next day (great as a filling for jacket potatoes) and is a dish that almost everyone likes. What could be better?


When we make "chilli", we normally use minced beef, but I believe it is more authentic to use meat that is cut into pieces, so this time round I am using cubes of "stewing beef". I don't claim that my recipe is authentic, by the way, but I do guarantee that if you make it my way you will get a great-tasting dish!

A classic accompaniment for Chilli con Carne is cornbread (made with corn meal or polenta). My dish has a topping of cornbread, just like the layer of mashed potato on top of a Cottage Pie. If you want the recipe for my cornbread, you can find it here:- Cornbread recipe 


My not-so-secret ingredient is the Chipotle, a type of chilli that is not hot, but mellow and smoky. It adds a warm savouriness to any dish. Furthermore, it is authentically Mexican! It is a dried, smoked chilli and needs to be re-hydrated before using. I use about 4 or 5 of them for a dish of this size, soaking them in hot water for an hour or two beforehand.

Chilli con Carne with cornbread topping (serves 4)

Ingredients:
Approx 400g diced stewing beef
1 large onion, peeled and chopped
1 tin (400g) chopped tomatoes
1 tin (400g) red kidney beans
500ml beef stock
4 or 5 chipotle chillis (re-hydrated, soaking water retained)
2 cloves garlic, peeled and crushed
1 tsp dried Oregano
1 tsp hot chilli powder (NB: adjust according to taste and to strength of your chilli powder!)
1 large fresh chilli, de-seeded and chopped (optional)
Salt and pepper to taste
Approx 3 tbsp vegetable oil, for frying

Method:
Heat the oven to 150C
Using about 2 tbsp oil, brown the meat in a hot pan, then set aside temporarily on a plate
Use the remaining oil to cook the onion in the same pan, over a lower heat, ensuring it softens but doesn't go brown (approx 5 mins)
Add the garlic and cook for a further 2 minutes, stirring gently to ensure it doesn't scorch
Add all the remaining ingredients except half of the stock; mix thoroughly
Cover the pan and place in oven
Cook until the meat is very tender (approx 2 hours), stirring occasionally and adding more stock if the consistency is too dry
Remove pan from oven
Remove and discard the whole chipotles
Set the dish aside to cool


Approximately 45 minutes before serving time, prepare the cornbread topping (see recipe HERE )
[By this time the chilli beef should have cooled and become fairly firm.]


Pour the cornbread batter over the beef and distribute evenly - it will be quite thick and you probably won't be able to pour it.


Cook at 200C (Fan 180C) for approx 30 minutes - until a skewer inserted comes out clean.
By this time the beef should have warmed up again, but if you judge that it is not sufficiently hot before the cornbread begins to get too brown, cover it with a piece of kitchen foil for the last few minutes.


Serve, accompanied with salad or hot vegetables.(Green beans are particularly good with chilli, as is Guacamole.)


I also recommend a robust red wine, such as a Cabernet Sauvignon or a Shiraz - something that will not be overpowered by the spicy heat.

Note: I think I made the beef part of this dish too dry. It needed more moisture. I'll remember that next time.

*********************************************************************************
P.S. The leftovers were used (as suggested above) as a filling for some jacket potatoes:-


I'm putting this forward as my entry for this week's Harvest Monday over on Daphne's Dandelions on the strength of the beans, which were home-grown ones from the freezer. Other than a few herbs I have no harvests to report this week.

Sunday, 16 February 2014

Leaf Celery

I'm sure you are all familiar with Celery, and many of you will know Celeriac (aka Bulb Celery or Celery Root), but how many of you know Leaf Celery? Researching the subject on the internet I found this entry on the Seedaholics website, which tells you probably all you need to know about Leaf Celery!

Photo credit: www.seedaholic.com

Think "Tastes like celery, looks like Flat-leaf Parsley"...

To be honest, I was only vaguely aware of it until recently. As regular readers will know, I have recently written several times about the Mesclun I have been growing, and the fact that one of its elements is a Celery of some sort. Those little leaves are so strongly flavoured! One tiny leaf seems to have all the flavour of a huge stalk of Celery. It is because of this that I resolved to grow some myself for use as a salad ingredient.

The other day, when I was at the Hampshire Potato Day I approached one of the seed stalls asking for Celery seeds, and got talking with the stallholder. Once she knew why I wanted the seeds she advised me not to buy Celery or Celeriac, but to opt for Leaf Celery instead, which is what I did.


I must say I'm very pleased to have been able to buy a pack with LOADS of seeds in it for only £1.50! Following advice on the packet, I have kept the seeds in the fridge, fooling them into thinking they are experiencing a severe Winter! Hopefully this will make them all the more keen to germinate...

The seeds of Leaf Celery are very tiny, and having read that they need light to germinate, I used the sowing technique of scattering them on top of some moist compost, without covering them. I have put the seed-tray inside a plastic bag to increase humidity and it is now sitting under the lights in my Growlight House.

My plan is to use most of the plants as microgreens, but to let a few grow on so that I can transplant them outdoors when (if) the weather improves, with a view to establishing a self-seeding clump which will always be there to provide a few leaves when we need to add some oomph to a soup or stew.

I'll let you know how I get on, but don't hold your breath because even germination is said to take 2 - 3 weeks, and after that the plant "...grows somewhat slowly"!

**********************************************************************************
P.S. The new blue cast-iron saute pan had an outing on Valentine's Day. Jane made a Greek-style meal which included chicken breasts beaten out thin, marinated with lemon juice, garlic and herbs and then sauteed (of course!)


Jane said the pan was great because it was big enough to allow lots of room to manoeuvre, and the heat-retention properties of the cast-iron mean that the pan does not lose too much heat when the food goes into it.

Saturday, 15 February 2014

Cardamom curry

The other day I discovered a business called "Craving Curries", which specialises in providing the dry ingredients for a number of different curry-type dishes. They kindly offered me with a free sample, and I chose the Cardamom Curry kit.


The kit is presented in a bright red paper bag, inside which are the spices in little plastic bags. My kit had 3 bags, identified with the letters A, B and C. Spice Bag A contained the main spice element (in my case mostly Cardamom powder), Spice Bag B contained additional spices such as chilli, turmeric, coriander and pepper, and Spice Bag C rather superfluously contained salt! A recipe leaflet was also included.


These kits are evidently aimed at the person who wants to cook a curry from scratch, but doesn't have a cupboard full of spices. (Who is that person???). I have to point out that the kits only include spices and to make your dish you have to add all the other ingredients - in my case chicken, tinned tomatoes, yoghurt and cooking oil. At £4.49 each I think they are therefore a rather expensive way to make a curry! (Though of course if you had to buy all the spices separately the initial outlay would be a lot more.)

Anyway, I followed the instructions and made my curry...

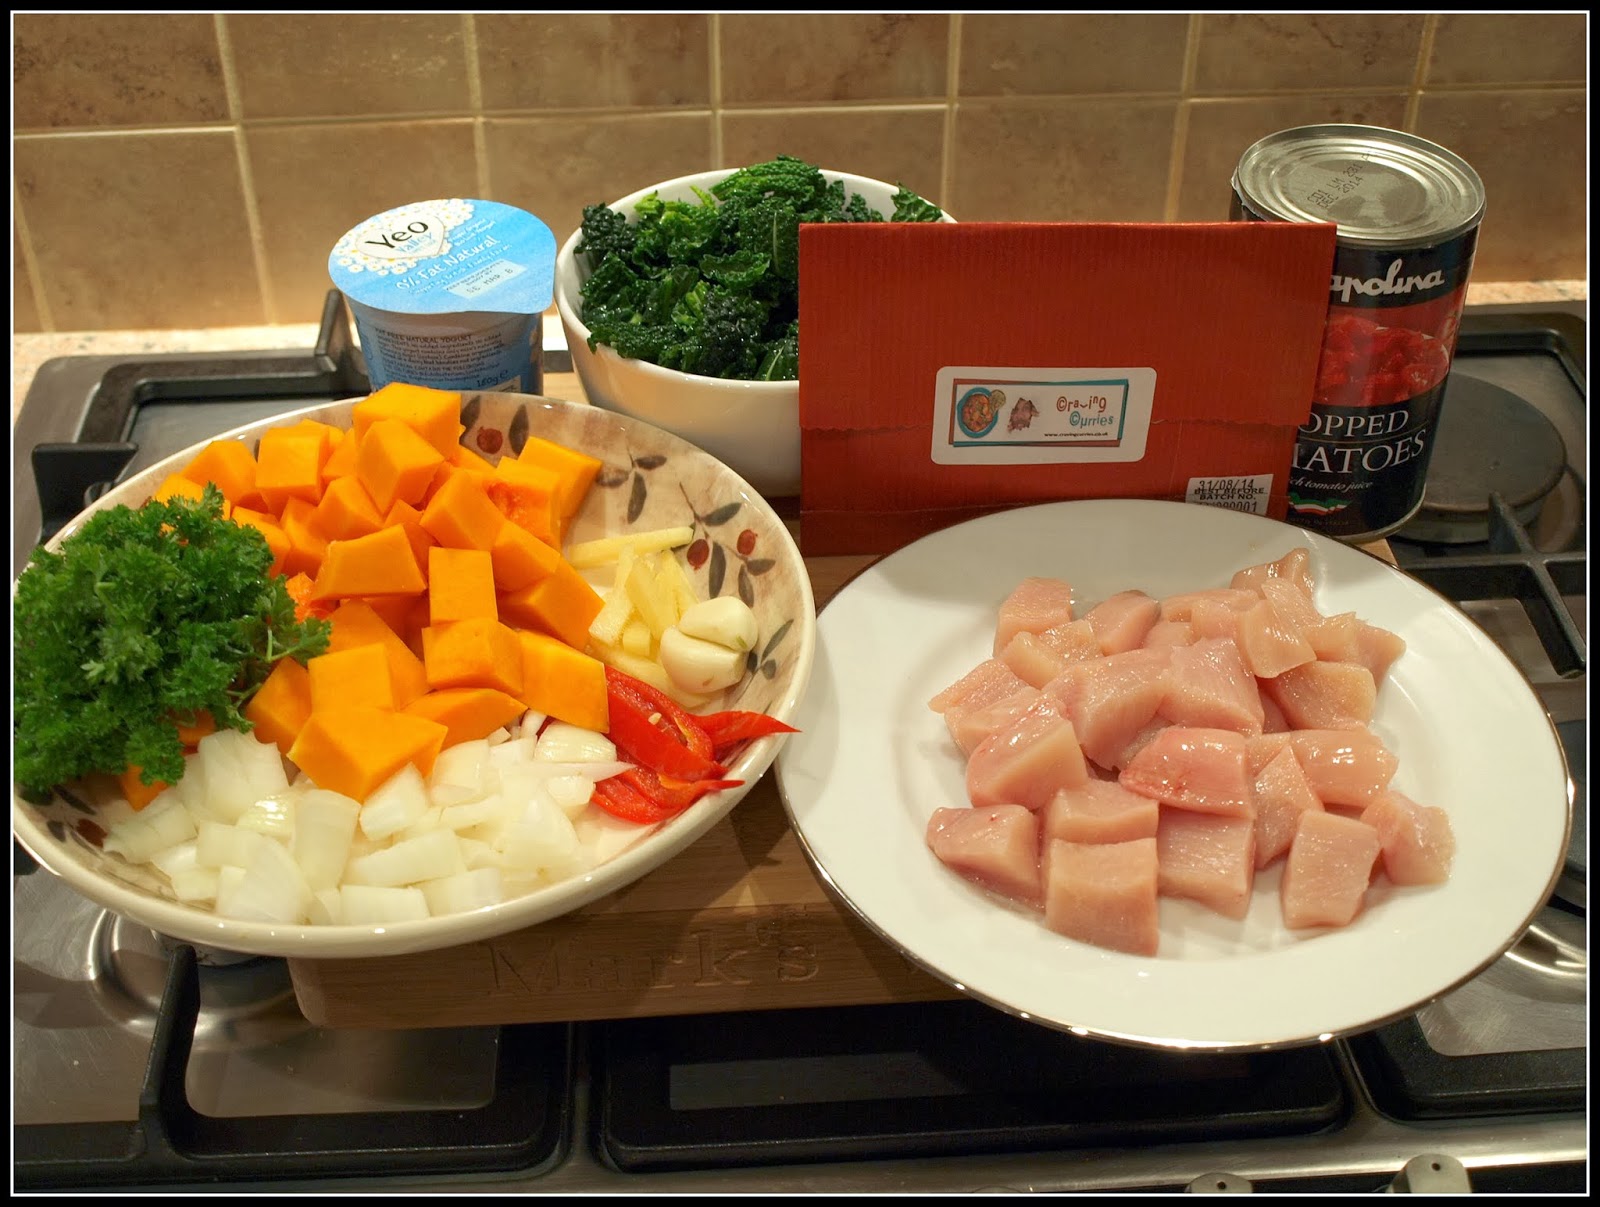
Here are my ingredients. Note that they include the things I needed for a supporting vegetable dish as well, and that I have not illustrated here the rice that went with it all. The Craving Curries element is in the red paper bag.

"Before"
I followed the instructions carefully, making Spice Bag A in to a paste and frying it in oil before adding the chicken and the contents of Spice Bag B. After another 10 minutes of sauteeing, in went the yoghurt and the tomatoes, and a little water. Then on with the lid, and simmer until done. I found that the moisture in the tomatoes would probably have been enough without the addition of the extra water. In fact, contrary to the instructions I removed the pan lid after a while in order to make the sauce reduce faster. Once reduced, the sauce with the added yoghurt was nicely creamy and very fragrant. Prior to serving I garnished the dish with chopped Parsley, because I am allergic to the Coriander which was recommended.

The finished dish just prior to serving

Here is the complete meal, including steamed rice and my vegetable dish:

The complete meal

My vegetable dish was Butternut Squash braised in coconut milk, with Cavolo Nero, flavoured with onions, garlic, ginger and chilli.

My vegetable dish
My verdict: the curry was nice. The spices were evidently fresh and the Cardamom flavour made a pleasant change from the usual Rogan Josh / Jalfrezi / Khorma mixtures.

However... I do not think the Craving Curries concept will have a very wide appeal. If you already have a cupboard full of spices then the kits are unlikely to be attractive, and if you don't, you would probably prefer a Take-Away anyway!

I also felt that the recipe leaflet left a bit to be desired. For instance, it gave little indication of how long the total cooking time would be - only this rather vague advice: "...cover the pan and simmer until the meat is tender and the sauce has reduced and thickened - be patient as this can take time." Now, a competent cook will know roughly how long it will take to cook some diced chicken breast, but if I were a novice I think I would appreciate something a bit more meaningful, e.g. "cook for approx 20 - 25 minutes, or until the chicken is tender."

The provision of the sachet of salt is also surely unncecessary - especially since you have to provide all the other ingredients except the spices!

In terms of value for money, I think the kits at £4.49 are over-priced, especially since you have to pay for postage too. Maybe £2.50 would be fairer. For comparison, the equivalent kits from the widely-available Geeta's range are £1.49 each.

Overall: OK. Produced a tasty curry, but the kits are just not my kind of thing.


Friday, 14 February 2014

Sunshine after the storm

I feel almost guilty that we have not been the victim of a flood, because so many other people have! On Wednesday on our way home we crossed the River Thames at Marlow, where the flooding is really bad, so we were able to see for ourselves what the situation is like. Fortunately we got home before the worst of the storm hit, and it was a rough night, though I don't think we had 100 mph winds like some places did. Yesterday I was out in the garden taking a close look.

There is not a lot growing in the garden at present, so damage was insignificant, but I did have to re-tie a couple of the PSB plants and hammer their stakes in a bit further. They had been loosened by the constant buffetting of the wind.

PSB "Early Purple Sprouting"

The PSB plants lost a couple of leaves, but otherwise they look OK (though too small for my liking!). The shoots are forming nicely:

PSB "Red Arrow"

I'm just a bit worried by one thing. Take a closer look at the stem of the leaf seen in the photo above at bottom left:


What has caused that, I wonder? At first I though it was chafing, caused by rubbing against something, but it doesn't appear to be near anything, and in any case that wouldn't explain the little black pinhead dots surrounding the "abrasion". Is this a sign of disease, perhaps? I'll be keeping an eye on the plants to see if any more of these appear.

Elsewhere, the plants seemed to be enjoying the brief lull between storms, and basking in a bit of unaccustomed sunshine:

Crocuses


Crocus

The rhubarb has made another couple of leaves since I last looked. Just need them to get bigger now...

Rhubarb "Timperley Early"

The weather forecast is for another storm to cross the British Isles today, so it sounds unlikley that I will be doing any gardening!

*************************************************************************************

P.S. Since I wrote this, the wind and rain have indeed returned. I bet sales of polytunnels are booming this year!