Monday, 7 March 2011

Chits with everything

At this time of year gardeners all over the UK will be chitting their seed potatoes. Experienced gardeners won't need any explanation of this, but for the benefit of less-experienced folk, this is what chitting is about...


Seed potatoes (traditionally purchased by gardeners in late Winter / early Spring) are placed somewhere cool but frost-free, in natural light, to allow them to produce chits or embryonic shoots, prior to planting a few weeks later. Opinions vary on whether this is necessary. You can just bung the seed potatoes straight in the ground (or pots) and they may do well, but chitting them seems to work better. My Dad always chitted his potatoes, and I intend to keep on chitting mine!

Many people chit their potatoes in used egg-boxes or something similar, because this enables the potatoes to be kept upright. Personally, I don't bother with this - I just prop them up against the side of some seed trays (though I made an exception for the sake of the camera, as you will see later!). Most of the chits will appear from one end of the seed potato (gardeners call it the "Rose" end), and when you plant the potato, the rose end should be uppermost to make it easy for the shoots to reach up to the surface of the soil. The chits should be compact and preferably dark-coloured, rather than spindly and anaemic. I reckon these ones look good:-


Here's a chit in close-up. [The photo is a bit fuzzy I'm afraid, because this is not a genuine Macro, but an "ordinary" photo that has been zoomed.]


And another one...


Doesn't this look like some ghastly alien monster with two hairy ears???

This year I am growing seven varieties of potato. They are all ones for harvesting as "Baby New Potatoes". First Earlies Casablanca, Lady Christl, Rocket, and Swift, Second Earlies Orla and Vivaldi, and  Maincrop Pink Fir Apple. First Earlies mature approximately 10 weeks after planting, Second Earlies about 13 weeks, and Maincrops anything from 15 weeks upwards.

Since my plot is very small I don't feel it justifiable to grow potatoes in one of the raised beds, so I grow them in pots instead. This year I am being sensible and not trying to have too many. I will plant only 21 tubers, each of which will hopefully produce enough new potatoes for a 2-person helping. Mine came in 5-tuber nets from Thompson & Morgan (why don't more suppliers offer potatoes in small quantities, I ask?), but I am sharing them 60:40 with my daughter Emma. Here she is teaching her daughter Lara how to plant potatoes:

Hope you remembered to drill some drainage holes in those buckets, Emma!


I think that maybe Lara has now added the word "chit" to her growing vocabulary...

Pink Fir Apple (PFA) is a favourite of mine, on account of its marvellous flavour and texture, despite being a challenge in the kitchen due to its sometimes very irregular shape. The PFA seed potatoes are much slower to chit than the others. Only one of mine has produced any chits so far, and only tiny ones at that. I'm sure they will be OK in the end though, all in their own good time.

You might just be able to see one tiny chit at the top of the PFA at right of picture

 Most of my seed potatoes could probably be planted any time now, but I'm going to delay a bit, to lessen the problems of protecting them from frost. Maybe towards the end of March??

Sunday, 6 March 2011

Compost re-distributed

Last weekend I used the matured compost from one of my bins, which had been "cooking" for the best part of a year. I distributed much of it over some of my raised beds, to act as a soil-improver. Well the local bird population think this was great. They have been scratching around in it MOST enthusiastically. Apart from the worms that I have already shown you pictures of, I presume the compost is packed full of other little creatures, aka bird-food....

The trouble is, all this scratching around has meant that a lot of  the compost has migrated onto the pathways. Here's the evidence:-


The worst culprits are the Blackbirds. From where I sit in our Living Room I can watch them at it. Scratch, Scratch, Peck.   Scratch, Scratch, Peck.   Scratch, Scratch, Peck... and so on, ad infinitum.

So what am I going to do about it? Well, nothing just yet. I know I could sweep up all the compost from the paths and put it back on the beds, but it would only get kicked out again tomorrow. I think I will wait until the birds have eaten their fill and then clean up in a few days' time. In a way I suppose it is all my own fault anyway. If I had had the energy last weekend, I could have dug the compost into the beds rather than just scattering it on top. But it's easy to be wise in retrospect!


See the bed on the left? This is the bed containing my Sprouting Broccoli. Here's a closer look at some of it.


I reckon these might be ready to start cropping in just a few days. Recipe suggestions are always welcome folks...

Saturday, 5 March 2011

Mum's cookbook

Some of you will have seen my post about the old slides I have been converting to digital files. Well, inspired by this I have dug out from the loft another family treasure - my Mum's old cookbook.


It is basically a scrapbook, containing a collection of recipes evidently compiled over a number of years, spanning the 1950s and 1960s. Unfortunately none of the recipes are dated, despite the fact that many of them were cut out from magazines.


Some of them are hand-written - sometimes on loose scraps of paper. This recipe for Tomato Chutney, written on the back of the cover of a pad of Basildon Bond writing-paper has obviously been well used...


A high proportion of the recipes are for sweet things, like cakes, pastries and desserts - presumably a rebound from the austere days of rationing after the Second World War.


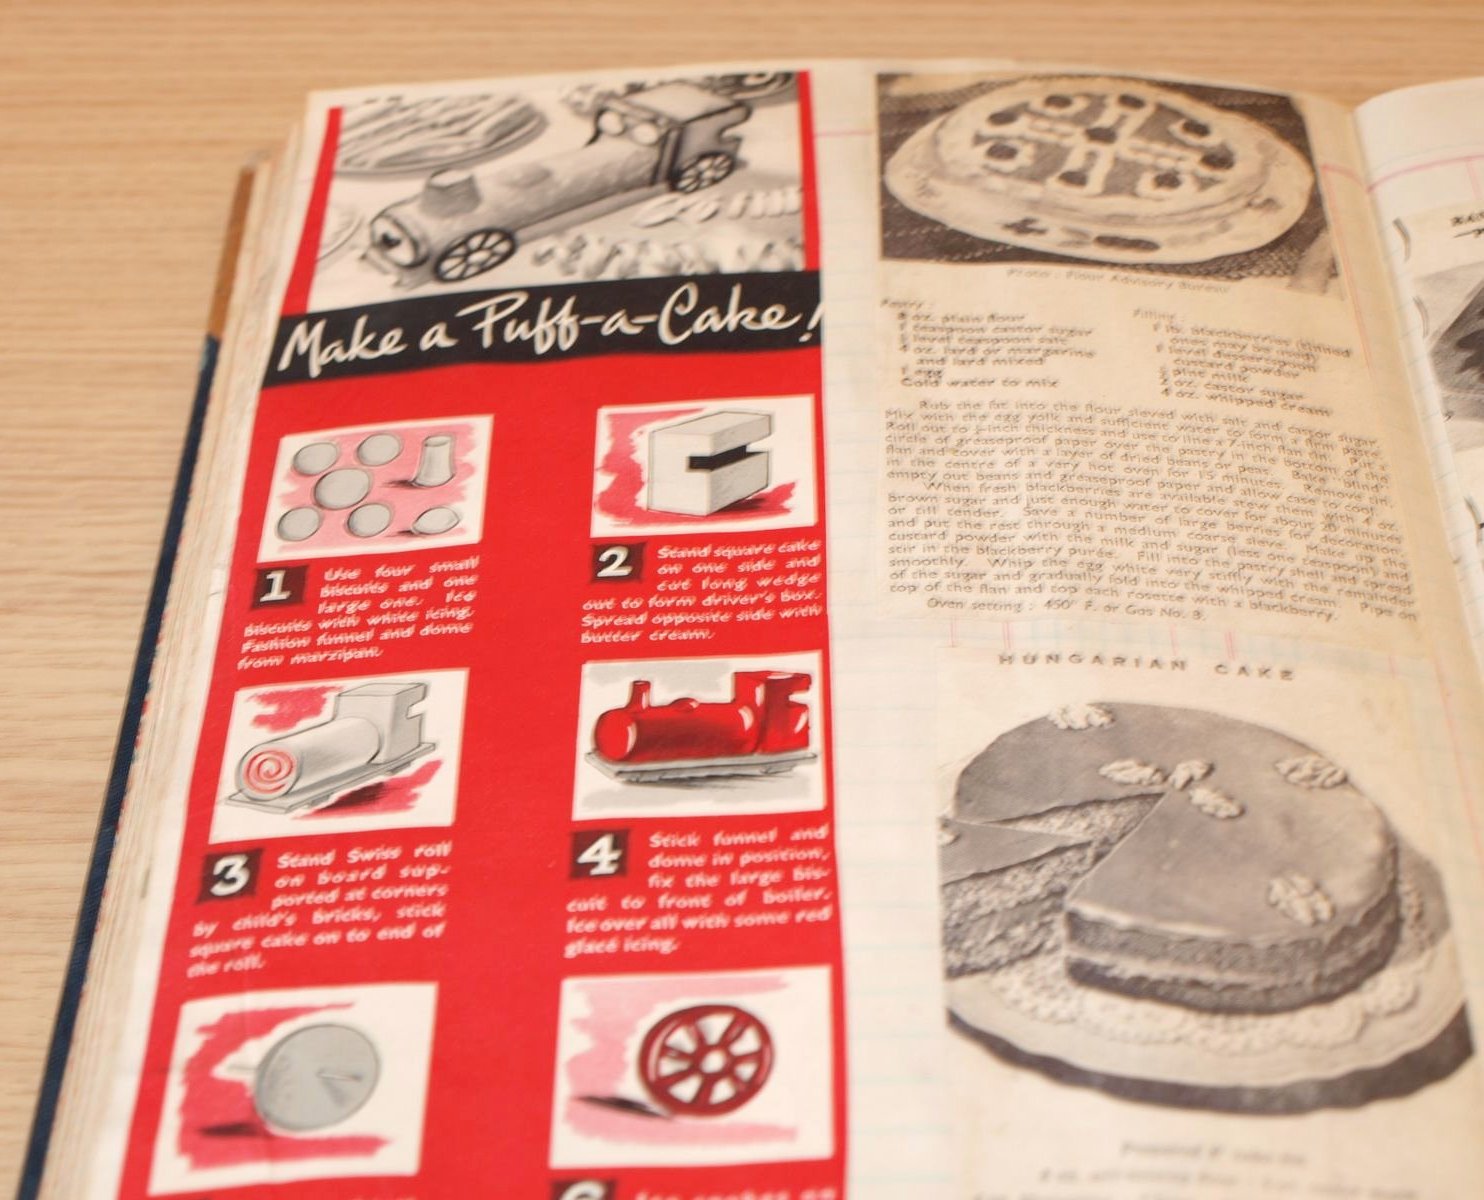
Some of my earliest memories involve garishly-coloured Birthday cakes in complicated designs. Here's a recipe for a one in the shape of a steam locomotive (aka Puff-a-train)


The 1950s idea of what constitutes Good Taste is a bit different to that of 2011...


Inside the book was tucked a sheaf of leaflets, like this one from the Stork Margarine company


This company was evidently responsible for this recipe for a ship-shaped cake  - The S.S.Stork...


I would have preferred this one with aeroplanes all over it - Wow, even Spitfires and Lancasters!


Many of the recipes are still perfectly viable today, so to honour my Mum's memory, Jane used this recipe from one of the leaflets


to make this delicious Steamed Syrup pudding


It was wonderful, served with some fresh custard! Some things are just timeless...

Friday, 4 March 2011

The new cloches

On Sunday I did a couple of unglamorous, but necessary tasks. I assembled my new cloches, and I pruned the Dogwoods.

I recently ordered some "Longrow Super Cloches", from Garden Oasis. They were on a "buy two, get one free" offer, and cost me just under £70, including delivery. Of course they were delivered flat-packed, so I did have the chore of assembling them. Fortunately this was a job I could do in the garage whilst sheltering from the rain.

Despite a rather unhelpful set of instructions (the pictures were too small and not sufficiently detailed), it didn't take me very long - maybe a quarter of an hour for each one. I have to say that I was unimpressed with the quality of the product. I had expected something a bit more substantial. The end pieces in particular seem exceptionally flimsy, and I think they will be the weak point of the cloches. Anyway, they are done now, so we'll see how we go. I have placed them roughly over one of the raised beds in order to assist the soil to warm up and dry out.

I need a fourth one now, don't I?

For those of you who are interested in such things, may I draw your attention to the construction of the raised beds in the picture above - you can clearly see my way of keeping the corners tight - angle brackets. These things cost me just 80p each at the Building Supplies shop, and I think they are well worth the money.

My other main job on Sunday was pruning the Dogwood plants. There's not much I can say about that really! I know my Dogwood collection is not huge, but these plants do produce a lot of branches and if you are to prune them carefully this can be a long job. Hopefully it will be worth the effort though. I wanted to get the job done before the plants produced a lot of new growth, so that all their energy could go into branches that are NOT going to be trimmed off. Here's a view of the end result...

Thursday, 3 March 2011

Home-made Compost

Today I finally got round to a task that I usually do during the Christmas holidays - distributing my compost. This year the severe weather at Christmas-time meant that it wasn't really practical to do the job at that point, and somehow it slipped further than it should have done down the list of Things To Do.

One of my compost bins is close to the back door, and into this one go all the vegetable scraps from the kitchen, as well as leaves, trimmings, weeds, etc from the garden. The bin fills up only slowly, because the worms do such a good job of digesting the material and converting it into useable compost, but about once a year I "harvest" the good stuff at the bottom of the bin. This is not easy, but this is how I do it:


I remove the plastic bin, lifting it off vertically, and fork the top 50% or so of the pile  - which is only partially decomposed - onto an old Army groundsheet laid out nearby. I then shovel the bottom 50% or so (in instalments) into my trusty Trug-Tub and distribute it around the garden, mostly onto the raised beds where I grow my veg. When all the good material is gone, I replace the bin and put back into it the other not-yet-decomposed stuff.

You can see in the picture above that this time there was about a two-foot depth of good crumbly compost.
It was enough for a layer about 2 inches thick on four of my six raised beds, but I was also able to fill my new cucumber-bin.


Actually I put quite a lot of the partially-decomposed material into the cucumber bin too, to act as food for the fifty million or so worms that went in there! Even the bottom layer of compost was heavily populated with worms, and the top layer was absolutely HEAVING with them. In this picture you can see lots of little wriggly white baby worms.


The compost in this bin will now have plenty of opportunity to settle, because I won't be planting out any cucumbers for about two months yet.

I have another compost bin on the go too, which will probably be ready for use in a couple of months, so I plan to put the compost from that one into the raised bed where I will grow my climbing beans. At present this bed is occupied by the Sprouting Broccoli. As soon as the broccoli is finished (probably about the end of April), I will remove the plants and quickly whack in a good dose of  "bulky organic matter" before planting the beans (which I will grow initially in small pots, under cover). With such a small plot at my disposal I have to think very carefully about what goes where, and when. My raised bed system allows me to run a reasonably efficient 5-year crop-rotation regime, but all the beds need a boost of good compost when they can get it, to keep their energy levels up. [One of the six beds is devoted to Asparagus now, so is excluded from the rotation plan.]

Wednesday, 2 March 2011

Bursting buds

Some of my fruit trees are beginning to burst into life. That makes it sound as if I have loads of trees, doesn't it? Actually I have the grand total of three and they are only little Minarettes! This one is the "Conference" pear:


This one is the "Scrumptious" apple:


And the "Victoria" plum hasn't stirred into life just yet, so I haven't photographed it.

This year I have gone to a lot of trouble to ensure that there is NO WAY that my fruit trees can complain of lack of nourishment. I have fed them over the last few weeks with pelleted chicken manure, Vitax slow-release plant food (the one specially for fruit trees), and then today some Growmore liquid general fertiliser. I will also be making a big effort to ensure that the trees get plenty of water in a couple of months' time when the fruit begins to set. I want the trees to look their best for the camera, and produce a crop that I can proudly write about. See what blogging has done to me!

This one is not a fruit tree, but it still looks like a bursting bud. Rhubarb...


Regrettably I don't have a lot of rhubarb either - just two crowns. I had three but one died before it got established. They are not in an ideal situation either, being sited in a place where the soil is fairly poor and which doesn't get enough sun, but I was determined to squeeze some in somewhere. I pride myself in having a very productive plot, even though it is pretty small, so sometimes I have perhaps been a bit over-ambitious.

Last week we had some lovely rhubarb, which we bought at a greengrocer's shop in that village New Alresford that I wrote about. It was massive. Just three stalks weighed-in at a total of 750g. Jane roasted it in the oven, covered with foil, with ginger, orange juice and orange zest. It was delicious - especially with some fresh custard. This will be a hard act to follow...

Tuesday, 1 March 2011

Daffodils and Irises

Several fellow Bloggers have pointed out that today (1st March) is St.David's day. He is the patron saint of Wales, and his emblem is officially the leek, but this has in recent times been supplemented by the daffodil, and since I don't have any leeks to show you, my post is about daffodils.

Some of you will remember that a few weeks ago I wrote about using some of the prunings from a Philadelphus tree to make a little "Anti-Postman Barrier" to dissuade visitors from treading on the bulbs around the base of my Crab Apple tree...

Well, it certainly paid off, and the Daffodil flowers are just opening now. I wanted to show them to you before the last of the Irises are finished, because I think the yellow and blue colour combination is really striking. You can see the Anti-Postman barrier still in place, but I think it has done its job and I shall now remove it. I don't think anyone could miss that colourful display of bulbs, and surely even a tradesman wouldn't be heartless enough to trample them down deliberately!


 For some strange reason the bulbs closest to the driveway are a few days behind the ones nearer the house. They are all the same variety (Tête-à-Tête), but the driveway ones are older. Maybe they have lost a bit of their vigour over the years. They have been there several years - maybe as many as 10?


I now have the grand total of EIGHT Irises blooming simultaneously. Woohoo!

Not wanting to be outdone, the Cherry tree is also showing off its own ornamental girdle of supporting Crocus flowers around its gnarled old trunk:


We haven't had a lot of sunshine recently, so the Crocuses have remained steadfastly closed!