Thursday, 29 November 2018

The season of crusts and jellies - Part 1: Jellies

No, this post has nothing to do with food (well, only very indirectly). It is about fungi. [NB: I don't claim to be an expert on this incredibly complex subject, and my post is written purely from the Enthusiastic Amateur point of view.]


Most of the edible fungi are ones which appear in the Summer and early Autumn. Not all of course, because during Winter you still get the Velvet Shanks (Flammulina velutipes), Blewits (Lepista spp), Wood Ears (Auricularia auricula-judae) and even the occasional Oyster Mushrooms (Pleurotus ostreatus). That said, however, Winter is usually the season for the fungi that are more for looking than for cooking - like the crusts and jellies. Incidentally, my definition of what constitutes a jelly fungus is definitely a subjective one!

Over the last couple of weeks I have been lucky enough to find quite a wide variety of jelly fungi. Perhaps the most striking is the Yellow Brain fungus, Tremella mesenterica, sometimes called Witches' Butter.

Tremella mesenterica growing on living Gorse

Although it grows on the (usually dead) wood of a variety of broadleaf trees, his highly visible fungus has a particular liking for Gorse bushes, either living or dead.

Tremella mesenterica growing on fallen (dead) Gorse wood

Tremella mesenterica growing on fallen Beech wood

To be pedantic, the Tremella does not really grow on the wood, but it feeds on another fungus by which that wood has been attacked. This is usually Peniophora incarnata, commonly known as the Rosy Crust fungus.

The best time to see Yellow Brain is in the Winter, particularly if the weather is wet. In dry weather the fungus shrinks and darkens, making it more difficult to spot. This photo taken a few weeks ago shows one which is very orange in colour, so it was probably just beginning to re-hydrate after the long dry Summer.


My next subject is Tremella foliacea, Leafy Brain. [I note however that if you want to be really accurate the name Tremalla foliacea is supposedly only used for the species that grows on conifer wood, whereas Tremella frondosa is the one that grows on broadleaf wood. Most people lump them together!]


The example I saw this week was growing on a small Oak tree, so I suppose it is technically Tremella frondosa.


About this time last year I saw a much bigger example in the woods just half a mile from our house, and this one was also growing on a young Oak. It was a multi-coloured specimen, which I think indicates growth in a number of different stages.


I believe that the lighter part is probably the youngest part, because other, very dark, specimens I have seen have appeared to be very old and ragged.


Like its cousin Tremella mesenterica, Tremella foliacea grows on wood that has been attacked by another fungus, in this case the wood-rotting fungus Stereum hirsutum, commonly referred to by the lovely name Hairy Curtain Crust.

I'll move now to the fungus called Ascocoryne sarcoides, commonly known as Purple Jellydisc. As I have found recently, this fungus goes through a number of stages during its lifecycle and can look quite different at each stage. I'm not going to attempt to describe these in scientific terms, because I am assuming that my readers are probably (like me) just enthusiastic amateurs, so let me just say that when young this fungus often looks slimy and ill-defined. In one of the Facebook Groups to which I belong this is often referred to as "Mouse Guts Fungus"!


Later on it seems to get firmer and it develops into more structured "blobs".


You'll notice that in the preceding two photos the fungus has a definite purple colour. When it grows older it turns more of a red colour, and tends to form flatter fruitbodies, like this:


In the past this has confused me. I had thought that this was a different fungus but friends in my Facebook Groups have confirmed that it's the same one.

Ascocoryne sarcoides grows predominantly on well-rotted broadleaf wood. I see it most often on Birch - though that is probably because there are loads of Birch trees in my area.

Ascocoryne sarcoides on very old Birch wood.

This post could go on for a long time, but today I want to cover only one more fungus, which is Bulgaria inquinans - Black Bulgar - aka Bachelor's Buttons or Poor Man's Liquorice.


This fungus usually forms fairly regular fruitbodies, which are broadly circular and cup-shaped, with flat upper surfaces. These upper surfaces (the fertile surfaces) are black and shiny, whereas the sides are usually brown and felty.


As with most fungi of this nature, Black Bulgar is softer and more jelly-like in wet weather and it is firmer when the weather is dry. Its preferred habitat is fallen broadleaf wood, such as this pile of Beech logs.


Look closely and you'll see that the logs are covered with hundreds of little black blobs...


There are literally dozens of other jelly fungi that I could describe, and I have been fortunate enough to find plenty of them, but I want to stop here. If you are interested to learn more I strongly recommend having a look at the relevant part of the First Nature website. In a future post I will cover some of the so-called Crust fungi.

Sunday, 25 November 2018

Butternut Squash with Feta and Pomegranate

Have you still got some Butternut Squashes left? If you have, here's a recipe that you might like to try. It makes a nice change from soups and purees! Actually, I'm fairly sure it would work well with pretty much any type of squash, not only the Butternut.


This is a recipe from Sabrina Ghayour's book "Persiana", with a few adaptations. For instance I have used Mint instead of Dill and Coriander, both of which I detest. Incidentally, if you haven't got this book I strongly recommend buying a copy. It contains loads of really great recipes, many of which are incredibly easy to make. Lots of them are suitable for vegetarians too.


For copyright reasons I won't spell out the complete recipe, but will give you the gist of it.

The first thing to do is make a pesto. Not the usual type, with Basil and pine-nuts. This one has Pistachio nuts, Parmesan cheese, herbs (I used Parsley and Mint, but Sabrina uses Parsley, Dill and Coriander), lemon juice, olive oil, salt and chilli oil. The recipe calls for 3 tablespoons of chilli oil, but it doesn't give any indication of its strength. I suspect that a fairly mild version is intended. I used a dessertspoon of Portuguese Piri-Piri oil and it seemed just right.


The pesto needs to have a texture I would describe as "gloopy" (not a technical term!) - in other words it should be spoonable but not too runny. You can make it in advance and keep it in the fridge until you need it, but I made mine about 6 hours in advance and kept it at room temperature so that it would remain fairly loose.

At some suitable point there is more prep that can be done in advance if you want. Remove and set aside the seeds from a pomegranate. Crumble a block of feta cheese - cover it with clingfilm, but let it get to room temperature so that it will not be too hard. Then of course you can prepare the main part of the dish - the Butternut squash. Cut it into quarters (lengthways) and remove the seeds. Again, set it aside until you are ready to start cooking.

The aim with the Butternut is to cook it until the flesh is soft and just slightly charred at the edges, so you will have to aim off for this and begin cooking at the appropriate time. Of course the cooking time depends to a certain extent on the size of the squash too. Sabrina Ghayour reckons that a medium-sized Butternut will serve 4 as a side-dish or starter, and 2 as a main dish, and her recipe suggests cooking it at 200C (180C for a fan oven) for 45 - 50 minutes. You will know when the squash is cooked because a pointed knife will slide easily into the flesh. By the way, the quartered squash is liberally anointed with olive oil before cooking - and I like to add a few grinds of fresh black pepper too.


When the squash is cooked, slide it onto a suitable serving-dish and then add the other elements. Using a spoon, smear the pesto over the pieces of squash and then sprinkle the feta and pomegranate seeds on top of it. Hopefully the "gloopy" pesto will help the other bits to stay put and not fall off! Finally, you can add a few sprigs of a suitable herb as a garnish. I used Parsley.


To accompany this dish I served Middle Eastern style flatbreads and a nice salad (which included homegrown tomatoes, despite it being late November).


Apart from being easy to do, this dish is healthy and nutritious as well as being a very pleasing combination of sweet and savoury tastes and lots of different textures. The soft creamy squash and salty feta, the acid tang of the pesto with its little buzz of chilli, and the sweet firm nuggets of pomegranate all come together perfectly.

Tuesday, 13 November 2018

Top 10 easy-to-identify edible mushrooms

As most of my readers will know by now, I have become very interested in fungi - learning about them, photographing them, and (when appropriate) eating them. As my knowledge of fungi has increased, so also has my repertoire of good ones to eat. Before I go any further though, let me just say that I am firmly of the opinion that you should never eat a mushroom unless you are 100% sure of its identity. 95% certainty is not good enough, and could make you seriously ill, or in the most extreme case, kill you! Having said that, there are loads of really nice mushrooms out there waiting to be collected, and I urge you to make use of this fabulous source of delicious FREE food.

Any novice fungi-forager would be well advised to start with mushrooms that are easy to identify and hard to confuse with other types. For this reason Number One on my list is Hydnum repandum, the Hedgehog Mushroom. It gets its name from the spines which line the underside of its cap. They are soft, by the way, not hard and sharp like real Hedgehog spines.


This is probably my favourite mushroom of all. It has a lovely sweet flavour and good firm texture.


Number Two on my list is Boletus edulis - the Cep or Penny Bun. This was the first wild mushroom type I ate and is still the one I most frequently search for. It is very recognisable too, on account of the distinctive net-like pattern (called "reticulation") on its stipe (stem). The brown "bun-shaped" cap almost always has a white margin too.


Number Three is Cantharellus cibarius - the Chanterelle (aka Girolle). This one is another very sweet-tasting and sweet-smelling one, almost fruity. Some people say that it smells like apricots.Key features are the egg-yolk yellow colour and the complex branching veins on the undersides of the caps. Once seen, never forgotten!


Number Four is Leccinum versipelle, the Orange Birch Bolete. The orange-brown cap and shaggy stem of this mushroom could only really be confused with its close relative the Orange Oak Bolete, Leccinum aurantiacum, which is equally good, but is mycorrhizal with a different type of tree. When cut, the bottom of the stem of this mushroom turns blue-green, darkening to nearly black - a good identifying feature. Don't be put off by this, because the colour fades again, and it is a really nice firm mushroom, almost nutty.


Number Five is Macrolepiota procera - the Parasol Mushroom. This very dramatic mushroom could perhaps be confused with its relative the Shaggy Parasol - Chlorophyllum rhacodes - but there are easy ways to tell them apart if you are in the know. The stipe of the "real" Parasol has a very characteristic snakeskin patterning, which the Shaggy one doesn't. Furthermore, the Shaggy Parasol turns a reddish colour when cut, which the real one doesn't. This mushroom is definitely best eaten young, preferably at the so-called Drumstick stage, before the cap opens out, and the flesh is firmer.

Parasol mushroom at the Drumstick stage, clearly showing the snakeskin pattern on the stipe

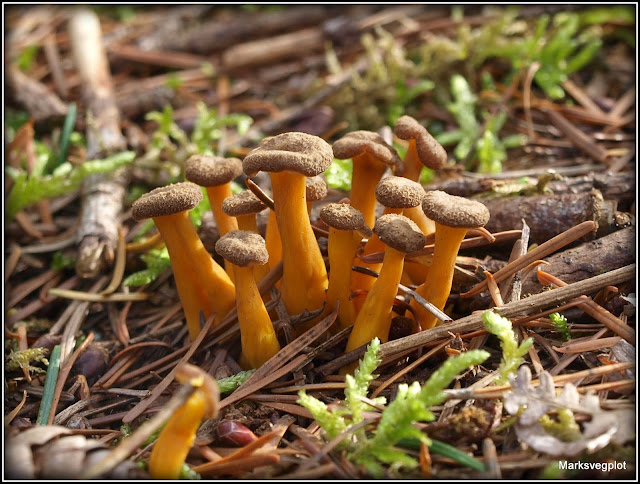
Number Six is Craterellus tubaeformis, the Winter Chanterelle. This is another hard-to-mistake one, with its distinctive yellow legs! The frilly-edged cap is brown on top, but the underside is grey in all but very immature specimens. I love the flavour of this mushroom, but for me its main attraction is that once you find one, you usually find hundreds more!


Number Seven on my list is Imleria badia, the Bay Bolete. Another good one for retaining its texture when cooked. This one does have a few lookalikes, but it also has some clear distinguishing features, such as the (usually bent) striated stipe that looks almost like grainy wood and always has a lighter-coloured yellowish section at the top, where it joins the cap. The cap colour is a good identifier too - a really deep walnut brown.

Bay Bolete - upper surface

Bay Bolete, lower surface

Number Eight on my list is Sparassis crispa, the Wood Cauliflower. Bearing a strong resemblance to its vegetable namesake, this fungus is pretty hard to mis-identify. When we ate this (as a baked Wood Cauliflower Cheese) we found the taste pleasant enough, but the texture was a bit rubbery. I have subsequently heard that this can be avoided by deep-frying the mushroom, perhaps in a tempura batter.


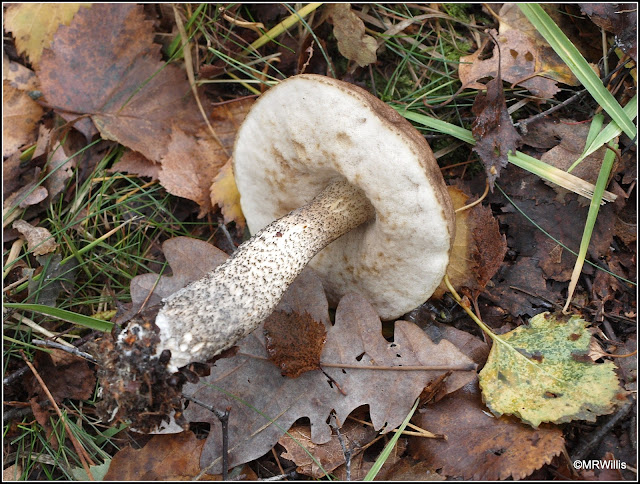
Number Nine is Leccinum Scabrum, the Brown Birch Bolete. This one also was one of the first wild mushrooms I ate. It is not hard to find in the area where I live, because we have lots of Birch woods - its favourite habitat. This mushroom is superficially similar to the Cep (in that it is a Bolete of sorts, which means it has pores instead of gills), but it is significantly different too. The most obvious difference is the scabrous (scabby) stipe or stem, which is very different to the reticulated (and usually much fatter) stipe of the Cep. Its pores are white, often with little brown dots, as seen below.


Number Ten is Laetiporus sulphureus - Chicken Of The Woods. I'm not sure why this one is last, because it is a really spectacular fungus, but it's probably because we have only eaten it once (simply because I have only found it in edible condition once!). Again, this dramatic, colourful multi-tiered fungus is hard to mistake for anything else, once you have seen on "in the flesh". We really enjoyed eating it too. I'm not sure it tasted anything like chicken, but its texture was much more meaty than any other mushroom I have ever eaten.


So that's my Top Ten, all ones that are good to eat and easy enough to identify.

Just for the record, (mainly for my own benefit) I also want to mention some other types of mushroom that we have eaten since I started foraging.

One of the first mushrooms to appear in the Spring is Calocybe gambosa - St.George's Mushroom, so called because it usually pops up round about 26th April - St.George's Day. It is easily identified by its mealy scent, but unfortunately in terms of looks it could be confused with other less attractive fungi. Nevertheless I have learned how to reliably recognise this one and we have eaten it several times.

Then there is Lepista nuda, the Wood Blewit. A very good-looking mushroom, with lilac gills and a tan cap-surface, this one is nevertheless the only one we have eaten that made Jane and me feel unwell. It was nothing extreme - just a bit of general nausea - and I have subsequently understood that the mushroom should have been cooked for longer - but still, I'm wary of this one!

This year, for the first time we tried Neoboletus luridiformis, the Scarletina Bolete. It has rather alarming colouring - red and yellow, with flesh that instantly turns bright dark blue when cut! This is also one that needs long cooking to remove its toxins. In its favour though, it is very meaty and retains its texture well when cooked. However it's not one that we were particularly enamoured with.

Finally a mention for Grifola frondosa - Hen Of The Woods. I have only ever found one in good condition, and it was just before we went away on holiday, so I only cooked one little piece to try it, and dried the rest for later use. The bit I tried was very tasty, though it did produce a few gurgles in the tummy! Friends have told me that it is prone to promoting severe wind, so maybe this is one to be omitted from your cooking if you are hosting a Dinner Party...


Incidentally, if you want to learn more about these or any other fungi, I recommend having a look at a website called First Nature, which has a really good section on fungi. It is the resource I use most often in my identifications, and I have found it to be immensely valuable.


Friday, 9 November 2018

It's not over yet

Well, the clocks have gone back, meaning that gardening activity has to cease earlier in the day; we have had a couple of frosty nights; we've had winds strong enough to shake the leaves off most of the trees. You might think that it's time to shut up shop on the veg-patch, but fortunately it isn't - the plot continues to provide good things to eat, repaying all the effort that went into it earlier in the year. And if you plan ahead and plant the right things, you can be harvesting all year round.


I did a stint up at my Courtmoor Avenue plot yesterday, mostly tidying up, but with some harvesting too.

The frosts had finally killed off the tomatoes, so I took them down. The foliage was blackened and limp, and although there were still some fruits on the plants they were beyond redemption. I brought some home, but they quickly went soft and brown in the warmth of the house. Still, they had done well, and I was pleased with the result.


I pulled up all the rest of my "Boltardy" beetroot. There were 14 that were big enough to be worth using, but the really tiny ones were consigned to the compost.


As you probably noticed in the first photo, my harvest also included two cabbages, one green "January King" and one purple "Red Drumhead", neither of them huge, but definitely of a viable size.


Finally, I dug a few of the "Thrupp" Parsnips, admittedly mainly to see what they were like! It's really hard to judge Parsnips from just what you can see above ground. The few that I took were all very long and skinny. I'm not sure if this variety is always like this, or whether they grew abnormally long in their search for moisture during the long hot Summer.


I had a good look at the Brussels Sprout plants, and removed a lot of the dead lower leaves in order to improve ventilation. This is particularly important in view of the fact (which I have owned-up to in an earlier post) that my plants are far too close together. Some of them don't look too bad though, and I reckon there should be something worth harvesting before very long:


Looking ahead, I still haven't made up my mind whether I'm going to keep on looking after this plot after the end of the year, when the current crops come to an end. Whilst I enjoy having the extra space, it has proved hard work for me maintaining it in addition to my own home garden. The yields, whilst welcome, have not been huge, so the results-to-effort ratio has not been brilliant. Maybe this is because of the abnormal weather though: the plants had to put most of their energy into just surviving. In fact, I suppose I should be pleased that I have managed to harvest as much as I have. For the time being though, I'll just enjoy what I've got...


Tuesday, 6 November 2018

In the spotlight: the Bay Bolete

In the world of mushroom-foraging, the Cep / Penny Bun seems to get most of the attention, but there is another mushroom that is much less well-known, and equally good to eat. It is Imleria badia, the Bay Bolete.


The Bay Bolete gets its name not from a type of coastal geographical feature, but from its colour - as in the deep-brown colour of a Bay horse. The cap of a good specimen is glossy, almost like polished walnut wood.


The cap surface of a young Bay Bolete is quite different. It has a rougher, downy texture, rather like suede leather.


At this young stage, the stem appears very thick in relation to the cap size, but as the mushroom grows the stem tends to remain roughly the same thickness, whilst the cap diameter grows a lot, typically reaching 12 - 15cm.

Being a Bolete, this type of mushroom has pores, not gills, underneath the cap. When fresh, the angular pores of a Bay Bolete are a bright pale yellow colour, though this fades as the mushroom matures. A distinguishing feature of the Bay Bolete, which helps considerably with identification, is that the pores turn blue when bruised. Look at the blue thumb-print in this next photo:


Unfortunately the Bay Bolete is not the only mushroom whose pores bruise blue, so you can't assume that if blue bruising takes place it is a Bay. You have to consider other factors as well.

For instance, the stem or stipe. This is usually about 10 - 15cm tall in a mature specimen, and about 2 - 3cm in diameter. Very often the stipe is bent, particularly near the ground. It is normally lighter in colour than the cap, and it has a streaked, grainy appearance - almost as if it were made of wood. It has neither a ring nor a skirt.


The Bay Bolete is very good to eat. This is quite a substantial mushroom, with firm flesh, so only half a dozen or so specimens are needed for a meal for two. When I harvest them, I discard the stems, which are fibrous at best and often infested with maggots. The flesh of the caps is initially white, but discolours to a dirty blue/black when cut, and then after a while it changes back to white! It is much more robust than many other wild mushrooms and retains its shape and texture very well when cooked.


The best place to find Bay Boletes is in coniferous woodland, but I find plenty of them in our local woods, which are mostly mixed, including predominantly Pine, Birch and Oak. Happily, the Bay Bolete tends to keep coming even after the Ceps have finished. I would say that the height of its season is early Autumn - say the middle of October.

Lookalikes: The Bay Bolete has a superficial resemblance to the Brown Birch Bolete, because that also has a brown cap, but they are soon differentiated by examining the stipes and pores. Brown Birch Boletes have scabrous (scabby) grey stipes and creamy-white pores, as seen here:


Mistaking a Brown Birch Bolete for a Bay Bolete is not going to do you any harm, because they are both certainly edible, but it might be a disappointment. The Brown Birch Bolete is (in my opinion) nowhere near as good, especially since its flesh is quite soft at best, and is inclined to be rather slimy if not cooked skilfully!

Friday, 2 November 2018

Chanterelles

One of the most delicious and sought-after mushrooms is Cantharellus cibarius - the Chanterelle, also known as the Girolle.


Once you've seen a Chanterelle "in the flesh" it's hard to confuse it with anything else. For a start, its bright egg-yolk yellow colour makes it really stand out amongst the browns of the fallen leaves on the forest floor.


A Chanterelle is normally funnel-shaped, with a wide, irregularly-shaped, wavy-edged cap approximately 5 - 7 centimetres in diameter, though they do sometimes get bigger. The stipes / stems are short - typically 2 -5cms.


The most obvious identification feature is the fact that the underside of the cap is covered with multi-branched raised "veins", superficially similar to gills. These veins are strongly decurrent - in other words they go a fair way down the stem / stipe as well. When cut open, the stipe is white inside, not yellow.


Chanterelles have quite a strong sweet smell - almost floral - some people say it's like the smell of apricots.

Unfortunately I have never found Chanterelles en masse. I know of a few spots in the area where I live that I can expect to find them in the early Autumn, but the yield from each patch is seldom more than half a dozen. Nevertheless, even 5 or 6 good Chanterelles are enough for a sauce, or to make a tasty addition to a pasta dish.


As I have mentioned before, much of the woodland around my hometown Fleet is dominated by Birch, so it won't surprise you to hear that the places where I have found Chanterelles are mostly in Birch woodland, but they also occur under Pine trees.


As it happens, Cantharellus cibarius is only one of several types of Chanterelle. Another one which is allegedly widespread in the UK (especially at this time of year) is Cantharellus tubaeformis - the Winter Chanterelle, sometimes known as the Yellowleg Chanterelle. I think you can see why...


I only know of one place in my vicinity where these grow, but last year it yielded a good crop. I got several basketsful like this!


This mushroom is in my opinion under-rated. It may not be as succulent as the "true" Chanterelle (for instance its stems can be a bit tough), but it has a much stronger taste - which fortunately is very pleasant. Incidentally, Winter Chanterelles can be dried very successfully in a dehydrator or cool oven, and when dry will keep for ages. Dried mushrooms are a very convenient ingredient, because then can be reconstituted quickly and easily by immersing them in hot water. And of course they are there when you need them, and you don't have to rely on being able to forage them.

The typical habitat of the Winter Chanterelle is a well-drained slope, under conifer trees and amongst bracken and brambles.


Their irregular brown caps make them hard to spot!


I want to show you a photo of young Winter Chanterelles, because usually you only see ones of mature specimens, and they are quite different.


Aren't they cute?

While I'm on the subject of Chanterelles, I also want to cover the False Chanterelle, Hygrophoropsis aurantiaca. As a reasonably experienced fungi enthusiast, I am now aware that this is VERY different to the "real" Chanterelle, but I still remember when I first found them and thought I had struck lucky, only to be disappointed when I carried out my ID tests!


The orangey-apricot colour of the False Chanterelle is very different to the lemony egg-yolk yellow of the real one. It has real, straight, crowded gills, unlike the wriggly multi-branched veins of Cantharellus cibarius. Furthermore, the stipe (stem) is broadly concolorous with the cap, whereas the stipe of the true Chanterelle is much paler than its cap as well as being white on the inside. Lastly, the cap of the False Chanterelle tends to be much less wavy, and it has a distinctly inrolled margin (seen very clearly in the photo above).


The False Chanterelle is not poisonous as such - some say eating it causes hallucinations - but it is generally treated as inedible, and it is in no way comparable with the True Chanterelle, which is a pity since it is a lot more common! 2018 has seen the False Chanterelle appear in huge numbers around my part of the world, and I know from interaction with other fungi enthusiasts that it has been the same throughout most of the UK.

I hope you have enjoyed this post, and that it will help you to distinguish confidently between the three types I have described.