Friday, 7 February 2014

Gardening advice for Beginners - Part 3

Since I have had several positive comments about my earlier blogposts of this type, I thought it might be appropriate to offer some more tips for the less experienced gardener.

Lara learning about chillis - August 2010

Last time I wrote about crop-protection equipment, and avoiding the temptation to sow seeds too early in the year. My opening gambit this time is:

1. Less is sometimes more. By this I mean, don't try to cram too much into your growing space. In my early years of gardening I was definitely guilty of this. There are just so many nice types of fruit and veg around, and I wanted to grow them ALL!  I didn't believe the advice given in gardening books - "allow 36 inches between plants and 45 inches between rows" - Oh yeah? That would mean I could grow about six plants in my entire garden. So I sowed my seeds far too thickly and planted my plants far too close together, and of course the result was (in retrospect) predictable. I got small, thin, weak plants and poor yields. This is the point at which many beginners give up, by the way. Over the years I have learned that it makes more sense to give your plants enough space for their roots to expand, and for their leaves to gather as much light as they need. When you buy a tray of 12 Runner Bean plants labelled "Suitable for container growing" it doesn't necessarily mean that you should put them all in ONE container (especially if it is only a 12-inch pot)!

An example of over-crowding- photo from 2010

2. Talking of pots and containers.... It is normally the case that bigger pots are better than small ones. Not always true I grant you (e.g. you don't need a half-barrel to grow some Crocuses), but generally so. Large pots dry out less rapidly and therefore need less watering. They also give your plants more room to spread out (see point 1 above). Small pots are fine for seedlings and plants that are being grown-on indoors or in a greenhouse for subesquent planting outside, but if a plant outgrows its pot it will not be able to keep expanding and you will end up with a spindly or stunted plant. For instance, I germinate my tomato and chilli seeds indoors, in artificial heat and latterly in my recently-acquired Growlight House, but then I transplant them twice more, into progressively bigger pots before they go into their final growing-containers. It sounds a bit of a fiddle, but it's definitely worthwhile.


3. Some other pieces of advice about pots / containers: think how heavy they will be when full. It may not be easy / possible to move them, so if you anticipate the need to bring them under cover (e.g. a citrus fruit tree being brought indoors for the Winter), give some thought to how you will do this. You can for instance buy little platforms on castor-wheels for this purpose. Also, to minimise water loss after watering, you might want to equip your pots with pot-saucers, like this:


4. Think about where to site the very necessary but less picturesque elements of your plot / garden, for instance your shed or tool-locker and your compost bins and bonfire site. The best thing to do is to site them in the place which is least good for plants to grow in, so that you are not using valuable growing-space. BUT, before you do that, have a think about how far you will have to walk each time you want to fetch a different tool from your shed, and each time you want to put some weeds in your compost-bin. It soon adds up! Of course, the value of gardening as an exercise-providing hobby may mean that you want to maximise the walking-distances... I have 3 compost bins. One is very close to the back door of the house, so handy for all those kitchen scraps. The other two are in a dry corner shaded by a huge conifer tree in next-door's garden  - a place where nothing much will grow.

Compost bins and "insect hotel"

5. Consider buying plants rather than growing from seed. I know that growing from seed may sound like the best option (you get more plants from a smaller financial investment), but raising good plants from seed can be quite tricky unless you know what you're doing. Also, you may only want a small quantity of plants, so it might be best to buy half-a-dozen healthy "plug plants" or even some fully-grown ones (especially if you want flowers), rather than getting a little sachet with literally hundreds of seeds in it. The benefit of buying the plant rather than the seed is that the plantsman / supplier does much of the difficult work for you, and you get the plant all ready to go into your garden just when you need it (of course in this respect you don't need to plan so far ahead either).

Hellebores, bought as plug-plants

6. When buying plants from a Garden Centre or Nursery, select specimens that have the potential for division or easy propagation. If you look carefully you sometimes find the odd pot which has two plants in it instead of one, or 15 seedlings instead of 12. When buying perennials I always look to see whether the plant could easily be split. For instance this Echinacea that I bought last Autumn:

A minute later I had TWO plants

Well, there are some thoughts for you to mull over. Let me emphasise again that all the views expressed in this post (and indeed all others on my blog) are my own opinions, and I fully accept that they may not coincide with the views of other people. There's no such thing as the "correct" way of gardening; there's only what works for you and what doesn't.

P.S. You might also like to read this post I did some while ago, about Sowing Seeds Indoors

Thursday, 6 February 2014

Lifting Parsnips

Now that I am beginning to seriously contemplate preparing the garden for sowing and planting (maybe Broad Beans will go in next month...?) I decided that the last of the Parsnips ought to be lifted. I wasn't sure how many were left, because the foliage had all died down. I should have been disciplined and put in a stick or something to mark where I had got to along the row when lifting them, but I didn't, so it was a case of scrabbling around in the soil until I found the crown of one and then starting to dig. In a big allotment bed this wouldn't be an issue, I would have used a big fork and levered them out easily, but in a small raised bed you need to be careful not to disturb other plants - like my nearby chicories.

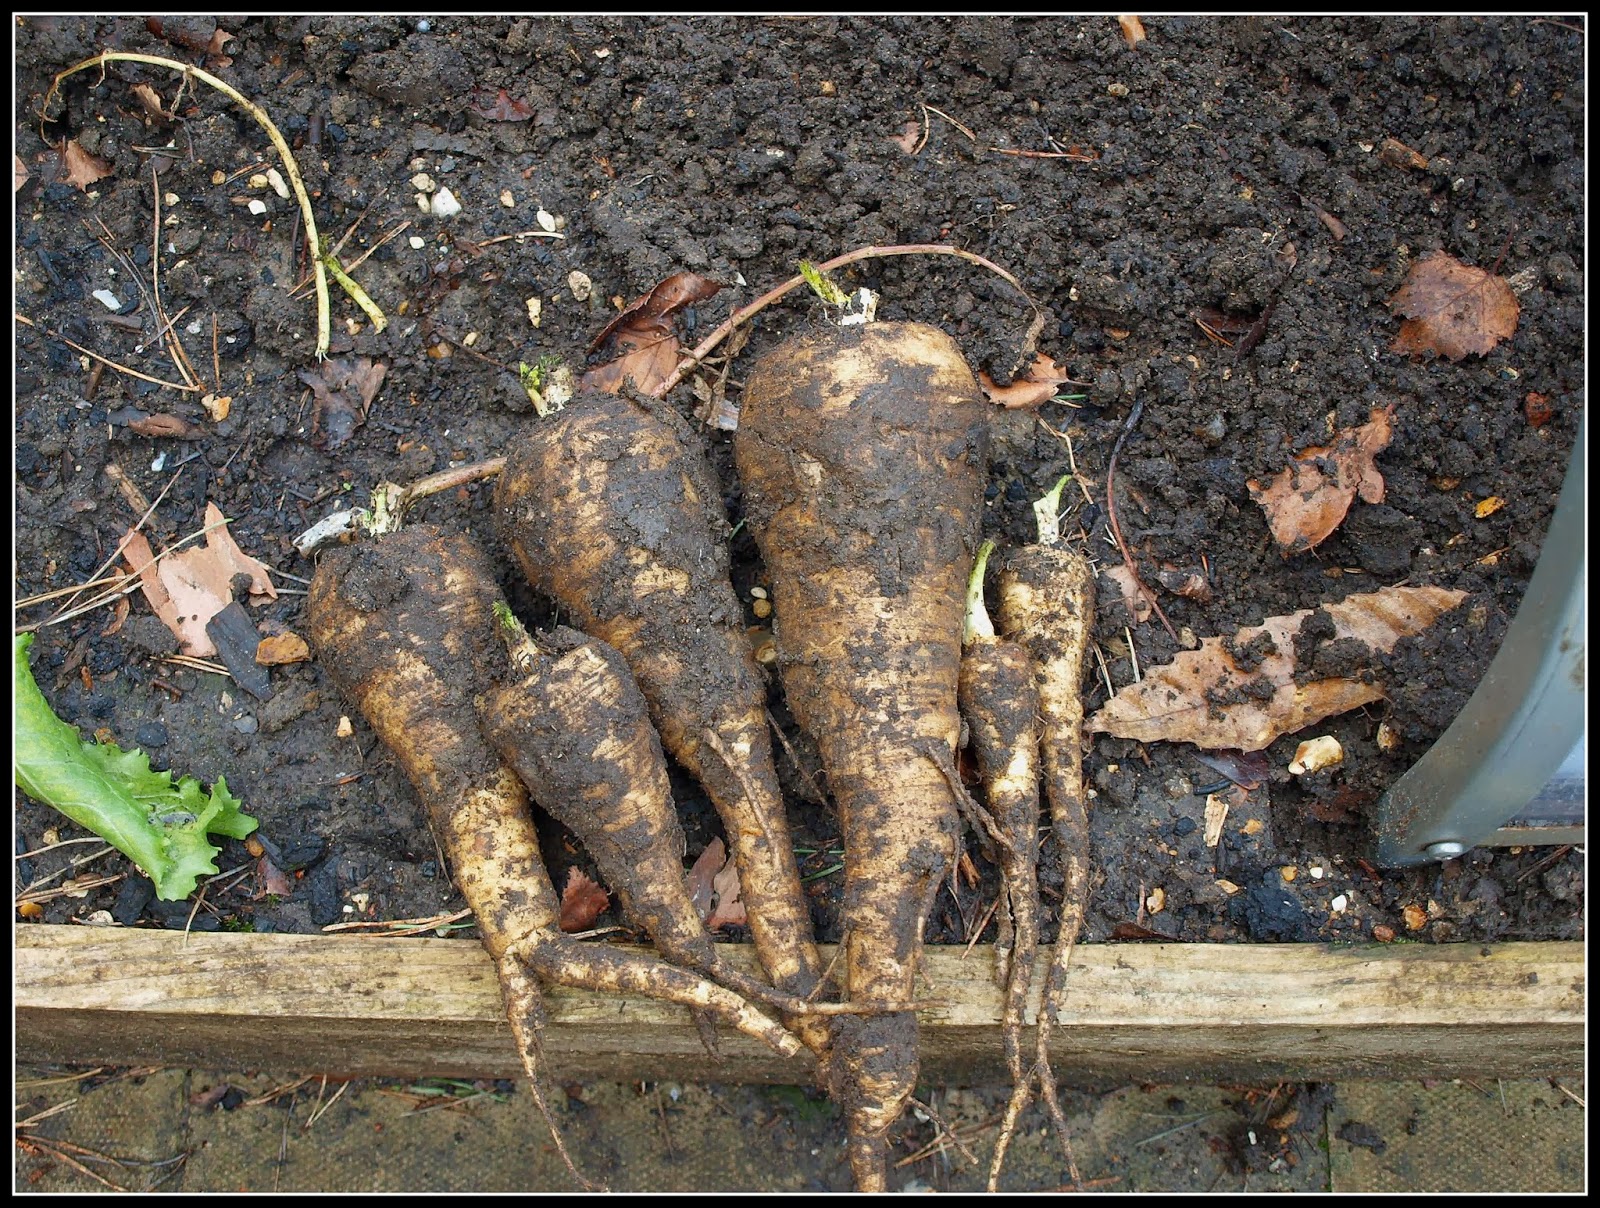
In the end I found six Parsnips, if you discount the couple of really minuscule ones that went straight in the compost-bin:


As you can see, they varied in size a lot. Two of them are borderline cases - hardly big enough to be worth using, though they WILL get used in our household! The biggest one weighed 314 grams, and the whole batch together was 733 grams. That's easily enough for two 2-person servings.

They look better when they are washed:


Of course, I'm showing them off to their best advantage there, but I have to admit that the big one got damaged during lifting. Turn it over and you see this:


Not a pretty sight! I accidentally jabbed my trowel into it, creating a deep cut. Rats! It would be the best one, wouldn't it?

Anyway, all is not lost, most of the Parsnip will be useable as long as we use it straight away. With a cut like this it would soon go bad if you tried to keep it. That photo also shows that the Parsnips have a mild case of the Canker disease, which gives them the appearance of being rusty. This is normal. Most Parsnips get it to some degree or other, unless you take special care with them because you are growing them for exhibition purposes (and even then, I don't know what that "special care" involves!). Unless the Canker is particularly severe I don't worry about it, as it is only skin-deep and is removed when peeling prior to cooking. 

Jane and I both love Parsnips, but we do not have a big repertoire of recipes that use them. Most often we eat them just plain-roasted with a bit of oil or PAM, and I can only think of another couple of dishes involving Parsnips that qualify as old favourites, namely Curried Parsnip soup and Sausages with Puy lentils and Parsnips. (Oh, and now Parsnip chips cooked in the Acti-Fry machine). They are not as versatile as Carrots, are they?

Wednesday, 5 February 2014

Plans for the Woodblocx raised bed

My big Woodblocx raised bed is currently lying empty, awaiting its turn in the limelight:


Last year it played host to bush tomatoes (3 plants of "Maskotka") and cocktail cucumbers (3 each of "Iznik F1" and "Melen F1"):


This year I am planning to use it for growing root crops - carrots, parsnips and beetroot.

I am currently contemplating various options for protecting this bed with netting / mesh / fleece in order to minimise damage from insect pests and marauding animals such as foxes and cats. It will probably involve something along these lines:-


I have a number of flexible plastic rods each 1.2 metres long. Simply pushed into the soil close to the edges these will be fine on their own in the early stages, but as the crops underneath them grow I will be able to "raise the roof" by slotting them into some aluminium tubes from my Build-a-Ball set, which are conveniently just the right diameter. Even better, I have several different lengths of aluminium tube, so I should be able to get just the right height. I need to buy some mesh now, and I have my eye on a product called "Enviromesh" which seems to be widely available. Any recommendations for where to buy it, folks?

I have only ever used anti-insect mesh once before, and I found that the crops beneath it didn't do very well. I don't think they got enough light or moisture. Maybe this was because I didn't choose the right grade of mesh? This time I had better be very careful I think. Do any of you have any advice to offer on this matter? 

Tuesday, 4 February 2014

Making the most of the sunshine

The weather over the weekend was amazingly good - sunshine and blue sky for most of Saturday and Sunday. Good gardening weather! I took the opportunity to do a number of little tasks in the garden.

Task number 1 was re-potting the Strawberries into black plastic storage-crates, four plants to each crate. Naturally I made sure they had fresh compost and a handful of general-pupose fertiliser to give them a good start.


Some of them are bigger than others, because these are my original 4 plants (bought in Summer 2012) and two generations of their progeny. The Alpine Strawberries that I grew from seed have been planted into a border. I can't yet see them as a serious cropping plant, because the yield was so very tiny. The others though are now under the protection of a couple of the plastic mini-greenhouses, in which the crates fit very neatly:

Notice the bricks weighing-down the greenhouses to stop them being blown away.

The little pots in the black tray on the top shelf are full of Broad Beans that are just germinating:


Up till now I have had those BBs in the garage where it is warmer than outdoors, but not too warm. The garage is part of the main structure of our house, not detached, and it is a very useful asset. Apart from germinating seeds, I also use it for chitting potatoes and storing wine!

Once the Strawberries had been put to bed, I had a go at pruning the Rosemary bushes which had been invading one of the raised beds. This is what they looked like a few days ago:


And this is afterwards:


That's better, isn't it? I cut off huge quantities of Rosemary twigs / branches, but the bushes are still fairly big, and I'm sure they will soon fill out again.

Just to make sure that I'm never short of Rosemary, I pushed a few twigs into the soil near the fence, where some of them are bound to take root.


I also temporarily removed the cloches covering some of my Chicory plants, and gave the soil a bit of a fork over before adding a liberal sprinkling of "Growmore" multi-purpose fertiliser, which will hopefully give them a boost. The protection of the cloches is largely beneficial, but there are some disadvantages too. For instance, the micro-climate underneath them is very different to the conditions outside - drier and slightly warmer - so you do need to remove the cloches occasionally to water the plants. The surface of the soil was green with algal growth and needed to be turned over. 

The trouble with gardening is that the more you do, the more you see that needs doing. As I worked I was conscious of the deep shadows cast by my huge Bay tree and remembered that this is the time of year when I usually prune off the top couple of feet. Oh, and the Mint needs dividing and re-potting; and the Lavender cuttings I took in the Autumn are covered in fresh growth and ought to be potted-up; and... and... and... 

Monday, 3 February 2014

Lamb Tagine with cous-cous

A "Tagine" is one of these:


It is a type of cooking-vessel originally used by the Berber people of Morocco. It has given its name to a style of cooking which uses this type of dish - in much the same way as the word "Casserole" literally means a type of cooking-pot but has come to mean a type of slow-cooked stew. The Tagine is designed specifically to re-cycle the moisture in the cooking liquid: as the vapour rises to the top of the conical lid it condenses and drips back into the bottom of the wide shallow bowl.

This time I decided to make a lamb tagine, though sometimes we have a meat-free version with loads of different vegetables. My next photo shows the main ingredients. The lamb is fillet of neck, nicely marbled with fat which melts during the cooking process and makes the meat much more tender. The chief spices are the fragrant ones - cinnamon, cloves, and coriander - all in powdered form today.


To give the dish a very North African feel I also used some Ras el Hanout (a typically Moroccan spice mix), and some Harissa (a fiery chilli-based puree, very much the same texture as tomato puree, and sold the same way too, in a tube).


The ingredients of the Ras el Hanout are listed as Black Pepper, Coriander, Ginger, Paprika, Allspice, Cardamom, Mace, Nutmeg, Turmeric, Cayenne, Cloves and Rose Petals (1%).  The name "Ras el Hanout" means literally "Head of the Shop", which implies that the shopkeeper has put together a mix of his top (best) ingredients. I'm sure there are lots of different variants of this, with each shopkeeper insisting that his own mix is the best!

I cut the meat into small cubes and put it in the fridge to marinate for about 8 hours in a mixture of the spices moistened with a little olive oil and augmented by some crushed garlic. This part of the procedure is not absolutely vital, but I think it gives the meat a much greater depth of flavour than if you cooked it without marinating it first.

Now an admission: I had never cooked in a tagine before. Jane has though, so I was as usual able to get some "consultancy"! As my culinary experience grows, I am becoming more confident and more adventurous with my cooking, so I try to rely less on Jane's superior expertise. Well, anyway, the key decision was how long to cook the meat for. If this was an ordinary lamb casserole I would have no problem with it, but using the tagine for the first time entailed a bit of the old "trial and error" technique.

I browned the meat in the usual way (the smell of the spices was amazing!), temporarily removed the meat from the pan while I sweated-down some chopped onion, then returned the meat to the pan and added a tin of tomatoes and some stock. At this stage you could add some dried fruit if you like - maybe some prunes, raisins, apricots or dates - I didn't though because I wanted to keep it simple. Many North African dishes aim to balance spiciness against sweetness, so adding fruit to them is very common. Next, I turned down the heat to a slow simmer, put the lid on the dish and left it to do its thing...

Meat, onions, tomatoes - before addition of stock

In view of the way the tagine dish is intended to work (see above), I felt it necessary to avoid removing the lid too often, which would disperse the steam, but I still had to check every now and then that the meat was cooking OK and not drying out. I think the knack is probably to allow a lot more time than you might at first think necessary, and cook the dish long and slow. In Morocco tagines are traditionally cooked over charcoal (which is not exactly famous for its ability to heat up or cool down quickly!), so I imagine it takes a fair few attempts to judge this bit accurately.

After adding the stock
 
As it happens, the meat definitely did NOT dry out - on the contrary I think I added too much liquid. Once the lid was on and the tagine was simmering, a bit of the gravy did bubble out onto the cooker top. Next time I will only add a very small quantity of stock. It all made a lovely gravy though!

To accompany the tagine, I made some cous-cous using some home-made chicken stock, and added to it a handful of chopped fresh (homegrown!) Parsley, some Raisins and some Pistachio nuts.


 I also made two different salads. One of them was sliced red onions softened in red wine vinegar (garnished with more Parsley):


The other was red Gem Lettuce with (homegrown) Mesclun:


That Mesclun grown in the Growlight House has been really worthwhile. We have had three 2-person servings from it already, and that is from only a half-sized seed-tray! 

By the way, have you noticed that I used appropriate dishes for my salads? The one with the onions in it is made in Tunisia (though we bought it in San Francisco!), and the one with the red lettuce on comes (I think) from Algeria. Fiona and Juan bought it for us in their local market in France.

After two hours of slow simmering, this is what the tagine looked like (Notice that the level of liquid has not reduced much):


Lots of lovely tomatoey gravy, sweet and fragrant, but not spicy hot at all (maybe I should have put in some more Harissa?).

Here it is with the cous-cous to mop up that gravy...


So that's one more culinary box ticked, so to speak.

*********************************************************************************
On the strength of the homegrown Mesclun and Parsley in my meal, I'm putting this forward for "Harvest Monday" over on Daphne's Dandelions, since I reckon that most people who are interested in growing fruit and veg are also interested in cooking and eating! :-)

Actually, yesterday I did pick another Curly Endive and one "Sugar Loaf" Chicory, but I have written about these things so often recently, I thought you would be bored of them.


Sunday, 2 February 2014

Feb One means Jan is gone!

Thank goodness January has finished - the wettest January since 1910. I wonder what February has in store for us... Its first day was not at all bad, and we had blue sky and sunshine for most of the day. Of course I only know that in retrospect. I was out in the garden with the camera shortly after sunrise in order to make the most of what I expected to be a very brief window of opportunity.

In the weak Winter sunshine the plot looked very stark, and the dominant theme seemed to be plastic. Plastic cloches in various forms - long ones, round ones, tall ones, tiny ones:


And plastic greenhouses, plastic compost bins, plastic tables. Where would we be without plastic???


At least the shed is wooden, not plastic! Oh, and the raised beds...


The plastic is actually doing sterling service, protecting my plants from the wind and rain while giving them the benefit of what little light is available. This greenhouse is hosting Sweet Peas (top shelf) and Hellebores (bottom shelf). [Notice the SIX bricks weighting it down]


This one hosts the two pots of peas - the ones that had originally been sown for peashoot-production. The peas are getting quite big now. I think I will soon have to provide them with some support.


Here in one of the long cloches you can see some chicories. The flimsy end-pieces of these cloches have proved to be more trouble than they are worth, but I have put in some sticks to dissuade the local cats from using the cloches as sleeping-quarters.


The Parsley is positively revelling in the relative warmth of the little bell cloches. It's really luxuriant at present. Much better Parsley than I usually have in January. I must do this again next year!


Notice how much smaller are the plants without the protection of a cloche.

Arrayed in profusion on and around the paved area are pots of various sorts. Some of them hold dormant herbaceous perennial flowers (Echinacea, Gaillardia, Rudbeckia), and some of them hold Blueberries, while in the wooden boxes are some Strawberry plants. 


I have decided to get rid of the wooden wine-crates that the Strawberries are in. They are already two years old and are rotting rapidly. Guess what? I'll replace them with more plastic! This week I bought a couple of 22-litre black plastic storage crates, at £2.50 each from Tesco, which will do the job nicely once I have drilled some drainage holes in them.

Now, at the beginning of February, the garden doesn't look very appealing, but I'm beginning to think about sowing and planting. Very few seed-packets bear the words "Sow from January onwards", but there are a few that say "Sow from February onwards"! We just need a few more dry sunny days like yesterday.

Saturday, 1 February 2014

Small-scale success

With the weather having been so atrocious recently (still, again, always...), outdoor gardening has been almost impossible and my focus has been on  indoor gardenening - i.e. what can be produced in the Growlight House.

Yesterday I passed a significant milestone in the gardening year - my first chilli seed germinated:


This is one of those Bird's Eye chillis I wrote about the other day. I sowed six seeds, so hopefully this will not be the only one to germinate, but even if it is I shall count this as a success, given the dubious origin of the seeds.


The Basil seedlings are also doing well under the lights - growing very rapidly:


My plan is to use these (I have two similar pots on the go) as microgreens, and I think they are just about big enough for this. Tonight I'm making a salad that would probably benefit from their inclusion, so I'll let you know the result in due course.


The distinctively D-shaped cotyledons (seed-leaves) of Basil remind me of the half-moon-shaped tool that you use for edging a lawn!

Alongside the Basil I have two pots of Parsley:


These ones are destined to be transplanted outside (possibly in bigger pots if the weather doesn't buck up) in due course.

In this next photo you can see how the plants have thrust up through the compost even before breaking fully clear of the seed-casings. One of them has brought a lump of compost up with it too:


Last weekend at the Potato Day I bought a pack of seeds for Leaf Celery, which I am very keen to sow, but we are going away for a few days soon, and I don't want to sow then until we get back because they will need some TLC in their early days and can't be left to their own devices. They will just have to wait. Amusingly, the seed pack advises you to keep the seeds in the fridge until you are ready to sow them - mimicking Winter, (vernalisation) I suppose.