Pages

Sunday, 29 March 2020

Coronavirus causes a few changes of plan

The extraordinary circumstances created by the coronavirus pandemic mean that shopping in the normal way is practically impossible, and there is no guarantee of being able to buy what you would like to buy - especially in respect of items with a short shelf-life food items, such as fresh fruit and vegetables. This has already prompted a huge surge of interest in growing one's own veg. Lots of people who have never done this before are having a go, converting their back gardens to veg-plots or taking on new allotments, just like their grandparents did in WW2. I suspect that many of them will discover the hard way that growing veg is a long-term affair, and requires lots of dedication and hard graft!

Midsummer veg harvest - July 2019

As most readers will know, I have been growing fruit and veg for many years now, and I fully understand that it would be incredibly hard to be self-sufficient with only the small amount of space I have available, and the best I can do is supplement our food supply. My garden is roughly 100 square metres (10 x 10), but nevertheless, by dint of careful planning I do manage to coax a fair bit of produce out of it! This year, in true wartime spirit I am being especially careful to utilise the space in the best way possible, and squeeze just a little bit more out of it. In this post I want to show some examples of this.

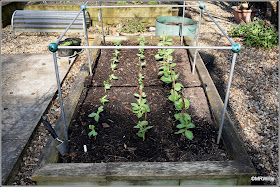
For instance, I had originally planned to grow 20 Broad Bean plants in this raised bed, in two parallel rows, the first of which I planted last week, but I have changed that plan and now have 30 plants in three rows instead.


In gardening it's often true that "Less is more", and overcrowded plants competing for insufficient resources may not do well, so to compensate the beans for being a bit cramped I gave their raised bed an extra boost. I dug-in some Growmore general fertiliser and incorporated a few bucketloads of homemade compost, to help the soil retain moisture. The compost comes with a disadvantage though: it's full of creepy crawlies, and the Blackbirds love scratching around in it, so I definitely have to cover the bed with anti-bird netting.

Some of the plants in the first row of beans were half uprooted by the birds before I added the net, so after re-planting them I gave each one a small stick for support and tied the plants to the sticks with soft string. This has the advantage of helping them to stay upright despite the very strong winds we have been experiencing.


Here's another example of my 2020 approach: you might remember that I recently planted a lot of onion seedlings, but was left with a few spares, which in normal times would probably have ended up being composted...


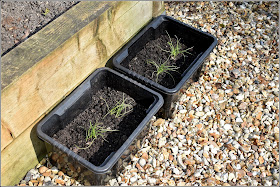
Well, I have now planted those four clumps of onions into a couple of black plastic crates filled with soil. These are containers that I have successfully used as "flower-pots" many times before. They have several drainage holes in the bases, by the way.


Since my main crop of onions will be growing elsewhere, my intention is that the ones in these containers should be harvested at an immature stage, to be used as "Spring Onions". It would be nice to be able to just nip out to the garden to pick one or two of those as required, instead of having to plan 10 days ahead and order a bunch from Ocado!


The plans I made just after Christmas had me devoting one of my five raised beds entirely to Carrots, and another one to Parsnips. However I have revised those plans and the Carrots and Parsnips will now share a bed, and the other one will be used for some of the quicker-growing brassicas - which I had not intended to grow at all. This change of plan is because I foresee that obtaining a supply of long-lasting root veg is going to be easier than getting hold of more perishable, "soft" veg, and "greens". Without wanting to appear too pessimistic, if the pandemic worsens and/or gets more severe, it's possible that even the supermarkets may find it difficult to source fresh veg.

In view of the above I have sowed seeds for Kohlrabi (a purple variety called 'Kolibri F1'), Green Broccoli (Calabrese style) and Brokali ('Apollo'). None of these can realistically be ready until early summer though, so in the meantime I shall be relying on salads, many of which should mature much sooner. I have two types of lettuce on the go ('Lobjoit's Green Cos' and 'Saxo'), plus a tray of Baby Salad Leaves, some Lamb's Lettuce and some Rocket. Oh, and let's not forget the Peashoots already growing on the Dining-Room windowsill:


Also in the salads department I have two pots of Watercress. This is over-wintered stuff, recently potted-up. It looks a bit "weathered" at present, and in normal circumstances I would probably have binned it by now, but because this year is different I'm keeping it, so hopefully it will soon pick up.


Some people think that Watercress will only grow in running water (e.g. a stream), but this is simply not true. As long as you keep the soil / compost moist, it is perfectly happy in a pot. Because of this it is a good crop for growing on a windowsill, which might be particularly attractive for anyone having to endure a 12-week stint of "shielding". It's easy enough to grow some from a sprig of shop-bought Watercress, rooted in a jam-jar of water, like this:


My final thought for today is this: how lucky I am that I already have a well-established veg-plot, and that it is in my back garden, so that I can do my gardening as normal, without any unnecessary risks. This is in stark contrast to the dilemma faced by allotment-holders across the country who have to choose between staying home and making repeated journeys to tend their crops and possibly livestock (hens etc). For everyone's sake, I hope that this year's weather will not produce any more extremes to add to the stress.

Wednesday, 25 March 2020

The spuds are in!

Well, not ALL the spuds. Just the first ones. A significant milestone, nevertheless.


This year, as usual, I'm growing my potatoes in containers - big 35-litre plastic pots, like these:


I find these pots perfect for growing potatoes in. Being quite big they don't dry out too rapidly, but at the same time they are not so huge that I can't shift them around when needed - and you can see that they have handles to make moving them easier. I got them from a company called LBS Horticultural Supplies Ltd.

On this occasion I was planting-up my First Early potatoes, the ones that mature quickly and are harvested as small "new potatoes". I have two tubers each of five varieties: "Pentland Javelin", "Rocket", "Lady Christl", "Colleen" and "Sherine".


The growing-medium I'm using consists of a mix of garden soil, homemade compost and composted stable manure, enhanced with a handful of proprietary potato fertiliser in each pot. When potatoes are grown in pots (which are prone to drying-out if not regularly watered) it is important to incorporate a good proportion of organic matter because the new tubers are likely to develop Scab if their soil is too dry.


I fill the pots only about half-full at first, use a trowel to make suitable holes, then plant the potatoes two to a pot, after which I cover them to a depth of only about 3 inches. Once the plants begin to grow and the shoots emerge I will progressively top up the pots with more of the growing-medium until they are nearly full.


I plant the two seed-tubers fairly close to one another, in the centre of the pot. [Of course the tubers were covered-over after this photo!]


The final part of the process is to cover the pots with my little plastic greenhouses, which will protect them from frost and wind. You'll notice that I have weighted them down with bricks (one at each corner) to stop them blowing away.


Each of those greenhouses covers four pots, though on this occasion I only planted a total of 5 pots-worth (i.e. 10 tubers).

I'll use exactly the same procedure in a couple of weeks' time when I plant the Second Earlies.

Saturday, 21 March 2020

Planting out my onions

Last year I grew some onions by a different method. Instead of growing each onion separated from its fellows, I grew them in clumps. This allowed me to produce many more onions, although of course they were much smaller ones. We found the small onions very versatile in the kitchen - there are times when a big onion is more than you need. I'm using this technique again this year.


This year I sowed my onion seeds in the first week of February, and brought them on first indoors and then in my coldframe. For the last few days they have been outdoors all day, acclimatising. Now I have planted them out in one of my raised beds.


I had available a total of 24 pots / clumps of onion seedlings - 9 each of "Bedfordshire Champion" and "Elista and Karminka mix", and 6 of "Ailsa Craig" - but in the end I only used 20, because I felt that any more would have made them too crowded. Anyway, it leaves me with four spares ready to cope with any emergencies!


I put the onions in two rows of 10, with about 20cm between clumps, and the rows about 30cm apart.


I have left room in this bed for a row of Beetroot, which I will be sowing soon.

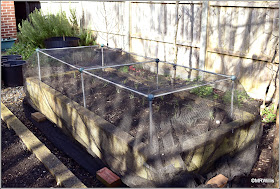
As regular readers know, I get a lot of problems with foxes / badgers / cats digging in my raised beds and little seedlings are never safe without protection, so immediately after planting I covered the onions with netting. I have a good collection of aluminium rods of various lengths and some of the "Build-a-Ball" sets for joining them together, so it was easy enough to construct a suitable frame.


The frame was then covered with black fabric netting which was weighted-down with some bricks.


That should keep the little blighters off!

Now all I have to do is wait for the onions to grow. They require very little maintenance, just weeding whenever necessary and occasional watering. They should be ready for harvesting some time in August, I reckon.


Tuesday, 17 March 2020

Chitting potatoes

I normally plant the first of my potatoes in mid to late March, so it's nearly time to do that. For the last two months my seed-potatoes have been chitting in preparation for this. "What does chitting mean?" I hear you ask. Well, it means this >>>>


Chitting is the word used to mean the formation of stem shoots on the seed-tubers. It's a way of accelerating a potato plant's growth, because a seed-tuber that has been chitted will develop its stems more quickly once planted than one which has not been chitted. The practice is not strictly necessary, but it's a technique used by gardeners for many generations and still used by most amateur growers.

To produce good strong chits / shoots, the seed potatoes should be placed in a cool light place. If they are too warm or too much in the dark they will produce pale spindly shoots. Mine have been on a windowsill in an unheated spare bedroom, aka junk-room!


This is the sort of chit I aim for - sturdy and dark-coloured.


Most of the shoots on a potato appear on the so-called "Rose" end - the end furthest from where the potato was originally attached to its parent plant. In order to give the chits the best opportunity to sprout, many people like to put their seed-tubers in egg-boxes or something similar which can support them in a suitable stance with the rose end uppermost.


I have found that sometimes egg-boxes are too small to accommodate the bigger tubers, and I have acquired a couple of long containers with four larger compartments, which are ideal. These originally held Persimmon fruits, bought from a supermarket.

So anyway, I reckon that my potatoes are ready to go whenever the weather is suitable. I've been looking at the 10-day forecast and I reckon I might be planting this coming weekend. I'm not too worried about frost, because my spuds will be planted into containers, protected in their early days by little plastic green houses. I want good weather for planting for selfish reasons - I don't want to get cold and wet while doing it!

Potato containers inside plastic greenhouses (pic from 2018)

Saturday, 14 March 2020

Planting Broad Beans

In my last post I described how my garden is currently almost bare, waiting for the new year's sowings and plantings. This week I planted out my first crop of 2020 - Broad Beans (aka Fava beans). These ones are a fast-growing variety called "Express".


As usual, I sowed my beans in individual modules and germinated them indoors to bring them on more quickly. After germination they were moved to the big coldframe for about two weeks, and then they spent a few days outdoors during the day and inside the coldframe at night. On Wednesday this week I judged them to be big enough and strong enough for planting out.

The site I chose for them is my "Woodblocx" raised bed, which stands apart from my other ones. I haven't grown Broad Beans in it for several years. A few days before planting I had given the bed a thin layer of home-made compost (I would have used more if I had had any!) and lightly forked it over. The soil in this bed is already light and fertile but an annual dose of fresh compost keeps it in good condition.

Before planting the Broad Beans I laid them out in a row to make sure I got the spacing right. I had 14 plants available, but I only used 10 because I didn't want them to be too crowded. With a row of ten they end up being about 20cm apart.


Planting was a very quick job - make a hole with a trowel; insert plant; backfill with soil and tamp down; done! It was gratifying to see that the plants all had really well-developed root systems, which hopefully means they will grow up big and strong.


There we are -job done!


After planting I covered the row of beans with two of my venerable "Longrow" tunnel-cloches. When I first got these I reckoned them to be very flimsy and thought they wouldn't last very long, but I have been proved wrong. I can't remember when I bought them but it was probably at least ten years ago.


Covering the plants with cloches serves two purposes: it protects them from the weather (we have gales of wind again here); and it protects them from the Night-time Diggers (i.e. foxes, badgers, cats etc) which cause such havoc in my garden if I don't take precautions.

The other half of this bed will be used for a similar row of beans, but of a different variety - "Imperial Green Longpod", which are about two weeks behind this first batch. In a garden as small as mine I could never hope to grow enough beans to make it worthwhile freezing any, so I just stagger the harvest by growing two types and sowing them a couple of weeks apart. This way I should be cropping Broad Beans for about 4 or 5 weeks, but not till late June or early July.

By the way, on the same day that I planted the beans (my first planting of 2020) I also harvested the first few spears of my Purple Sprouting Broccoli, sown last May. Seems fitting, doesn't it?


PSB "Red Arrow"

Tuesday, 10 March 2020

Back to Square One

Yes, I know it is possible to keep a garden populated with vegetables all year round, but I prefer to start "from scratch" each year. At present my veg-plot is almost completely empty. I have two Purple Sprouting Broccoli plants that have just started cropping (having been in the ground since last May!), and a few endives under the cloches, but apart from the fruit trees and perennial herbs, that's it.


After such a mild, wet Winter, all the "hardware" (wooden raised beds etc) is covered in green algae. We need a spell of warm sunny weather to brighten things up a bit. A few days ago I did one of my least favourite jobs of the year - emptying the compost bins. Usually my compost turns out pretty well, thanks to the millions of worms that inhabit it, but this year it is very poor - wet and slimy, with only a thin layer of "good stuff" at the bottom. I think this is probably because the compost bins have not been able to drain as well, as the soil on which they stand has been waterlogged for months.

I did manage to get enough material to put a thin layer on three of my five raised beds, and a bit for the potted fruit trees, but it was nowhere near as much as usual. The black pots seen in the foreground of the next photo are not filled with fresh compost, regrettably. They hold a soil+compost mix from last year, which I will use (enhanced by some new material) for growing my potatoes.


These are two of the beds to which I have applied the compost.


After applying the compost I just work it into the soil a little, level it off and leave it for a few days before sowing or planting anything. This gives the birds an opportunity to scratch about in it to find any lurking insects. I know from bitter experience that anything planted into fresh compost is almost certainly going to be damaged or destroyed, mainly by Blackbirds, which are an absolute menace in this part of the world.

Likewise, I don't attempt to dig-in the compost around the fruit trees, because there would be a strong likelihood of damaging their roots, many of which are quite close to the surface. I just let the rain and the worms do their thing.

Apple tree in 60L pot

Assuming the weather is all right, by which I mean drier and hopefully sunny (although this seems unlikely just now!), I plan to plant out my onions and my first batch of Broad Beans in about a week or ten days' time. Right now they are outside in the fresh air, but still in their little pots, gradually getting used to the outdoor life. Both of these vegetables are very hardy, by the way, and I don't anticipate they will have any problems making the transition.


This year, in view of all the uncertainties raised by Brexit and the Covid-19 pandemic, I'll be growing mostly basic staples, and not many exotics or unusual veg, just in case fresh veg becomes harder to buy. In any case I probably won't be sowing any seeds in the raised beds for a while. It doesn't make sense to sow them while the soil is still cold and wet - they wouldn't do well, and seeds sown later always seem to catch up anyway. Meanwhile, I shall sit back and enjoy the sheer potential of all those empty beds for a while longer!

Saturday, 7 March 2020

Transplanting chillis

I sowed my chilli seeds on Valentine's day (14th Feb), and they have now grown to a size where they needed potting-on - by which I mean putting each seedling into a separate pot.


I had ten such pots, two each of five different varieties, and each pot had either 3 or 4 seedlings in it. I think I have mentioned before that my pack of "Cayenne Mix" seeds (which was supposedly going to deliver chillis with fruits of 4 different colours) only had a total of six seeds in it! For this reason I'm going to grow all six, in the hope of getting at least one of each colour. For the others, I plan to keep the best two seedlings and discard or give away the remainder.


In theory therefore, for each variety I can choose two plants from eight candidates. Sometimes it's difficult to choose which are the best, but on other occasions it's much easier. Look at this: two pots sown on the same day with four seeds each; same seed variety; same batch of seeds; same compost; treated exactly the same way - but one pot has produced four big strong seedlings and the other has produced four much smaller, weaker ones!


Sometimes you get a few sub-standard seedlings. For instance the one seen in the foreground in the photo below, which has grown "blind" - in other words the growing-point has failed to develop. This would most probably never grow into a good plant, which emphasises the wisdom of sowing more seeds than the number of plants you think you will need.


So, to transplanting... Tapping the pots firmly on the underneath, I eased out each clump of seedlings and gently separated them before quickly re-planting the best ones in individual pots, using fresh compost. At this stage I did not give them bigger pots, since they now have as much space as was previously used by four plants. These are 7cm pots, by the way.

The little plants understandably experience a bit of transplant shock, which causes them to droop for a while.


I help them to get over this by giving them a good drink of lukewarm water, and by putting them back in the Growlight House as soon as possible, so that they can benefit from its light and gentle warmth.


They normally perk up pretty soon and begin to enjoy their opportunity to spread out without competition from their siblings! This photo was taken about two hours after the previous one:-


Right, so now that the chillis have reached this point, I will start thinking about sowing my tomato seeds. The procedure I use for them is exactly the same as for the chillis, so that Growlight House needs to be vacated within the next two weeks!